
Anyone who has set some quality time aside to sit down and make music, knows just how delicate and fleeting inspiration can be. The strength of your will as a producer is the vital factor during this time but ensuring your workflow is optimal by removing any unnecessary roadblocks, can be the difference between whether you get any music made or not.
I and the team at ModeAudio are tired of all those half-started tracks laying there unfinished, waiting to be turned into nuggets of purest production gold - it's time to keep inspiration alive with my top 20 tips for speeding up your music production workflow, gleaned from hard graft and experience. Without further delay, let's get some tunes finished!
Sound Organisation
1. keep all your samples and presets in one place - it's super obvious but when you're halfway through a beat and suddenly realise the one thing missing is a killer cowbell sample, you need to be able to audition and find the perfect sound as quickly as possible. Keep your sounds in one place, organised in folders and by sound type.
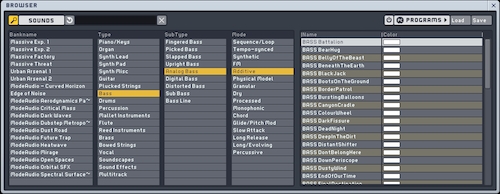
2. make use of browser tagging - if you're working with a system that stores tags for loops or presets, such as NI Massive or Logic's Apple Loop browser, use them to narrow down the sort of sound you want as quickly as possible.
3. save lots of copies of your DAW project - if your DAW has an autosaving function that saves multiple session copies, rather than saving over one copy continuously, then use of it - this can be the difference between making a fatal mistake or producing the next worldwide club smash! Being able to go back and compare changes with previous versions is invaluable in my experience - I like to label copies with descriptions to make them easier to search also, for example 'Track#27b - bigger kick' etc.
4. do not be afraid to use copy and paste - you won't find me saying this with regard to any other stage in the production process but when you're first sketching out your ideas in your DAW, don't be afraid to copy and paste those MIDI and audio regions to your heart's content! Doing this helps you to see early on how your arrangement is taking shape and can give you helpful early impressions of where your next section needs to start, how much variation you need to programme in and so on.

DAW & Synth Presets
5. setup DAW templates - do you always bus out your lead synths, pads and arps to a 'synths' bus for group processing? Then setup a template in your DAW so you don't need to organise your inputs and outputs every single time! Simple, huh'!
6. make use of channel strips - whilst one chain of plugins will almost certainly not work perfectly in more than one production situation, the ability to load up useful plugins in one go and tweak as you see fit can get you in the right sonic ballpark very quickly indeed.
7. begin with a preset - when inspiration strikes, the one thing that should be on your mind is getting your ideas down somehow, before they disappear forever! Starting with a synth preset simply as a means of recording down your ideas for parts, is a quick and effective process - you can always tweak or change out your synth or preset afterwards.

Music Technology
8. use software that allows you to audition samples quickly - when it comes to selecting samples for use in your music, being able to listen to tens if not hundreds of sounds quickly is paramount. With an Apple system, you can simply use Finder, hit the space bar and use your arrow keys to audition lots of samples in a single folder - you can do the same in Windows Media Player or iTunes on a Windows computer.
9. make use of MIDI - MIDI is an incredibly powerful and oft-overlooked tool, storing as it does the essential ingredients of your music (pitch and rhythm). If you have a MIDI part nailed for your track, in order to change the sound you simply have to copy the MIDI region to a new track and load up a new synth and hey presto!
10. use an external MIDI controller if you have one - from playing in parts to programming in automation curves with pan pots and sliders, using an external MIDI controller can be much, much faster than repeated pointing and clicking with a mouse (as well as being much, much more fun!).

Production Specifics
11. use multiple copies of samples for a more organic sound - using multiple copies of a hi hat for example, each with a slight pitch, envelope or filtering tweak, and then spreading your hits between these can add instant, organic vibe to your drum track. Rather than using the same, monotonous tone every time, the subtle shifts in sound will add variety and a more 'human' feel.
12. use pitched copies of samples for a fuller sound - does your clap sound a bit thin? Try using a copy mixed with the first, pitching it down an octave and rolling off the very low-end so as not to interfere with your kick. The same process can be used in a variety of situations, to brighten up a snare (pitch the copy up an octave or more), add more 'click' to a kick sample etc.

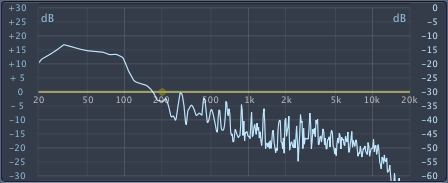
13. use spectrum analysers - when it comes to music production and listening to music in general, your ears should always be the final judge. However, spectrum analysers can be incredibly effective tools for allowing you to learn about the aural character of your music - need to know which parts of your kick's spectrum to EQ out to allow your snare to cut through the mix? Take a look at its spectrum. I would stress to only ever use spectrum analysers as a means, rather than as the basis for making production decisions - for example, you should look at your clap's spectrum because you want to make it sound weightier, not make it weightier simply because of how its spectrum looks.
14. layer up those tracks - much the same with writing an essay, having too much material to then edit and refine down is a very useful approach to creating something rich and with lots of depth. Adding in lots of sonic layers in the beginning, from background textures, pads, doubled synth lead parts, washes of noise, field recordings and so on, can give you a rich and diverse musical canvas from which to reduce down to the essential parts.
15. setup a reverb send at the very start - one of the biggest roadblocks to progressing with a track is simply that it doesn't sound exciting enough to justify your continued work on it! I find that applying a little reverb to the appropriate elements early on (synths, cymbals, vocals etc), can really help to add some sparkle and depth with minimal effort. It just might be that very sparkle that keeps your inspiration going!

Old School Tips
16. have a pad and pencil to the ready - this tip is old school indeed but having a sketchpad to hand that you can quickly jot down thoughts and diagrams onto to assist when you're arranging tracks, can be incredibly helpful. We're as much visual as we are aural beings after all!
17. remove distractions from your vicinity - this is another obvious one but tell me, seriously, are you trying to make music whilst sitting with your laptop in front of the TV? It won't happen, trust me! Find yourself a quieter space where you won't be disturbed, take a deep breath and begin.
Production Priorities & Philosophy
18. don't worry about EQ or mixing in the beginning - EQ is probably the most powerful mixing tool you have at your disposal but remember that it should be used most at precisely this stage - during mixing. Of course, applying a bit of EQ in the beginning can help you to shape things up in the initial stages of making a track, but don't get bogged down in tweaking things to perfection too early.
19. load up inspiring tracks for reference - this tip is more for the production stages immediately after you've come up with your initial track ideas, but whenever you get stuck for what to add or take away next, having a quick listen to music you really respect in your media player or internet browser can turn up some helpful pointers.
20. think holistically - this is a little more philosophical than the other points but it basically means consider the whole of your track, as well as the parts individually. For example, consider the full audible spectrum, from 20Hz up to 20,000Hz, when adding in or taking new parts away - do you already have a part that occupies this part of the spectrum?