For the predominantly computer-based producer, it's pretty difficult to avoid feeling envious at any mention of classic, vintage hardware. These are the devices that are responsible for that coveted warm, soft-saturated sound - a sound even more sought-after today, in the hybrid digital/analog production landscape we now find ourselves in, than it was in the past. As users of humble software like Ableton Live, we might as well forget the alluring charms of the analog world however, because it's next to impossible to produce a similar sound without spending big bucks on old gear, right' Well, wrong! Whilst it might be futile to attempt to exactly copy the sonic characteristics of classic analog gear, we can certainly approximate them with the ample digital plugins and tools at our fingertips.
In this tutorial, I'm going to take you through a simple yet highly effective recipe for creating a crunchy, warm sound in Ableton Live. I'll be using drums (a custom Drum Rack selected from our new Beat Voltage - Drum Machine Samples pack) as my material to be worked on and processed but these techniques can be equally applied to basses, synths and other instruments - the key, as ever, is to experiment till you get something that sounds good. Let's dig in!
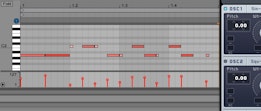
My example, unprocessed drum loop:
1. Dress To (Glue) Compress
The first step is to add some compression. A compressor provides two functions here - firstly, we'll use it in the conventional manner to iron out the dynamic range of our sound a little. At the same time, we'll also be able to use the device to begin the chain of saturation - depending on the strength of the effect you want to create, you can use the amount of gain reduction and makeup to produce a 'hot' signal that we'll deal with further down the chain.
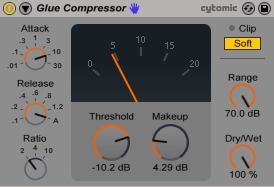
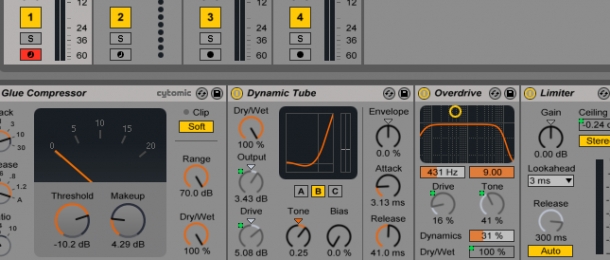
Ableton Live 9 handily provides two compression plugin options - its own native compressor and the excellent 'Glue Compressor' from Cytomic. I'm working with drums in this tutorial so I'm going to opt for the Glue plugin, as it is very good at doing exactly what its name suggests - gluing sounds together. However, if you're applying these techniques to other types of sounds then Live's native compressor might just do the trick for you.
I want to produce a moderately crunchy and saturated effect, so I'm going to give my drums a decent squeeze with the Glue - I've set attack to 10ms, release to A (for automatic), ratio to 2 and threshold to -10dB, which gives me a gain reduction of between 3 and 5 dB. This allows me to set my makeup gain to around 4dB - this is actually just enough to cause the master fader to clip. Typically, I'd never be encouraging you to cause anything to clip but the Glue offers us a handy tool to rectify the situation - the 'soft clip' button. This function effectively limits our drum signal but rather than doing so in a transparent fashion (like Live's native limiter plugin that we'll use later on), soft clip gently saturates the drums, producing a lightly crispy, warming sonic effect.

Here's my example drum loop with compression and soft clipping applied:
2. Adding Crunch: Tube Distortion
Our saturation effect is already well under way. The next step is to introduce some analog tube-style warmth and crunch, and Ableton Live offers us just the tool to achieve this - the 'Dynamic Tube'. This plugin seeks to emulate the saturation effect caused by the valves and tubes often found in classic analog mixing desks and rack equipment, and the effect can range from lightly crunchy to all-out grit! We're going to use it to produce an effect somewhere in between, though perhaps a little closer to the lightly crunchy end of the spectrum.
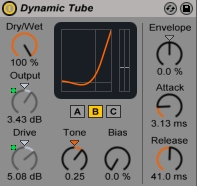
Firstly, I've selected tube amp model B (there are 3 options here) as I find it creates a nice balance between crunch and retaining the sharpness of the transients in my drums. To further preserve transients, I've pushed the effect's attack setting to 3ms. Release is set to 41ms and tone to 0.25 - this directs the attention of the saturation effect more towards the mid to higher frequencies in my drums, crisping up the rattle of the snare, hats and cymbals just a little more than the kick and toms.
The most important control here however, is the drive amount. As I'm going for a moderate saturation effect, I've set this to 5dB but if you want to achieve a more extreme sound, simply dial in a higher value. I'm also going to produce a signal that's a little too hot again for the next plugin in the chain, by setting the output gain to 3dB - I'll explain why below.
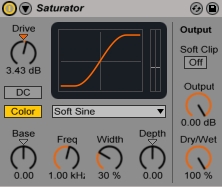
Live 9 also has a native 'Saturator' plugin that you can use either alongside or instead of the Dynamic Tube but I find its effects can sometimes sound a little harsher than I need for the purposes of warmth and light crunch. It is always worth trying out however and may be the better tool to use on less transient-rich material.
My example drum loop has now been compressed and saturated, analog tube-style:
3. Two Birds, One Stone: Ableton Live's Overdrive
The final step in my chain before limiting is going to be to introduce the noisiest and gnarliest effect of them all - distortion. Well, I'm actually going to use Live's 'Overdrive' plugin, the gentler, more even-tempered cousin of distortion but it works towards the same end result.
We're already using tube saturation previously in the chain to produce a light harmonic distortion however, so why is there a need for another distortion effect' The answer is that Live's overdrive plugin offers us not only an additional sprinkling of harmonic colouration but also a gentle low-pass filtering effect on top. Subtly low-pass filtering the drums helps to shift the tonal emphasis of the overall sound down towards the all-important mid range, where perceptions of warmth are borne. Overdrive's filter is actually a band-pass model, so to make it act as a gentle low-pass I've set the 'Q' factor to 9 (i.e. the maximum) and frequency to 431Hz - we're basically just lightly rolling off the sharpest elements of the hats, cymbals and snares.
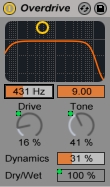
The icing on the cake is to add a little drive and shift the tone control down a notch, to add extra crunch and low-mid tonal emphasis respectively - I've gone for a drive setting of 16% and tone of 41%. Remember we increased the Dynamic Tube's drive to feed a hot signal into Overdrive' This allows us to dial in a lower drive value within Overdrive and yet produce a noticeably crunchy effect - making Overdrive work harder by feeding it a quieter signal produces a noisier result, in my opinion.
I've also reduced the amount of internal compression applied by the Overdrive plugin by pushing the 'Dynamics' slider value up to 31%, ensuring the drums aren't overly squeezed and again producing a signal that is slightly too hot for the master fader.
4. Reach The Limit(er)
To finish things off and ensure we aren't clipping at the end of the chain, I've placed a limiter to round-off the protruding peaks and spikes in amplitude. As I've been working with drums that already sound warm and full, I haven't felt the need to EQ the sound at all but if you find your sound lacking a little warmth at the end of the chain, try applying an EQ right before the limiter and boosting the 300-500Hz region by 1-3dB.
Our final drum sound - warm, crunchy and full of vibe!
I hope you've enjoyed the tutorial and are ready to get munching and crunching your drums in Ableton Live. All our drum sample packs come with custom Ableton Live Drum Racks and Audio Effect Racks, so if you're in need of some nice drum samples to get you started, you know where to look!