With this new tutorial series, I aim to bring you only the most essential production elements typically used in the creation of various genres. In stripping back particular styles of music to their bare necessities, I hope to bring newcomer producers the tools required to get started in making music that might not be familiar to them, all from a production point of view.
The first genre I'm going to tackle is the wobbliest of them all - Dubstep. I have split up 5 vital production elements specific to this foot-stomping and energetic musical form and will explore each in turn.
1. Tempo
Firstly, you're going to need to set up your project with the correct Bpm. Dubstep's classic tempo is 140, though going 5 or so Bpm above or below this is not uncommon.

A huge part of Dubstep's power comes from the fact that it is played in half-time, meaning that rather than placing emphasis on beats 1 and 2 with your kick and snare, you'll want to go for beats 1 (kick) and 3 (snare). This spaces out the groove, giving you double the amount of time to play out your patterns before repetition.
This half-time method of measuring the musical time in your track gives you an extra rhythmic dimension to play with. Often, the drums and percussion in a Dubstep track will be arranged and separated out according to their relative weight. What I mean by this is the big, heavy-sounding drum hits (e.g. kicks and snares) will play out at the seemingly slower, half-time speed, whereas the lighter elements (e.g. hats, percussion, SFX) will play in normal time. This makes for an exciting and dynamic interplay between, strong, thumping drums and skipping, skittering cymbals and percussion.
2. Beats & Rhythms
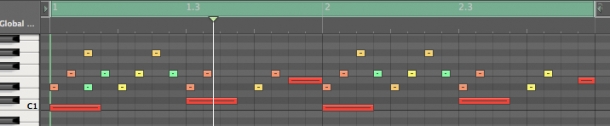
So we've already mentioned that Dubstep makers often separate out the kicks and snares, playing at half-time, and the hats and percussion, playing in normal time, in their drum parts. The main rhythmic emphasis is on beats 1 and 3, with the faster cymbals creating a dynamic tension.
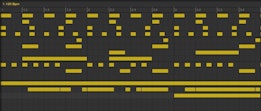
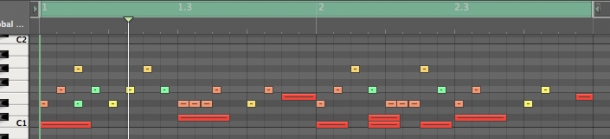
However, another incredibly important feature of many a Dubstep drum pattern is the triplet. This is another rhythmic division of notes, where 3 equally-spaced notes are fit into the space typically occupied by only 2. This gives the groove a lilting, weightless quality but typically only for a fraction of a full drum pattern. The interchange between the normal, straight-time beats and the compound triplets is another tool used by Dubstep producers to create energy and momentum. You can experiment with this interplay using the free MIDI files downloadable at the end of this tutorial.
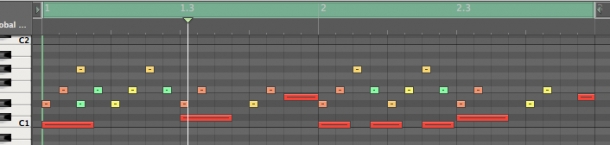
The triplet has typically been employed on the kick part, between beats 1 and 3 of the first repetition of the 140 Bpm groove. You can of course mix this up however and pepper triplet patterns throughout your groove and individual drum sounds. It is also interesting to experiment with faster and slower triplet patterns - try fitting in 3 equally-spaced quaver hi hats where there'd normally only be two, for example.
3. Drums
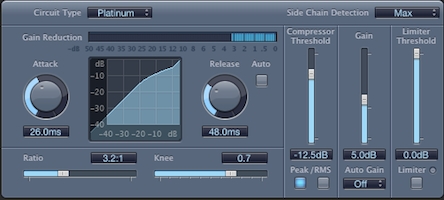
Another key feature of a Dubstep beat, particularly in its more contemporary incarnation, is a big, chunky drum sound. This means piling on the compression, overdriving and saturating your drums as much as you possibly can!
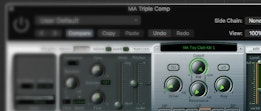
Pull your compressor's threshold back to -12dB, set the ratio to 3:1 or more and pump up the gain makeup to really squeeze that drum track. Parallel or New York compression will also help a great deal to thicken up your drum sound. A great way to employ this technique is to firstly route all your drums into a single stereo bus channel. Then, you need to send the output from this channel to a second stereo bus channel.
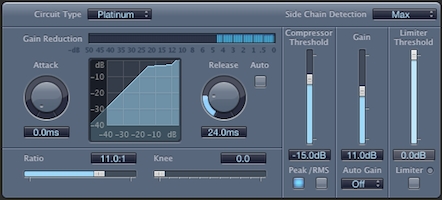
So, you now have your entire drum sound playing out of two separate bus channels. Mute the first bus and on the second bus channel, add a compressor and completely flatten out the sound. Don't be shy! Set the threshold to -15 dB or more, ratio to something crazy like 10:1, gain up to whatever peaks at around 0dB and tweak your attack and release settings so you aren't hearing distortions in the output. Now, pull the volume of this second bus right down to nothing and unmute the first bus. Slowly bring up the second bus' volume till you hear the combined sound begin to thicken - you'll need to mix and balance the first bus against this so you don't clip your master fader. Play around with all the mentioned settings to tailor the technique to your taste and material.
Distortions and overdrive units can also be useful here for some subtle harmonic modulation, rather than all-out fuzz - try pushing things by just a few dB. You may also want to use a limiter to really smash your sound up against that 0dB peak mark.

4. Bass
Probably the single most distinctive and unique feature of Dubstep is its signature bass sound. Whilst of course Dubstep basslines vary wildly and come in all varieties and flavours, two traits they almost all share are a focus on deep, low frequencies and, of course, the wobble!
Firstly, this attention to the lower end of the frequency spectrum probably stems from Dub itself, whose deep, sub-centric basslines have been shaking bodies across the globe for decades. If you're using synths, dial up some sine waveforms and push down the octaves till you have something operating south of 100Hz. Layer these up with other classic waveforms, such as squares and triangles, to introduce some higher pitched harmonics into your sound and to give the bass part some bite and edge. Distortions will also help here, depending on how dirty you want your bass to sound.
The second common feature of the Dubstep bassline, the wobble, is commonly achieved through filter modulation. One method is to apply a low-pass filter across your bass channel and manually automate the cutoff to achieve that rhythmic 'talking' quality, although this is a little painstaking. A better option is to use a synth with LFO routing capabilities, such as Massive, SubBoom Bass, Operator, ES2, Thor etc. Sync your LFO to the master tempo of your track (beat divisions such as 1/4, 1/8, 1/16 and so on will work nicely) and set it to modulate the filter cutoff - just listen to that beauty yap away!

5. Layering
Another method used by Dubstep producers to create excitement, momentum and movement, is to layer up numerous bass sounds with different modulation routings to create a composite part. A good starting point is to record your main bassline to a MIDI file on a single voice, then copy it to a few channel with different synth sounds loaded up. Then, you can automate volumes or simply delete certain notes across the different layers to have your bassline jump around from sound to sound.

This dancing and flitting between sounds helps to give Dubstep its breathtaking quality, keeping listeners and dancers guessing as to what will come next. Watch you don't move things around too much and give people a headache however!
I hope you've found my introductory steps to Dubstep production useful and will be posting more advanced tips and tricks in the magazine soon. To get you started, check out our Dubstep sounds here. Get those beats thumping and dancing, turn your bass into a composite beast and check back here for updates soon.
Download the MIDI used in the tutorial above, as well as some bonus audio loops using the button below!