It's late - so late that it's really the next morning. You've been working for what feels like days and hit a roadblock hours ago'suddenly, lightning strikes! Inspiration has appeared as if from nowhere and suddenly you're working faster than ever towards a finished track...
These eureka moments keep us going as producers, each and every one making us wiser and more technically-able to make the music we hear in our heads a reality. For us, there have been many such moments, including the first time we bus mixed drums and discovered side-chain compression, as well as the one we're going to focus on in this tutorial - layering synths.
This simple technique is one of the most effective ways to beef up your sound, creating thicker, bolder and richer sounds at the drop of a hat. So how does this technique work' You'll have the chance to download some free synth and MIDI loops to begin your experiments with at the end - let's dive in!
MIDI In The Lead
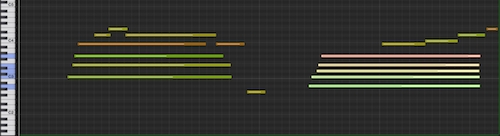
The layering process I'm going to explore takes advantage of a single MIDI pattern, which we'll then copy to different soft synth channels to layer the part up. You can create your own MIDI files or choose from the thousands of MIDI files included in our catalogue. If you're working from an audio loop you can try out your DAW's audio to MIDI algorithm or figuring out the MIDI part for yourself.
As always, experimentation is key to the layering process but listening intently and asking yourself some key questions will save you time and keep you focused - so, this is how I'll present my explanation below.
1. Analyse The Sound
Find the synth part you want to modify/thicken. Listen to it in the mix as many times as it takes to answer the following key questions:
a. What are the essential qualities of this sound' Is it fuzzy, smooth, sharp, mellow, metallic, wooden, noisy, warm, cold etc'
b. Is the sound thin and bright, full and fat, small and round'
c. Does the part stand out' Do I want it to stand out'
d. Would the synth sound better in this mix with more weight (bass) or air (treble)'
e. How else might I be able to improve this sound' Does it need a bit more bite to stand out from the bass' More body to give it more impact'
How you answer the above questions will determine how you proceed. As a general rule however, you will need more layers for thicker, more complex sounds and less for thinner ones.
2. Splitting Your Layers Into Frequency Bands
So you know how your synth part sounds, as well as how you want it to sound. A helpful way to think of layers is in terms of frequency, so you can split things up in terms of bass, low-mid, high-mid and high, or even more if you want a thicker sound still. It can be useful to move the MIDI notes up or down an octave for the high or low parts respectively.
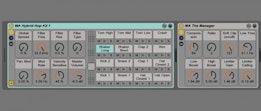
Try loading up some different synth patches and make sure your MIDI pattern is copied to each channel. Yours answers to the questions in part 1 above should inform which patches you try e.g. a distorted bass sound, a warm, analogue-style low-mid sound etc.

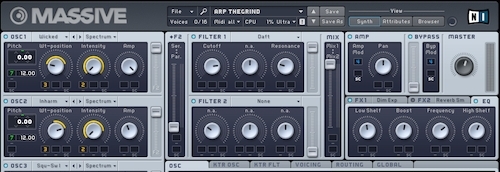
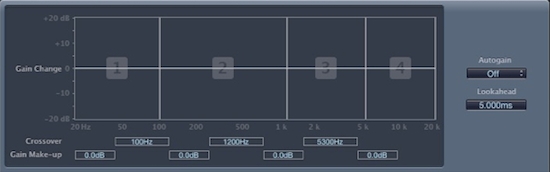
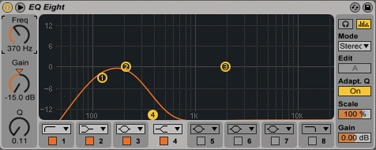
3. EQing - Pay Attention To The Spectrum
A major pitfall with synth layering is producing a muddy, lumpy sound, caused by too much sound energy being present at particular frequencies. A great way to combat this is to filter and EQ each part so they each have their own frequency space to work in.
It is often useful to start with extreme band-pass filter values, so your layered elements are completely in their own space e.g. 150 - 300Hz (low), 300 - 550Hz (low-mid), 550-2kHz (high-mid), 2kHz - 15kHz (high). You can then modify these values so frequencies begin to blend as they cross over, creating complex timbres. Be careful though, as too much crossover can result in the lumpy sound we described above.
4. Applying Effects and Sound Processors
Going back to your answers to part 1, it can be useful to try applying particular effects to only one or two of your layers. Say your sound needs a little more bite to stand out from the mix - if you didn't have your layers, simply adding distortion to an entire synth part is hardly a subtle or unobtrusive method to give it a harder edge. However, adding just a little distortion to only the low-mid or high-mid layer might be enough already to achieve a slightly sharper sound.
Reverb is another useful effect to try here. Added only to the high-mid or high parts can add air and atmosphere to your sound, lifting it up and over the other parts of your mix.

5. Mixing and Balance
So you've got your synth elements layered up, creating a nice complex sound and each layer is occupying its own relative frequency space. The next step to consider is balance - how are my layers weighted'
Listen to the part in the context of your mix again. Is it too heavy' Too light or bright' You can now mix between your different synth layers to modify and improve how your synth part sits in your mix. If it's too weighty, reducing the level of the bass and low-mid layers will often help. If it's too bright or thin, boosting the low-mid and high-mid layers may work. Experiment until you're happy with the mix.
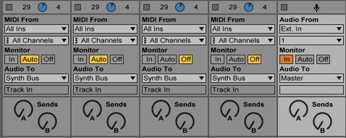
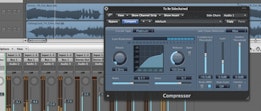
6. Bus Routing - Adding the Glue
If you're lucky, your synth layers sound fantastic together and work seamlessly next to one another (knowing your synth patch sounds and choosing wisely will help here). However, you may find that your layers sound a little disjointed or unconnected, like many voices speaking at once. Bus mixing is the key to this problem, helping to gel and glue the layers together to form a unified, rich synth sound.
Route all your synth layer channels to a bus. Add some light compression (slow attack and release, threshold of only a few dB, gentle ratio) and EQ, preferably one with a built-in frequency analyzer (if you don't have an analyzer you can get Voxengo's for free). Increase the compression effect to further bond the layers together.
Look at where the frequencies peak and trough in the analyzer. For a more cohesive sound, try gently flattening the sound with your EQ (boosting frequency areas with little energy, cutting areas with lots of energy). Flatten too much of course and you'll end up with a boring, characterless sound so always pay attention to how the part sounds in your mix.
7. Blending Disparate Envelopes
As a bonus tip, you can begin to experiment with sounds that have very different ADSR envelopes applied, to produce movement and flow in your sound. Try blending a pad sound with a harsh, sharp lead for example - the possibilities are endless.
More Sides To The Story
Of course, splitting up the layers in terms of frequency is just one way to go about executing this technique. Another highly effective way to separate the layers is to think in terms of timbre or sound colour e.g. you could have a soft layer, jaggy layer, warm layer, bright layer etc. The steps above can be carried out in exactly the same way, so experiment to find the most logical process for you.
Download a set of free synth loops and MIDI to kick start your layering experiments!