
Building tension and momentum into your track is an important part of music production, helping to form bridges between sections and creating excitement for your listeners. It can be tricky to find the right sort of material to use to create these compositional elements however, which is why we are now so used to hearing the same sounds used for this purpose such as noisy filter sweeps, reversed cymbals, air horns and so on.
Rather than being a burden on your time in the studio however, creating these transitional elements can be just as creative as making any other part of your mix - today I want to show you one easy to use yet flexible method for creating an SFX crescendo that will be totally unique to your music and style.
It will use existing elements of your track so as to maintain consistency and allow your SFX sample to blend perfectly with the other parts of your track, plus it'll take you less than a minute to make when you know how. Sound good' Then let's get started!
Preparations
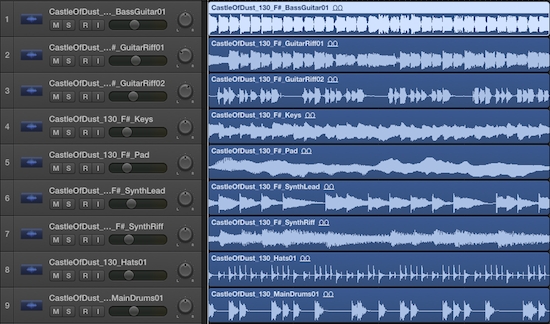
I'm using Logic Pro X to demonstrate this technique but the very same method can be applied in virtually every DAW under the sun - to begin, we have a looped section of a track, using loops from our Glide - Chill Electronic Loops release. We have drums, bass, guitars and synths, which sound like this:
The goal is to create an extra layer of sound that can sit alongside the other parts of my mix, but rather than adding a new rhythmic, harmonic or melodic element to the track, this layer will build the momentum created by the existing parts to catapult us towards the end of the loop and into the next section.
Firstly, I need to choose which sound I want to build my SFX crescendo out of - I like one of the guitar loops the best in this section, so this is what I'll use initially.
Sending For Delay
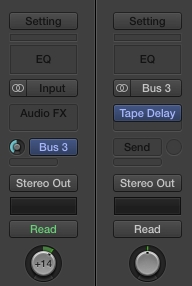
By using a send channel, I can feed the audio from the guitar loop through a plugin, which I can then use to export out my new layer of sound. So, I send the guitar loop out to Logic's 3rd bus, changing the type to 'Pre Fader' so the level is nice and healthy, and dial up Logic's Tape Delay plugin on the bus channel itself.
Delay is central to this technique, as it lets us create long, rhythmic sections of audio that fade out smoothly - perfect for a transitional device! I'm using Tape Delay here because I only need a single delay line, whereas the Stereo Delay plugin would offer me 2. This doesn't mean you can't use 2 of course and in fact ping pong style effects work really well in this context, but I want to demonstrate the idea in its simplest form before you take it further in your own productions.
The delay amount is synched to my project tempo, which I've set to a semi-quaver or 1/16 of the BPM for a very fast, repetitive effect. It's important to get the feedback amount just right, because I want a long tail to the sound but without causing the feedback to actually build in volume to clipping level.
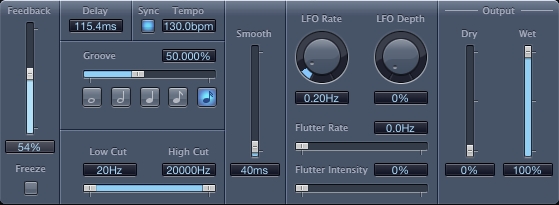
I've found that 54% is just right here, giving me lots of repetitions of the guitar notes but still allowing the sound to eventually fade away to nothing. Soloing this, selecting just the last bar of the guitar loop as well as the following 4 and bouncing all this out gives us this:
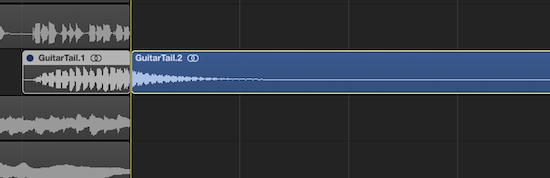
Don't worry that the original guitar loop sounds heavily delayed, as we're actually going to cut this part of the sample out - dragging the new sample back into my project and snipping the first bar leaves me with 4 bars of delayed guitar loop, fading out nicely across the sample.
However, I want to use this sound to build tension rather than take it away, so the next thing to do is turn to one of the oldest music production tricks in the book, the humble audio reverse!
Flip Reverse
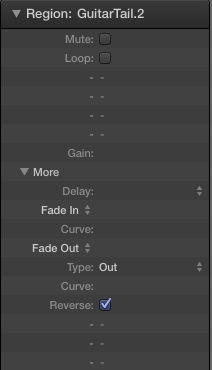
Logic Pro X makes reversing audio beyond easy, by placing a 'Reverse' function in the region edit box in the top left-hand side of the main arrange window. Enabling this flips my delayed guitar tail, so that it now builds in volume towards the end of the 4 bars and all in perfect time with the rest of my track!
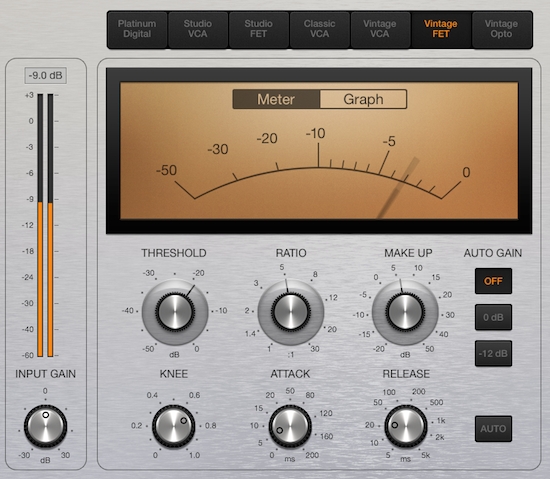
I like to add some compression to my SFX crescendo at this point, as it allows us to begin hearing it earlier in the loop and helping to add to its tension-building effect. Compressing the sound quite hard allows me to add around 7dB back into the channel without clipping and adding a touch of reverb to ease off the abruptness of the sample's end sounds like this:
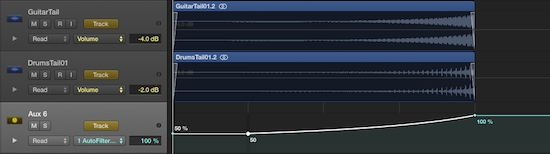
Placing this transitional sound within the context of our mix now sounds like this:
Hey presto, the delayed guitar sound blends perfectly with my track, yet builds the tension across the 4 bars towards the end of the loop and the next section in the song. It's a win-win situation!
Repeating The Trick
As my delay plugin is setup on a bus channel, I can very quickly and easily perform the same trick only using other parts of the track as source material - here's another SFX crescendo made using the drum loop from our Glide sounds:
So, I hope you can begin to see how flexible and powerful this simple little technique can become, as you apply other effects to the delayed signal, experiment with delay times and the amount of material being fed through and so on. Here's a final example that uses both guitar and drum SFX crescendos, only this time applying a low pass filter sweep to give the impression of opening up into the next section:
As usual, you can take this technique as far as your imagination can throw it, so good luck and get creative!