
Today we've got a free offering for the FL Studio users among you (we know you're out there!)
In most of our drum sample packs, we offer a selection of native FX settings for Logic, Live and Reason, and we usually include some kind of drum boosting preset.
In this free download, we're giving away an FL 'mixer track state' using the software's native plugins to achieve a similar effect. We're also throwing in a free taster of our LoFi drum sample pack Crush - a DirectWave kit along with 16 samples!

After downloading, open up the included FL Studio project file and you'll find the Trap kit from Crush pre-loaded into DirectWave with a MIDI drum pattern.
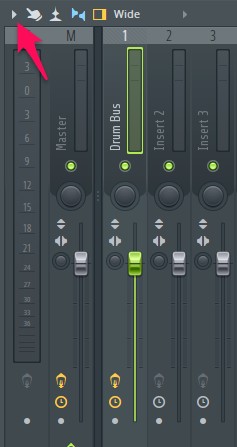
You'll also see the instrument routed to its own mixer channel, where we've added the 'MA Drum Booster' mixer settings:
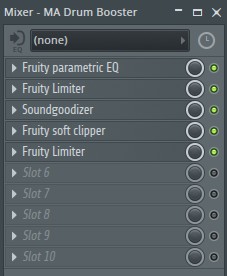
This is the FX chain that will supercharge our drums in FL Studio, taking us from this:
to this:
You can find the download link at the bottom of this page, but if you want to see the FX chain explained step-by-step, keep reading!
Slot 1: Fruity Parametric EQ
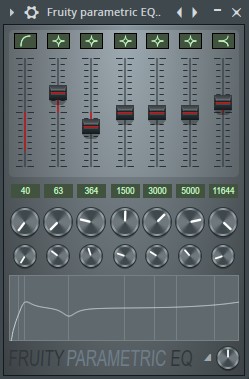
Our first step is to add an EQ curve across our drum bus to 'colour' the sound slightly. A low-cut filter at 40Hz should tighten the bass a bit, with a little push around 60Hz giving us a nice, bassy 'thump' .
A little dip around 350Hz should hopefully tame any 'boxiness' and a gentle shelf lift around 11kHz will hopefully add some 'air' or presence to our drums.
Slot 2: Fruity Limiter
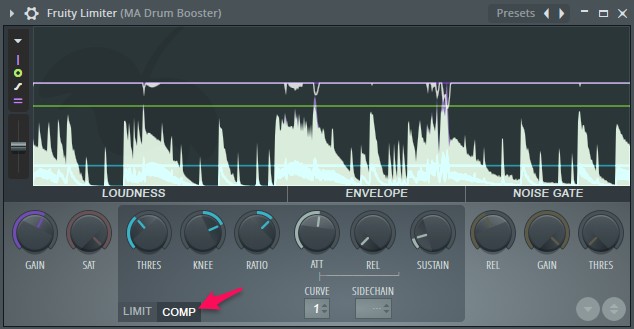
In this slot, we want to try and 'glue' the drums together a bit with some light compression. Using the Fruity Limiter on its 'COMP' setting allows us to use it a compressor.
With a low ratio, slow attack and fast release, a compressor should help to bind and tighten our drum sounds nicely. You can also see from the top-most white line on the visual display that the compressor is only applying a small amount of gain reduction.
Slot 3: Soundgoodizer
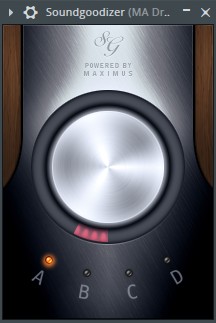
How can you resist using a plugin with a name like this? The Soundgoodizer is basically a one-knob version of the Maximus plugin, and you can see the precise settings for each preset (A, B, C, D) if you open them inside Maximus.
This tool helps you to 'maximise' your sound through multi-band compression and limiting, and as you can see, we've only dialled in a small amount - as we already have compression happening in the previous FX slot.
This is a good effect to use on a group, or master channel, when you already have a nice mix that just needs a little lift to give it presence and finesse. It won't make something that sounds bad magically sound good.
As the old saying goes - "you can't Soundgoodize a turd" (or something like that)
Slot 4: Fruity soft clipper
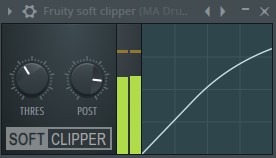
With the Fruity soft clipper our aim is to introduce a touch of saturation. A little bit of this effect can bring some 'warmth' to our sound with a little tasteful distortion.
Again, we don't want to push things too hard from the get-go, but you can try to introduce more saturation by bringing the threshold down, or increasing the signal level going into the soft clipper itself.
Slot 5: Fruity Limiter
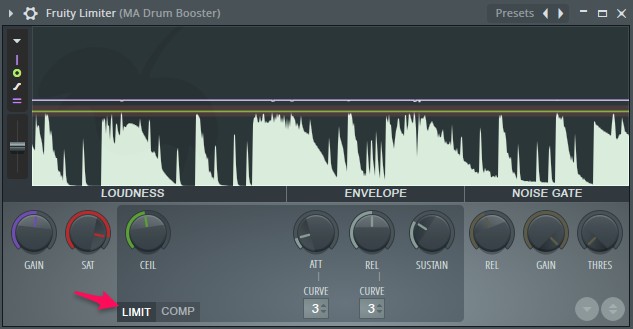
And as is often the case, the final effect in the chain is a limiter. Again, we have an instance of the Fruity Limiter, but this time on its 'LIMIT' setting.
All we're doing here really is making sure that the final output of the drum bus is not clipping. We've already 'pushed' the sound with compression a few times in the chain, and if we go much further, things could start to go downhill.
The drums should be sounding good before this effect, and as you can see from the white line again we are just 'tickling' the limiter at this stage.
Remember, we're only doing the drums just now, so if we do start to add other elements and make a whole track, the drums will likely go through another limiter on the final master channel.
Do It Yourself: Adding The MA Drum Booster To Your Own Drums
Of course, most of these FX settings we've used are general and there's no cookie-cutter approach that can be applied to all sounds. However, hopefully from what we've outlined above, you can see what we are trying to achieve with each effect.
Why not try adding the MA Drum Booster to your own drum kits and playing around with the settings?
After downloading the MA Drum Booster zip, follow the instructions in the pack guide to add 'MA Drum Booster.fst' to the appropriate location on your HD.
Once you have a drum pattern ready, make sure all drums are routed to the same mixer channel. Next, click on your drum bus mixer channel and navigate through the mixer options to load in the 'MA Drum Booster.fst' file, as shown here:
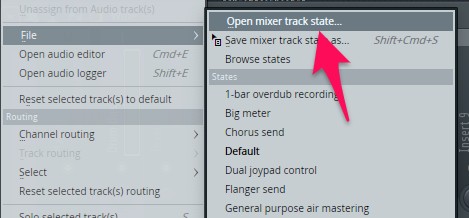
Voila! You now have the FX chain on your own drums.
One thing to bear in mind is that the sound output by the FX chain is very much dependent on the sound going into it - so keep an eye on your drum gain levels before they enter the chain!


