
Welcome to part 2 of our discussion with the fascinating and inspiring Martin Russ, author of the definitive Sound Synthesis & Sampling textbook! In part 1 of our Q & A session, Martin dove head-first into transforming some of the guitar loops and samples from our Float release into exciting new shapes and sounds, such as beautiful, resonant percussion and cinematic-style ambient textures. In this, the concluding portion of our exhilarating chat about all things guitar sound design, our esteemed guest nudges the discussion back towards more familiar ground, using Ableton Live in ingeniously simple ways to craft some truly eccentric sonic manipulations. Join us as we explore and pick apart Martin's unique approach to music production and sound transformation below!
ModeAudio (MA): Martin, hello once again! So far, you've morphed and twisted Float's samples far beyond their original sound and flavour. How about exploring something that might work in a more conventional production context?
Martin Russ (MR): Ok, but I reserve the right to twist things a little! Let's look at one of the guitar loops from the pack - 'SiberianShelf_122_Em_GuitarLead02'. It's a nicely recorded loop of real guitar playing and the riff contains a four-note sequence. So, the things I notice when listening to this are as follows: the first three notes have a strong initial attack, whilst the last one doesn't, and the last note is shorter than the others. Now, I could just load the loop into Simpler and set the markers to the beginning and end of one of those notes, transpose it, and I've got a playable guitar sound, but that would be wasting the other three notes in the loop'
Back in the days of analogue tape recording, one of the standard tricks to make tracks sound better was to record them twice - the natural variation in the performance meant that you got slight changes in timing or pitch, and when you played the two tracks back in sync, things sounded richer and thicker. Flanging arises when you try to cheat and use the same recording twice by adding pitch changes manually, and very short delays (Automatic Double Tracking, as it was called) had a similar aim of reducing the time spent recording the same performance several times. Now in this loop, we already have four versions of a note being played, but they are at four different pitches'using an analogue multi-track, then undoing that loop would be very time-consuming, but in a modern DAW like Ableton Live, we can do it very quickly.
MA: Ok, so you're going to use all four notes from the riff as layers, to product one 'hyper' guitar sound?
MR: Yep, and because of the way that guitar sounds have a characteristic loss of harmonics with time, there's a very good use for this type of composite guitar - synth bass! Here's the audio waveforms (top) and a spectrogram (bottom: spectrum plotted vertically against time horizontally) for the loop using Audacity, my favourite (and heavily customised) audio editing tool:

If you look at the spectrogram of the loop then the loss of harmonics with time is very striking - in some cases it is so regular that it almost looks synthetic (almost)! But because the sound just naturally does this, then, just as with the first part of our exploration, we don't need to use the filter in Simpler (which saves processing power for more layers!). Looking closer at the spectrogram, notice how the waveform doesn't tell you very much about the sound and look at the way that some of the notes have strong emphasis on certain harmonics (the horizontal lines in the spectrogram). Plus, look at the blip of harmonics at the end of the third note and before the fourth note - definitely places to investigate deeper for interesting sounds! The spectrogram of the end of the fourth note also shows why the loop's end sounds a little weird - there's a harmonic at about 2kHz that continues on after the rest of the sound has stopped'in other words, spectrograms are VERY powerful tools that can tell you a lot about what is happening inside audio loops and samples. Use them!
MA: Agreed! But let's get this straight - you're going to turn a guitar sample into a synth bass' Is that correct'!
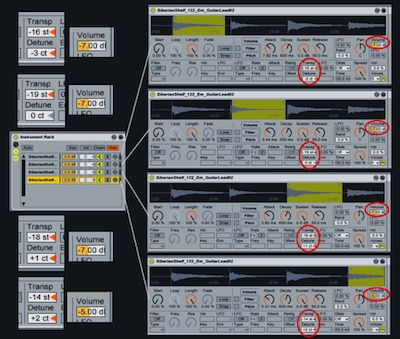
MR: Not just any synth bass. This is a pretty expensive-sounding one (without actually being expensive)! Back to the loop, the four notes are: E, G, F# and D, and we will be using four instances of Simpler inside of an Instrument Rack. Fixing the transposition requires us to reverse the pitch differences, so, adding an octave downwards as well, we need to transpose by -16, -19, -18, and -14 semitones respectively. All of the Simplers are now playing the same note - the click at the start of some of the notes can be left in or trimmed out (try both and see what happens yourself). Because we have four separate Simplers, then we can control each component individually, so I usually add a bit of detune whih normally sounds best when it isn't applied evenly across all parts of the sound. So, I've added detunes of -3, 0, +1, and +2 to get lots of permutations, and adding Spread wobbles things even more. Playing notes in the range of a bass should now give a powerful synthetic sound.
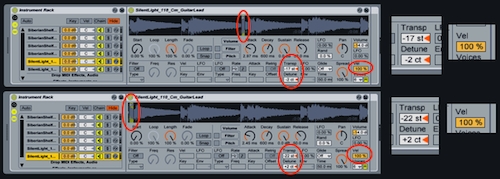
Because we can add as many extra layers as we want, there's nothing to stop us taking the attack from another guitar loop (I used the attack from the 'SilentLight_110_Cm_GuitarLead' loop) so that we have additional bits of interesting sound to listen out for. By making those extra layers velocity sensitive, we also avoid the usual curse of DAWs, which is where people develop sounds using the QWERTY keyboard. This often leads to a series of sounds where the velocity sensitivity doesn't have much effect. When I've programmed sounds for synthesizers, I've tended to use velocity a lot to change timbre in real time to produce a more organic effect, and I'm always careful to include velocity as part of my DAW sound design.
Looking at the screengrab above, what I'm doing here is just layering samples inside a Rack - this is an incredibly simple technique but it can give astonishingly detailed control over sounds. In many ways, I prefer the high-level 'rapid prototyping' abstraction that Racks provide to the low-level 'assembly language programming' precision that modular synths provide. But what I've also done is to make the most of the available samples in the loop, and this is one advantage of loops over samples - you tend to get extra material in a loop (repeats, transpositions, fret buzz, finger noise, mute sounds etc), and you can then use that as a layer to make other sounds. Samples are great where you need to have a precise capture of a sound, but if you want to explore and create new sounds, then loops are my preference - and there's nothing stopping you adding something taken from a loop to a sample either - the addition of the guitar attack to the synth bass sound described above is an example of exactly that sort of hand-edited 'synthesis' of sound.
You may never have thought of Ableton Live's Racks as synthesis tools but that's what they can be used for, and they can be astonishingly powerful! For example, replace one or more of the transposed 'GuitarLead02' Simper instances with Ableton's Analog synthesiser, and you now have a mix of samples and synthesis'there's almost no limit to what you can do by taking some samples in Simpler or Sampler from a pack like Float and layering them with the existing synthesis instruments in Live.
MA: Once again, this is all music to our ears Martin! Modern DAWs are often far more powerful than meets the eye.
MR: Indeed! But enough theory, let's get back to the sound example - the result of all this work is a synth bass that has elements of a picked bass for short hard notes, but a smooth, rolling synth bass sound at lower velocities and longer notes. The example shows how this might be used in a jazzy way, and note the Clip Envelope used to add in echo for just the short notes!
MA: Wow, you've produced a really big, expansive synth bass sound from only a handful of guitar notes. Amazing! Where are we going next?
MR: Well, let's move outside of Float's 'chill' zone - adding some overdrive to our bass sound takes us into a very different area, and within this new sound design territory, I'll use another sample from the pack in 'almost' the way it appears in the pack...this time it's a bass loop I've chosen to work with - the 'SiberianShelf_122_Em_Bass' loop.

This sound is rough and electronic in sound, with modulation and noise included - this type of sound can be good for complex multi-note piano-rolls. The spectrum shows lots of content at most frequencies (i.e. it is noisy) and the spectrogram shows the filter modulation and the variation of harmonic content over time. Some sounds are useful over restricted pitch ranges (a triangle sounds good at only one note - many samples only work well over a small range but some synthetic, heavily modulated and noise-based sounds can be used over a very wide range - do some auditioning and see what you can find to play around with).


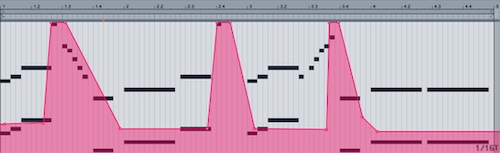
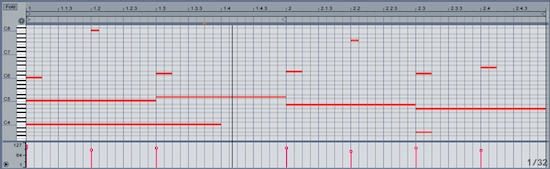
I looped the first quarter of the bass loop in Simpler, added 100% velocity sensitivity and transposed it upwards. Then, I added some Ping-Pong Echo, and a slow LFO modulated Auto-Filter. Normally I try to avoid going into the red with levels in Ableton, but here I'm not so worried. The piano-roll shows what I'm aiming for here: low notes are long, whilst high notes are short, and there's velocity variations as well as a wide span of octaves. The resulting sound definitely isn't very chilled'turn the piano-roll into a slow build, add some moody vocals on top, and stir'
MA: We're loving the spooky, ambient vibe! Are there any other genres you can bend the samples towards?
MR: How about an alien music loop' The 'Gas Giant' drums are quite cool, and if you add an envelope-driven resonant Auto-Filter and some echo, then you can change them quite radically with very little effort. Using an envelope to drive a filter is a quick way to alter a drum track, and the more resonance you add, the more synthetic it sounds. As with the first part of our discussion, remember that I'm using some global effects on the 'Master' channel in Live too - a slowly scanning low pass filter with just a hint of resonance, some multi band dynamics to emphasise the lows and highs, and finally a limiter.
The LFO-driven filter is set for a period of 2 bars, so the change in timbre is synchronised and the combination of the two filters sounds more complex than it actually is! In the picture, the original drum loop's at the top (waveform above spectrogram) and the modified drum loop (what you hear) is at the bottom, again with the waveform above the spectrogram. Notice how some quiet parts are accentuated and how the spectrum gets brighter (the red band moves upwards) for some of the individual drum hits contained within the loop.

The 'DreamKings GuitarLead01Tail' gives a nice Electric Piano sound with a bit of EQ to remove the low end, and I put it into the 'Guitar Room' Reverb just for irony! Layering all of the different 'DreamKings' Tails in the Simpler instances in an Instrument Rack (adjusting the transposition as for the Synth Bass example above, and tweaking the individual volumes in Simpler so that they work together well) gives a wonderful, brittle sound that I emphasised using flanging and chorus.

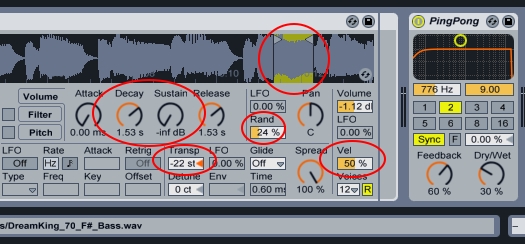
Finally, to get an acoustic sounding bass sound, I used the 'DreamKings_70_F#_Bass' loop and found an interesting section right near the end that works well as a bass sound when transposed down. I also gave the sound a decaying envelope and added Spread and random stereo positioning to add some movement. Put all of this together and you've got a bit of 'Elevator Music' from a planet far, far away'once again, I'm taking the sounds in the pack and using them slightly outside their safety zone, but in this case the sounds are used in reasonably conventional ways. It's totally up to you as the creative force behind your music to decide just how far to take your exploitation of the sound modifications that are possible.
MA: Bizarre! And all from a collection of guitar samples...we're being blown away all over again! Do you have any final tricks up your sleeve?
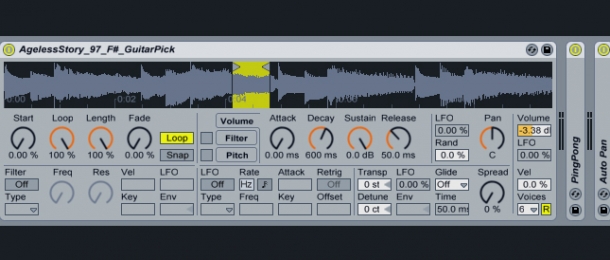
MR: Yes and finally...a guitar sound! I've gone back to the 'AgelessStory' set of loops used in part1 but, this time, I've used the Guitar Riff loop. By now, you should be able to predict exactly where I found the part of the loop I used as a sample'
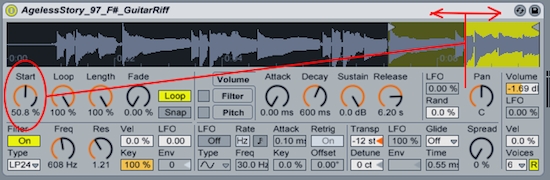
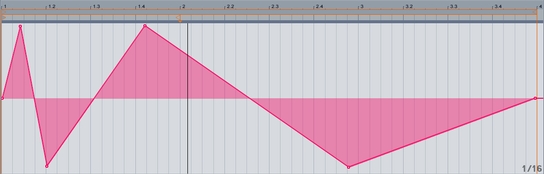
You guessed it, right at the end - just as the loop is about to end, there's a little picked sub-riff with an abrupt end. I started with a little bit of filtering and auto-pan to move it around, but the key thing here is to use a Clip Envelope to alter the Start parameter. What this does is move the start of the sample around in real-time, and this turns the simple guitar riff into something very different and very atmospheric. Using Clip Envelopes in this way can be very useful to provide unusual timbres and motifs from loops and samples.
MA: Using the Clip Envelope to modulate sample start position, is such a brilliantly simple yet effective method of building in movement into a sound - it really gives the pattern a life of its own! Martin, we're humbled anew and thank you so much for sharing your awesome, inspiring ideas with us!
MR: No problem! As you've seen in all the parts so far, a sound pack can be a wonderful trigger for making new sounds and new music - especially if you go beyond the ordinary and really make use of the powerful facilities that a modern DAW like Ableton Live gives you. Good luck with your experimentations!


