

Today's Guest Post comes from Martin Kristiansen, founder of Home Studio Ideas.
Before signing with a record label, you’re on your own when it comes to finalising your music. Owing to the cost of studio time and professional mixing engineers, many producers start off by mixing their tracks themselves. Truth be told, mixing is an art that is hard to master, but there are plenty of helpful tips that will help you along the way, including common pitfalls that are best avoided.
Today, I want to share 6 common mistakes I hear musicians make when mixing their own tracks, many of which are easy to make and even easier to bypass - let’s get started!

1. Mix At Low Volumes
When we mix at loud volumes, everything sounds better. This is an unavoidable fact of psychoacoustics; the bass just hits harder, vocals cut better, the stereo image is wider, and everything sounds more ‘in your face’. But what happens when the volume drops, when the mix leaves your studio and ventures out into the world? Mixing at loud volumes often tricks us into thinking the mix is better than it actually is.
Listening to your mix at low volumes allows you to better spot volume imbalances and dynamic differences. Louder volumes also enhance the high frequencies, which will trick you into thinking that your hi hats or acoustic guitar need more treble cutting than they really do. The result? A hollow-sounding mix lacking air and presence.
Another, extremely important side-effect to be aware of here, is ear fatigue. Loud volumes make our ears tired and if you’re unlucky it can cause permanent damage to the most valuable tools you will ever possess as a mixer. Your ears are special - protect them!
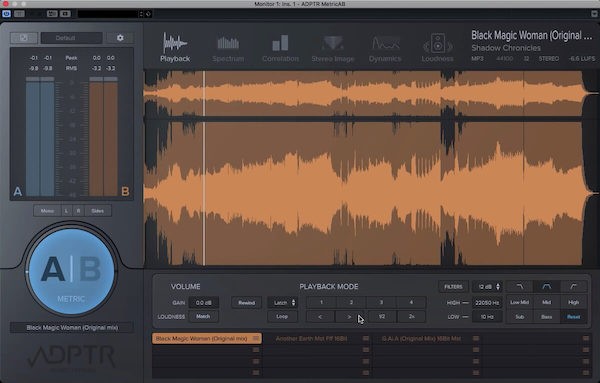
2. Use Reference Mixes
Reference mixes can help you know what to listen for and can guide you in the right direction when making balancing choices in the studio. So, what exactly are they? A reference mix is a commercial quality mix that has been released, and in the same genre or style as the one you’re currently working on.
Try to find a high-quality audio file with similar instrumentation and texture to the track you’re working on. Here are some of the question you should ask yourself, as you compare your own session with the reference mix:
- how do you balance instrument levels compared to the reference track?
- is the stereo image comparatively wide enough?
- is your kick too loud?
- does your bass stack up to the reference or does it need a boost?
These are just a few suggestions but really you can and should compare every aspect of your mix to the chosen references, saving you countless hours of going back and forth from studio to listening environment, making incremental tweaks.
This way, when you bounce your first mix, you know you haven't backed yourself into a position where you have to start from scratch. Of course you can use reference mixes simply by dragging the audio file directly into your DAW, but there are also a plethora of plugin tools on the market that allow you more options when it comes to making quick and easy comparisons.

3. Leave Enough Headroom
During the mixing process, you might have heard that it's always a good idea to leave a decent amount of headroom on your master bus. So what does this actually mean? Headroom is the difference between the level of your audio signal and 0dB, or the maximum possible level before clipping. It’s also the amount of space the mixing process will leave for the next stage of the process, mastering.
If your mix is close to peaking, the mastering engineer won’t have much room to work their magic. They'll want to use tools like compression and EQ in order to get the most out of your mix, which will be extremely difficult to use without clipping if your mix is already close to going in the red.
A good rule of thumb is to keep the body of the waveform around -18dBFS and the peaks around -10dBFS. You should follow these guidelines as you mix your track:
- use your ears and eyes - are there any red peaks in your DAW?
- control your dynamics with automation or light compression
- have your main instrument around -18dBFS and use that as a baseline for your other tracks
Play your track from start to finish and check exactly where the level reaches its highest point. If you hear clipping or notice your master bus flashing red, then you’ll need to lower the overall level of your mix. Remember that gain or volume can always been put back into your mix via compression or maximising, so keep the mastering process in mind when dealing with the overall level of your track.

4. Process With Restraint
If you feel that a master bus plugin adds a lot of value to your mix and gets you closer to your desired sound, then by all means use it. However, you should always be especially careful with plugins that affect the overall headroom of the mix.
Limiters and aggressive compression will probably do more harm than good here, since mastering will take care of overall levels and dynamics to a large extent. If your mix is finished and you are unsure what plugins are appropriate for use on the master bus, then you can always send two versions to your mastering engineer for them to choose between.
Here are some examples of excessive processing that I usually try to avoid adding to my master bus when mixing:
- limiting of any sort
- compression that lowers the peaks and dynamics by more than 3dB
- aggressive EQ that lowers frequencies more than 3dB (if you find you're having to cut or boost by more than this, you should probably be dealing with track level EQ instead)
Remember the mastering process will take care of final maximising and limiting, so leave this job for a later stage.

5. Check Your Mix On Multiple Systems
When you’re mixing in the studio, you probably use a pair of studio monitors or headphones. They are great for presenting a 'clean' version of your mix, but they differ greatly from how regular loudspeakers and consumer-grade headphones perform. These pieces of gear are designed to boost and enhance frequencies, while studio monitoring attempts to keep all frequencies as flat as possible.
The room you’re mixing in also affects how you perceive the sound. Untreated rooms without any acoustic absorbers usually cause issues with the low end. The bass frequencies either get trapped or hang around in the room. The result? They sound way louder than they really are. Naturally, you start cutting the bass frequencies when you're in an environment like this, only to discover things sounds thin when listening on other systems.
Thankfully, these problems are easily fixed since you probably have access to multiple systems. Check your mix on your smartphone, earbuds, laptop speakers, and car stereo. This is crucial because most listeners almost certainly won't consume your music via a pair of studio monitors, so keep multiple listening environments in mind when making overall mixing choices.
6. Automation Is Powerful - Use it!
Automation is a powerful tool to bring your mixes to life. It may be tempting to get all your levels set for each track and leave them there, but chances are that the same settings won’t be appropriate for every moment throughout the entire song.
Many inexperienced producers add a compressor every time they need to smoothen the dynamics of a track. As an example, using the same compressor setting on both soft vocals and loud vocals will make the track sound lifeless. With volume automation, you can adjust the volume differences on any signal before it enters a compressor, so both techniques can be used to work in harmony.
While volume level automation is the most commonly used automation, there are endless parameters in each mix that can be automated. Automation brings mixes to life, so start experimenting and always try to think of what the particular section you're working on is trying to do in support of the song overall. For example, is the bridge providing some space and quiet after a loud, busy chorus? Then, you'll probably want to dial back all that saturation and distortion.
I hope you'll find the above advice useful the next time you sit down to work on some music, once you adopt these tips into your workflow they'll quickly become second nature, an important part in the process of building up a musically conducive mixing practice.


