
We're delighted to welcome back Kristian West, Managing Editor at IGN's Nordic websites, for another guest tutorial. This time, Kristian digs into the shadowy world of mastering and getting your tracks ready for that final piece of sonic polish. Take it away Kristian!
Isn't 'mastering' something you leave to a mastering studio with a real engineer' This might have been the case some years back, both for financial and technical reasons, but today you are able to achieve perfectly respectable results at home using only 'in the box' tools. If you plan to have your track played in a huge club or festival you might want to reconsider, but that's not our mission here!
Today, I want to apply some final polish to the track is created to soundtrack that fictional Cyberpunk game scene, created in my last article. I'm going to use the fantastic Ozone 7 mastering suite from Izotope for this purpose, though as I'm going to cover each element step-by-step, you can of course sub in your own plugins and effects to achieve similar results.
Master Balancer: The Overview
In short, mastering is all about balance. In part, this relates to achieving an acceptable loudness level, since the music will quite possibly sit in the background of dialogue in a game, film or TV sequence. So, there needs to be both compression and maximization going on for the piece to balance nicely with the other audio elements and achieve a consistent volume. If our track was to boost up and drop down again constantly in volume whilst viewers are trying to concentrate on dialogue, it would become very distracting indeed!
Another central concern is to listen carefully to the timbral balance of the elements in your track - of course, we're mastering a track made ourselves from scratch, so a much better solution to fix critical issues here is to go back to the original mix and work from there. However, attending to the overall spectral colour of a track at mastering stage is always a useful exercise, as even humble boosts and cuts can help us achieve positive results to the track as a whole, rather than the individual elements we deal with during mixing.
Let's get started - here's my original piece from the game scoring article:
The Video Breakdown: Enter the Ozone
I've created an accompanying video to this tutorial so you can see and hear exactly how the different parts of the mastering process effect the sound, here's the video with my text commentary following beneath:
Enter Ozone 7 and its range of helpful presets to get us started. Presets are just fine to use as a beginning point, as long as you know how things are operating and how to tweak them towards your own particular goals. Let's load up our track through Ozone 7, select the CD Master setting and customise things from there.
An important tool in your mastering arsenal is something called an A/B test, where you are able to simply bypass all your processing at once to check it against the raw track. Ozone makes this easy with the bypass and ear icons, ensuring your original playback volume resembles the processed sound so that your ear isn't fooled into thinking your track sounds better, when really it's just a little louder.
Part 1: Master EQ
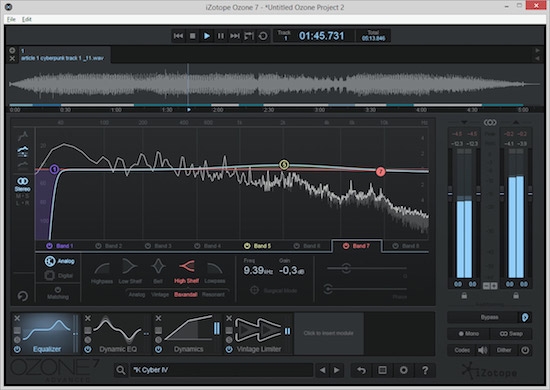
The first module placed in my chain is an EQ, where I've dialled in a low cut at around 35Hz with a slope of 48dB cut per octave. The upper mids are boosted a tiny bit by around 0.5dB with a proportional Q setting of 0.4, while a third EQ band at around 10KHz creates a slight high shelf reduction of 0.3dB. It is important to cut below around 30-35Hz at this stage in the chain, as it takes out any low, rumbly frequencies that your playback system almost certainly won't be able to output (again, unless you're in a club setting), which will in turn affect the processing abilities of the plugins we place after EQ in our chain.
The upper mids are boosted a little for warmth and the highs cut slightly to reduce the overall brightness of the track - this is done with voices and dialogue in mind, giving them plenty of space to be heard above our soundtrack.
The second module added to our chain is a Dynamic EQ; while the first EQ is static, affecting the overall input in a fixed and consistent way, the dynamic EQ affects the selected frequency area only when the input signal exceeds a certain threshold. In our case, this is boosting the lows to make the bassdrum hits are louder only when they're actually playing and not simply muddying up the entire mix.
Part 2: Master Dynamics
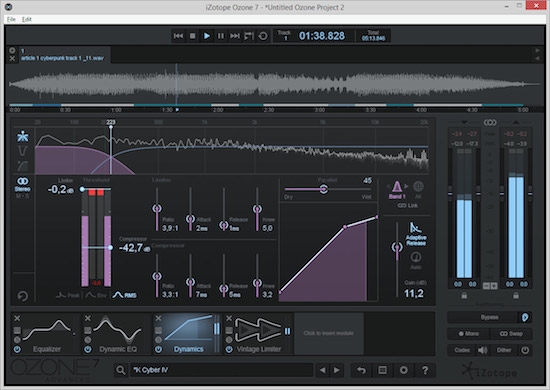
Our next step is to apply more traditional compression, by placing a Dynamics module (basically a fully-featured, mulitband compressor) into slot three. The focus here is again our bass, by having the first band cover the low end up until 233Hz with fairly heavy compression and makeup gain applied, whilst adding a much subtler dynamic squeeze to the second band covering the rest of the spectrum.
This means that our low-end is going to be a much more consistent and present force in our final output than the upper parts of the spectrum - again this is useful for giving space to dialogue, as well as being consistent with the current trend for bass-heavy music. You can start to see how different mastering goals and songs from different areas would have called for a very different mastering process!
Obviously you can take things to a much more complex level by applying lots of instances of single bands, thus applying different processing to many different parts of the spectrum but for our purposes, this simpler 2-band arrangement achieves the sound I want.
Part 3: Master Limiter
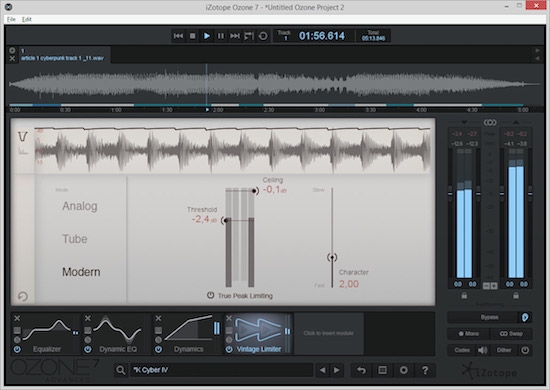
The fourth module used in the is the Vintage Limiter, part of the vintage modules found in the Advanced version of Ozone 7, which helps to deliver a warm feel to the sound. In our case this helps to ease off the digital edge of the track a bit, making the overall feel a little bit more friendly to the ear.
As is the case with all modules placed in our chain, the processing here is subtle. The original mix was satisfactory and we don't want to alter it too much here - we just want to make it reach its full potential. The Modern setting on the Vintage Limiter is a good fit for our track here, as it avoids the pitfall of muddying up the low mid, 200-300Hz frequency area, which is something 'vintage' or 'analog-modelled' devices are often guilty of.
As you can hear in the video, the difference before and after applying the limiter is noticeable and feels like a comfortable upgrade of our original exported track - this is what counts in the end. With mastering or in fact any type of audio processing, you always have to make sure that you've actually made your sound better, rather than simply applying a plugin or effect for the sake of it.
Comparisons Count
To take stock for a moment, our resulting audio feels more glued together now, packs more weight in the low end and is consistently audible across the spectrum even at lower volumes, when compared to the raw export from Ableton Live. A useful trick here is to compare the track with similar songs from related projects, such as film scores or released electronic music. If your mastered track stands up against these, you know you've completed your task; if not, then you need to keep tweaking!
This article of course only scratches the surface of what mastering can accomplish but we've satisfactorily shown that a little attention to detail and careful processing can go a long, long way to achieving polished results that feel much more finished than before!


