
We're delighted to host the wonderful talents of Kristian West, Managing Editor at IGN's Nordic websites, in today's guest tutorial. Kristian previously got to grips with using ModeAudio sounds in a game sound tutorial posted over at IGN, so we're delighted to have him delve deeper into our catalogue here!
Sometimes, it helps to have an overarching objective in mind before beginning a new track. As has been mentioned in this magazine before, one of the hardest things to face as a producer is the dreaded 'blank project' - an empty session view offering no clues as to where it wants to be taken.
Today, I want to share a detailed demonstration of how effective having even a very basic objective before starting can really be.
So first up, I need to define my objective: to create a soundtrack using Ableton Live accompanying an imagined video game scene, where the protagonist is trapped in a waking dream as the result of a black market brain implant. The track should also be strong enough to be listened to out of context.
I'll be using three videos to demonstrate how I built up the track below but before we start, and to give you an idea of where we're going, here is the finished result:
Now to begin: what did I use to make the track'
Suited and Booted: Choosing Production Tools
As another aid to establishing as efficient and creative a workflow as possible, I decided to limit myself to a predefined set of tools: samples and presets from ModeAudio, loops from a Computer Music sample CD, the Massive and Virtual CZ synths and selected tools available within Ableton Live itself. Here is the full list of tracks that ended up in my project:
- NI Massive preset ' 'Analogue Dreams' (stock NI patch)
- NI Massive preset - 'Bad Brum' (stock NI patch)
- NI Massive preset ' 'KICK Meltdown' from ModeAudio's Neon Dream
- Drum loop from a Computer Music Magazine CD
- Cymbal sample from a Computer Music Magazine CD
- 'PurpleDawn_72_Am_SynthChords02' sample from ModeAudio's Lost Archive
- Female voice clip from Mutekki Media
- NI Massive preset - 'CHORD Twos' from ModeAudio's Surface Tension
- Processed computer voice sample
- 'FuturePeace_Synth' sample from ModeAudio's Hover
- 'Spyrography_78_Dm_Bass02' from Lost Archive
- 'GentleWaves' field recording sample from ModeAudio's Coasts
- VirtualCZ preset - 'DDisco Bass' (stock patch)
So now we've nailed down our gear list, how was this all used to give my track colour and shape'
Bringing the Track to Life
The key to an effective game or film soundtrack is simple - creating a believable mood or atmosphere to envelop the scene within. Considering my objective here, the track's mood will need to evoke a feeling of anticipation, drawing the listener in, to eventually placing them within the protagonist's dream itself.
To this end, the two first Massive patches form a sort of ambient 'state' for the song to sit on top of, creating a foundation for my kick-based rhythm to be built upon. This rhythm consists of two layers ' one created using ModeAudio's 'KICK Meltdown' Massive preset on track 3 and the other a Computer Music drum loop on track 4.
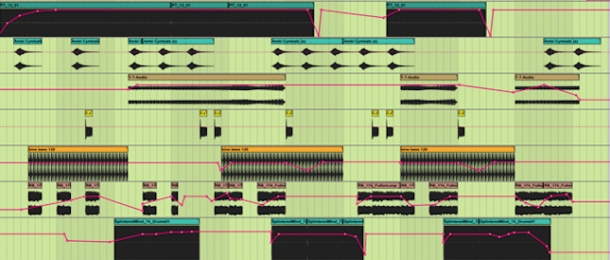
In all three of my demonstration videos, I'll take you through how the arrangement was created track by track. I'll now run through the making of each track in accompaniment to my first video, making direct reference to the video's timeline for clarity.
Video 1: Building the Core of the Track
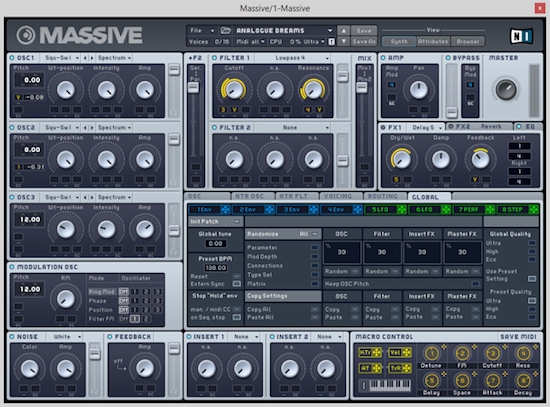
0:12. Track 1 contains an instance of Massive loaded with the 'Analogue Dreams' stock NI preset. This rhythmic sound gives us instant momentum and movement, driving the song forward.
0:18. To expand the sound and give it a bigger feel, I've used MeldaProduction's MmultiBandComb. As you can hear in the video, this thickens the sound and emphasises its metallic feel, which fits our cyberpunk theme nicely.
0:34. Track 2 contains another instance of Massive, this time loaded with a modified version of the 'Bad Brum' stock preset. This soaring melodic hook is made to stand out by introducing overtones created by the high filter resonance setting, as well as intensity from the 'scream' filter control.
Additional depth is added to track 2's melody from subtle use of MeldaProduction's MUnison plugin - too much of this effect sounds cheesy, whereas we only want to gently add some weight.
1:21. Track 3, also loaded with Massive, sets up a basic, 4 to the floor rhythm using the 'KICK Meltdown' preset from ModeAudio's Neon Dream. Adding some simple chorus and compression from Live's internal plugins helps us achieve a dry thudding sound, which will provide character when mixed in with a heavier kick sample.
1:44. Track 4 contains a drum loop from a Computer Music Magazine CD from the late 90s ' this adds power and punch to the rhythm setup on tracks 1 and 3.
Using Live's EQ Three and a reverb preset, we're able to place the loop better in the mix, giving it a subtle tail and removing the harsh, coily spring reverb sound printed in the sound.
2:04. Track 5 brings in another old Computer Music sample, this time a really long, low-pitched cymbal sample to help propel the track and create tension.
I've used MeldaProduction's MMultibandGranular to make the cymbal sample swirl around the stereo field, echoing across the frequency spectrum in granulated form.
These first 5 tracks form the core of our soundtrack, which is beginning to really come alive! Each layer offer one of two things ' it either introduces an element that supports our theme, such as the driving rhythm of track 4 or the metallic, glassy tone of track 2, or it elevates what is already there, such as the characterful kick on track 3.
So, now we've established our core, let's move on and build things up to a greater degree.
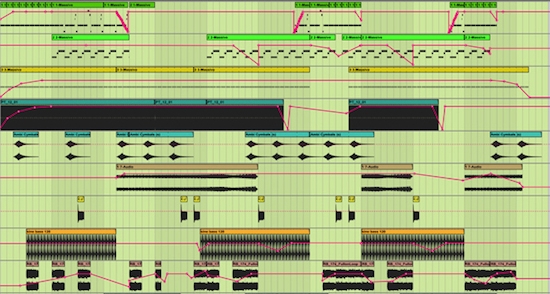
Video 2: Sculpting and Refining
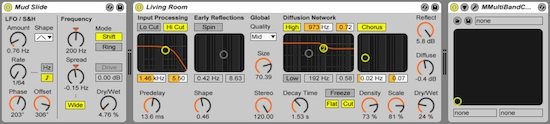
0:10. I want to add some more atmosphere next, so on track 6 I've added a pad loop, 'PurpleDawn_72_Am_SynthChords02' from ModeAudio's Lost Archive pack. My philosophy about using presets and samples is to find something that almost fits your track, and then work around the edges to make it fit perfectly!
Having time-stretched the loop using some warping, I've added Live's Harmonics Delay and the Outer Space Reverb preset to smooth out the stutters and breathe extra life into the pad.
Of course, you can make all your sounds from scratch but this is very time consuming and luckily, an existing sound can often be modified into something that better fits, something that is 'yours'.
0:37. On track 7, I've placed a chopped vocal sample ' the beauty of placing a sound someone else made into a context over which we have control, is that the sound can have a new meaning and purpose. Someone might create a D&B track with this vocal sample, whereas here we can use it as a mysterious element buried in the mix, keeping the listener/player locked within the psychological zone of the cyberpunk dream.
1:00. Movement and structure are often created in dance music by changing sections or using drops ' to add some interest into my track at the half way point, I've added a high pass filter sweep on the master channel to create space in the mix that the full depth and body of the song moves back into after I've lowered the frequency again.
1:19. To further develop my section transitions, I added another instance of Massive onto track 8, using the 'CHORD Twos' preset from ModeAudio's Surface Tension release.
Using only the Massive preset on this track with no effects added, goes to show just how powerful this synth really is. Creating patches for it can be cumbersome, so with a little help from presets, the results can be very rich.
1:45. After the stabby notes heard in the build up, I've added much longer notes for contrast using exactly the same Massive preset on track 8. To me, these harmonically rich notes sound almost like plates of styrofoam being slowly twisted and ground up ' once again, ideal for our theme.
2:32. The robotic vocal sample that gives this song its title, "Your Dream Is Real, Do Not Wake Up Yet", is on track 9 and was generated using a text to speech application. It has on obvious application here I think ' to remind our protagonist, and the gamer, not to wake up!
I've cut out the low end of the sample using a low cut shelf in Live's EQ Eight and then added the handy Mcharacter harmonic distortion plugin from MeldaProduction to provide that strange, disembodied tone. Just right!
As with any effect, there's a huge difference between blending in a little and using them fully wet. Three subtle effects on the vocal sample here give it its own place in the mix, as well as providing enough presence to make it seem like it's coming from inside the head, underlining the implant theme.
3:29. After the first main section, the song seems to start fading away ' the beginning of the end of our dream sequence - but even though the driving beat is gone, a range of synths and samples help us keep the momentum going, adding some contrast and allowing us to repeat the main part.
I added the 'FuturePeace_Synth' sample from ModeAudio's Hover on track 10 here for just this reason, its blossoming quality adding some atmosphere as well as propulsion.
4:10. To remind us of our driving rhythm and to add some grit, I've placed the 'Spyrography_78_Dm_Bass02 ' loop from Lost Archive on track 11.
4:29. Towards the end of the track, I want to suggest the sense of arriving somewhere new and of coming coming out of one state into another. To do this, I've added a field recording on track 12 of some gentle waves called, you guessed it, 'GentleWaves', from ModeAudio's Coasts pack. You will hear this sample more clearly at the end of the song.
4:52. For a little more clarity, glue and punch, and to bring everything together, I've added a very low cut on the master channel, as well as MeldaProduction's MmultibandDynamics. This helps to smooth and level each part of the spectrum out, before I take the track out of Live and into Izotope's mastering suite, Ozone, for some final polish.
That concludes my main demonstration, taking you through how I built up the core and then the structure and embellishments of my track. To finish, I want to take you through how I processed the thick, see-sawing synth lead that appears throughout the track.
Video 3: Dream Clubbing
0:22. The VirtualCZ soft synth gives instant retro fatness in almost every single patch, this being very much the case with the stock DDisco Bass patch. I'm using it here to add a sharp, energetic edge to my track.
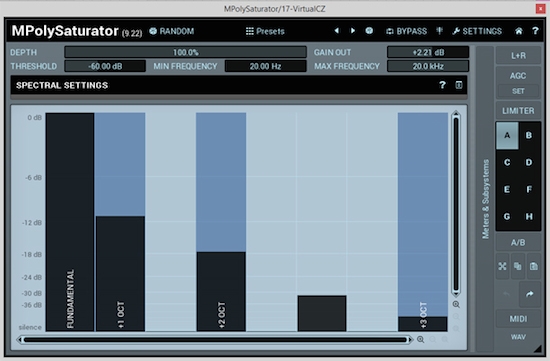
0:48. I've added MeldaProduction's MPolySaturator to further fatten up and widen the sound, giving it even more warmth and presence in the mix.
Being a bassline patch, I had to be careful of not overly distorting the low end, which would have resulted in a loss of weight in the mix. So, with the MPolySaturator affecting higher frequencies much more than the lower here, the effect gives us just that slight edge to help the synth cut through the mix.
Remember that your use of prodution tools, plugins and instruments can be as complicated and surgical as you want it to be, or they can act as gifts on a table that is already set. This particular VitualCZ patch was exactly the missing link I was needing for the song to reach its maximum potential.
Mission Accomplished! What now?
The next step, as I mentioned above, is to master the track, optimizing the song's spectrum and dynamics as much as we can to bring it to a finished state. I'll be covering this process in another article, so keep your eyes peeled and I'll be back soon!


