
These days, with the ubiquity of top quality samples and state-of-the-art music production software, us producers have everything we need to make music that can stand up alongside anything in the charts.
But what about those of us who hanker for an edgier sound that has an almost punky aesthetic? Those of you who are into the likes of Omar S, Levon Vincent or Randomer will know what I’m talking about.
The thing is, if we want that ‘rough around the edges’ sound, it can seem like we need to start filling our studios with old analog machines, which in today’s world are actually the scarcest and most expensive pieces of equipment on the market!

Now if you’re like me, you just don’t have a spare thousand dollars lying around to buy one of these synths - however, the good news is that the technology has come so far now that there are many digital tools we can use to effectively replicate that classic hardware sound and feel.
So the question is, how can we get that lo fi sound without handing over wads of cash for cumbersome equipment that will take us ages to figure out how to use anyway?
In this article, I’m going to demonstrate a few ways you can do just this, showing you how to create a lo fi House sound using nothing more than your favourite DAW and a few samples. I’ll be using Ableton Live and samples from our Lo Life - LoFi House Loops pack, which will quickly get you up to speed with that crunchy, rusty vintage vibe.
Here’s the final idea that we’re going to arrive at:
It’s sounding nice and rough, I think you’ll agree! But how did we get there? Let’s go back and look at each of the steps in turn.
Amp It Up
Live’s ‘Amp’ effect is a great little module that emulates classic amplifiers and cabinets. In our loop, we applied it to the kick drum to give it some extra ‘fuzz’. Here’s the raw kick sample, taken from our Lo Life pack:
It sounds great straight out of the box, however let’s load up the Amp plugin and select one of the presets to see if we can’t make it even dustier:

As you can see above, I’ve opted for the ‘Blues’ setting. I’ve tweaked the frequency knobs and gain slightly and also brought down the Dry/Wet balance so we’ll get only a very subtle ‘fuzz’ layered onto our kick.
I’ve also rolled off the higher frequencies using an EQ so our kick isn’t too bright sounding. Here’s the resulting sound:
Now we’re cooking! Let’s hop onto the next step.
Give It Some Crunch
Let’s focus on the clap sound now. I’ve used a standard 808 clap in this example and it sounds quite crisp as it is:
That’s all well and good if that’s the aesthetic we want. However, we want something dirtier! First I’m going to add Live’s Saturator and Erosion modules to the FX chain:
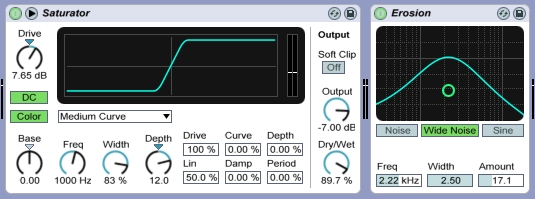
The Saturator is another great tool in Live that we can use to add a flavour of distortion to our sounds. I’ve used quite a high Dry/Wet setting as I want really add some warmth and dirt to the sample.
The Erosion plugin works by adding some filtered noise and artefacts to our original sound, helping us to get that ‘crunch’ sound that we want. As you can see above, I’ve also selected the Wide Noise setting as this gives a nice, subtle stereo image to the clap and helps us achieve a fuller sound.

At the end of the FX chain, I’ve also added some fairly strong compression to really try and squash the clap somewhat, emulating that hardware sound. I’ve also added some EQ to clear out the lower frequencies and bring down the higher ones slightly - again to reduce the overall brightness and keep things as lo fi as possible.
Here’s our resulting clap sound:
Adding Some Hiss
Moving on to the hi hats, we’ve gone with a sample from the classic 808 machine again as it really is the go-to choice when you’re making House. Left unprocessed, our hi hat sounds a bit thin and too clean for what we’re trying to achieve:
With our clap sound, we used the Erosion plugin to help give it some crunch. This time we’re going to apply the same plugin to add a raspy or hiss-like quality to our hi hats:
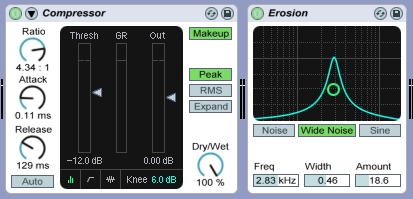
As you can see above, I’ve added some noise to our signal with a smaller bandwidth, with the centre at around 3kHz - this helps to add some thickness, or body, to our hats, while also introducing some fuzzy distortion flavours. Again, the Wide Noise setting gives a subtle stereo effect, helping us to get more out of our relatively sparse beat.
Here’s the resulting sound of our hi hat tweaks:
Now let's put all those drums together:
Get Rid Of Those Highs
Another very effective way we can achieve that lo fi aesthetic is by turning down the higher frequencies in our sounds. Cheap and old equipment is often not capable of producing those higher frequencies, so we can easily emulate this by pulling some treble out of our beat with EQ or filtering.
For our synth part, again I’ve taken a music loop from Lo Life. Here’s what we’re going to work with:
Now I’m going to apply a low-pass filter to cut out the frequencies above around 2.5kHz. This might seem a little extreme but trust me, it’ll work nicely in this context - I’ll also apply a touch of distortion using Live’s Overdrive plugin too, just for good measure:
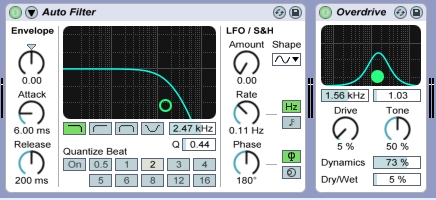
Here’s how our loop sounds after having those effects applied to the channel:
As you can hear, the resulting sound is a little less defined and sounds like it could have been sampled or produced by some vintage piece of gear. Jackpot!
Throw In Some Vinyl Crackle
Another great feature of Live is the Vinyl Distortion effect. Again, it’s another method of introducing some distortion to our sounds, but with a specific vinyl-like essence. In turn, this can help our musical elements sound like they’ve been sampled from records.
Here’s our original tom pattern, created using another sample from Lo Life. It already sounds nice and dirty straight out of the pack, but I’m going to add a touch more filth:
Now let’s load up the Vinyl Distortion module and apply some light crackle and a touch of reverb. This should help us to get that subtle ‘sampled’ effect.
Here’s the resulting sound:
We can also introduce our own, genuine vinyl crackle just as an audio sample on its own channel. Lo Life contains a number of loops directly sampled from the silence at the beginning of vinyl records, so I’ve picked one to use here:
Now, putting it all together and adding a bassline music loop from Lo Life, here’s what we end up with:
Things are sounding rough and edgy (in a good way!), don’t you think?
Wrap It Up
So to summarise, there are a number of digital tools we can use to get that dirty lo fi aesthetic - Live has some that are unique, but I also used plenty of off-the-shelf plugins that are available in any DAW you care to mention.
What’s important is that you concentrate on audio processing that will degrade the perceived ‘quality' of your sounds - anything that introduces some distortion will do wonders in this regards: ‘Hiss', ‘crackle', ‘fuzz’ and ‘dirt’ are all good words in this world!
At the same time as introducing these artefacts through distortion, you’ll also want to dampen your sound slightly using EQ and filtering to reduce higher frequency energy. This will help to reduce the clarity of your sound and really give them that lo fi character.
A word of warning though - you can easily push this idea too far and end up beyond the point of diminishing returns, creating a swampy mess of noise. You don’t want to end up with a track that is unplayable, so as ever, subtly is best - until next time, get creative!


