
Tuning the kick drum to the key of your track is one of those little secret tricks that can really perfect a mix. It can be the difference between your production sounding just right or just that little bit off and whilst it can be a little fiddly to get spot on, once you've mastered the process you'll never look back.
In this tutorial, I'm going to show you a couple of methods you can use to tune your kick drums in Logic Pro X, though you can apply exactly the same techniques in other DAWs using the appropriate native tools and plugins.
It's worth briefly pointing out that not all kicks will necessarily contain a clearly defined root pitch, such as very fast decay or heavily distorted/noisy sounds. Tuning may not be quite so important in these circumstances, though there will almost certainly be a 'sweet-spot' in pitch that sounds just right for your given track.
How To Tune Kicks - Using a Sampler
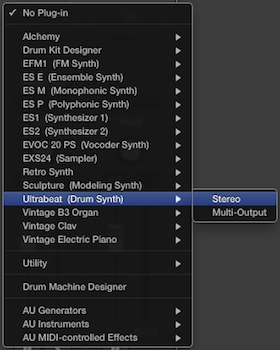
Firstly, we're going to need a sample that contains a nice, clear pitch - I'm using 'Resonate_Kick_Mid22' from our Resonate - Analog Drum Samples collection. The only other piece of kit I need when using this method is a sampler, so I'll call up an instance of Ultrabeat on an empty software instrument track, one of Logic's native sampler plugins.
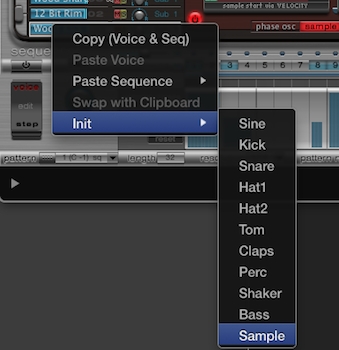
As I said above, I want to work with my own sample so I just need to right-click one of Ultrabeat's voices and select 'Init > Samples' from the dropdown to clear the slot. I can now drag 'Resonate_Kick_Mid22' onto the waveform display to load it up.
Here's how the kick sounds:
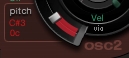
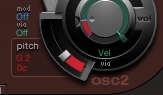
To change the pitch of the sample, all I need to do is drag on the red bar next to the 'osc2' label - you can see as you drag this up and down, the displayed pitch will change accordingly.
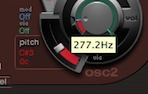
This is known as 'course' tuning, where the pitch is shifted in steps of a semitone - we can also alter the 'fine' tuning of the pitch, by clicking and dragging on the '0c' text shown just beneath the displayed pitch. The pitch is changed in steps of a cent when using this control.
Finding The Key: Tuning In Context
So, we have our chosen kick and we know how to tune it. However, it doesn't make sense to alter the tuning of the kick till we have some other sounds to tune it to - I'm going to use a section from the Resonate demo to demonstrate this process.
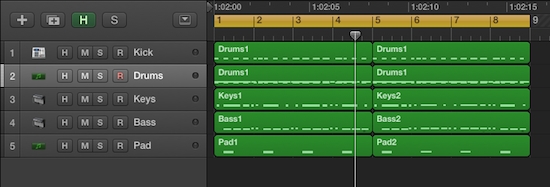
Now we've added some synth keys, a percussion top line and a bassline, we can go about tuning the kick to the key of our song. Opening up the bassline MIDI part shows me that the key of this 8 bar section is 'E' (it doesn't matter whether the key is major or minor for our purposes), so this is the note I'll want to tune the kick sample to.
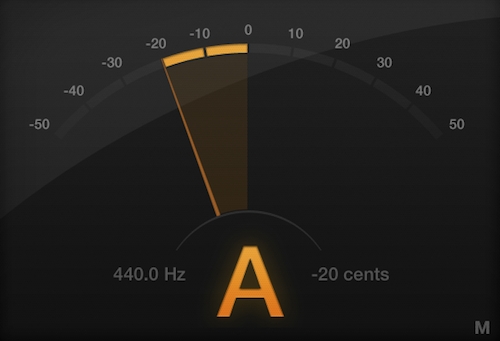
Using Logic Pro X's handy Tuner plugin shows me that the kick sample is roughly tuned to an 'A', so we'll need to get from A to E to properly tune the kick for this section of my song.
If you're not using Logic, there are free tuning plugins available that will attempt to figure out the key of the audio being run through them, such as Melda Productions' MAutoPitch (available as part of their free plugin bundle). This process is notoriously tricky however, so these plugins will not be totally reliable and a fair amount of trial and error will always be necessary.
Back to the task at hand - remember that a full chromatic scale contains the following 12 notes:
C, C#, D, D#, E, F, F#, G, G#, A, A#, B
So, to get from A down to E, we need to move the kick's pitch by 5 steps or semitones - moving back to Ultrabeat, we just need to drop the red pitch bar down by 5 semitones to achieve this. A little annoyingly, Ultrabeat always displays the root pitch of a sample as C, even though in this case we know it's actually an A. Thus, rather than dropping the pitch from A down to E, we in fact need to move it 5 steps from C, which is a G.
Listening to the kick both before and after tuning really demonstrates the power of the process - here's the loop with the kick in its original key:
Now here's the loop with the kick tuned properly:
It just fits better doesn't it'!
How To Tune Kicks - Using Flex Pitch
Now we've heard the clear benefit of tuning our kicks, let's move onto method 2. Our first method of tuning a kick works great for relatively small shifts, say within about an octave, but we must bear in mind that this process does also affect the playback length of the sample. Tuning down results in a longer sample and tuning up, a shorter one.
If we want to change pitch without affecting time, or the length of our sample, we'll need to use something called a phase vocoder. Luckily for us Logic Pro X users, we have one at our fingertips - the ingenious Flex Pitch. Many high-end DAWs have their own pitch and time processors built in, so check out your documentation if you're not sure if you already have access to one or not outside of Logic.
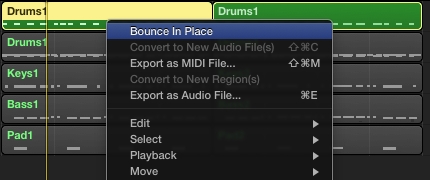
To use Flex Pitch we need to be working directly with audio, so let's bounce our Ultrabeat-triggered kick pattern onto a new track to get an audio loop we can work with.
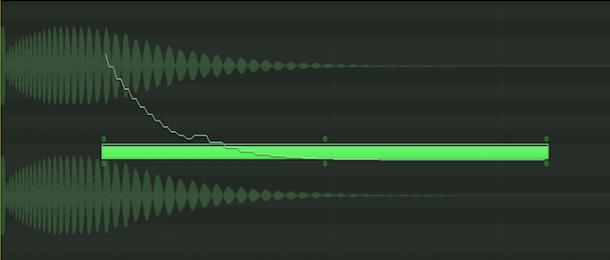
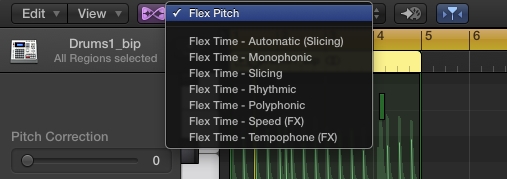
Now, we can turn on the Flex function by hitting the hourglass icon within the audio editor view (open the piano roll, click away from the new audio track and back again to open this up), then navigate to Flex Pitch in the dropdown.
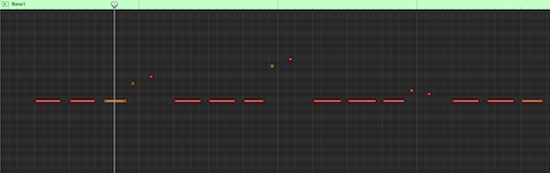
Now we can see that Flex Pitch has identified our kick tunings as mainly As but with one 'stray' F - I didn't say this was an exact science after all! We don't really need to worry about this though because we already know that we just want to shift all the pitches down by 5 semitones - to do this, select all the notes (cmd + A will achieve this or holding shift while clicking) and drag them down to an E.

Listening to the results reveals mixed success:
The pitch has definitely changed but some of the note transients sound a little echoey all of a sudden. This is due to the nature of using a phase vocoder, which will inevitably introduce sonic artefacts into your audio. The benefit however is that the kick sound retains much of the timbre and character it had at its original pitch.
Again, small shifts will generally sound better than bigger transpositions and you'll be able to push samples without overly pronounced transients (the sharp attack portion of a sound) further than those with, like the one I've used in my example, so experimentation is key. Here's a pitch shift of only 2 semitones, which sounds a lot tighter:
Wrap Those Kicks Up
Wether you choose to use the sampler or phase vocoder method of tuning your kicks, I hope the demonstrations above have shown you how powerful the process can be in getting your kicks to sit well in your mix.
Most of the time, you'll probably just be using these techniques to achieve subtle pitch shifts and thus achieving high quality results but as ever, they can be pushed to extremes to achieve weird and unexpected effects. Good luck and get creative!


