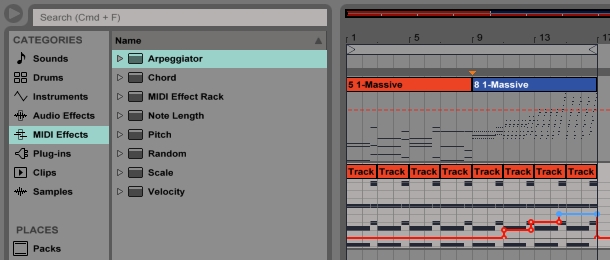
If you're familiar with programming MIDI in Ableton Live, you'll know that the MIDI clip interface is one of the slickest of any DAW available. However, even beyond Live's elegant grid snap and slip abilities, checking out the in-built MIDI effects plugins can be a real eye-opener! Dropping Arpeggiators, Chord makers and Random units in front of a synth plugin can be a great way to create MIDI clips that would take an age to program by hand (or wouldn't even be vaguely possible with a mere MIDI keyboard) - but before we get too carried away, there's just one little problem. How do you get the MIDI output from the MIDI effects into a separate MIDI clip, so that you can store that serendipitous Random output, edit the bum note that came from the Arpeggiator or record the notes you're playing with the computer keyboard because you're on the train'
The answer: MIDI routing! In this Ableton Live 9 tutorial, I'm going to show you how to work with Live's MIDI routing so that you have unfettered access to a whole new world of musical MIDI wizardry - you can also download free MIDI files used in the following discussion, at the end of the article. Let's get started!
Arpeggiator MIDI Routing: Show Me The Way
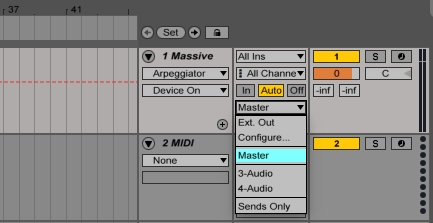
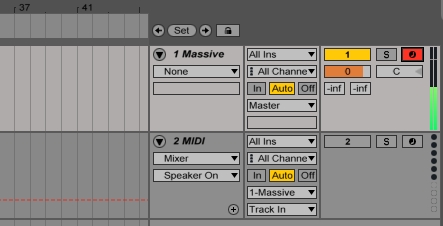
In the image above, you can see that with a plugin (in this case, Massive) loaded on my MIDI track, I can only route the audio from Massive out of the track. It's going to the Master bus at the moment, which you can see in the routing panel below the yellow Auto monitoring box. In front of Massive on the device view for this track however, I've placed an Arpeggiator which I've been playing with whilst listening to how it sounds when triggering a Massive preset:
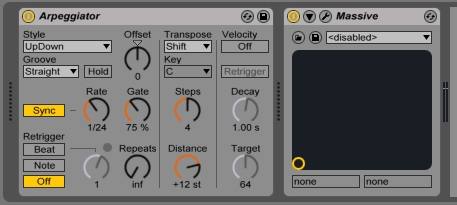
The MIDI clip I'm using is just a couple of chords over two bars, which sounds like this:
And through the Arpeggiator, it sounds like this:
Pretty cool, huh' But I don't like the very last couple of notes. I want to edit them so that the notes lead back into the Bm chord that begins the loop, and continue rising melodially rather than descending at the last moment. I can't do this using Arpeggiator alone, as I'd have to change the chord back to Bm just before the end of the loop, which would start the Arpeggiator back at the root note, rather than continuing upwards.

So, I need to route the multitude of MIDI notes coming out from Arpeggiator out of the track before they hit Massive and get turned into audio, which I can't edit easily. How can I get round this' Well, in the image above, you can see that in a naked MIDI track with no instrument on it, the same panel that would let me choose where audio from Massive goes now shows 'No Output'. Clicking on it would let me route the MIDI to another MIDI track, or crucially, another MIDI track with an instrument on it.
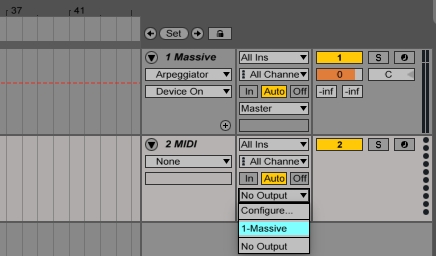
If I send the output of this pure MIDI track to the Massive track, I can now simply drag my MIDI clip and the Arpeggiator out from the Massive track and onto the new MIDI track, where the MIDI will get sent to the track with Massive on it...but wait...there's no sound! That's because you need to Record Arm the Massive track, like so:
Now, you can hit record and Ableton Live will miraculously print those arpeggio notes into a new clip! Here's my Arpeggiator output:

This makes the output of the Arpeggiator directly accessible for editing. Here's the MIDI with my edits at the end of the loop:

So, this is how the loop sounds with my MIDI tinkering included:
Ableton Live At Random
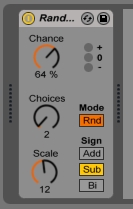
Using exactly the same method, we can extend this technique to other devices within Live - let's check it out with Ableton's Random Midi effect. Tweaking the controls on the effect, I get a range of voicings of my two chord loop. By printing a couple of these into new MIDI clips, I can string them together to add some variation in order to create a 4-bar loop rather than the 2 bars I had originally, whilst remaining in key. Awesome! You can also use this effect on just about any MIDI track that features repetitive material looping over and over, for a bit of spice. Here's how it sounds:
A, D, G = C: Recording Output From Computer Keyboard MIDI
So, you should be starting to see how you can use this technique with a host of tools within Ableton Live to spark new musical ideas. As a final example, and just because I love using it, I'm going to show you how to record the output of Live's insanely handy computer keyboard MIDI facility.
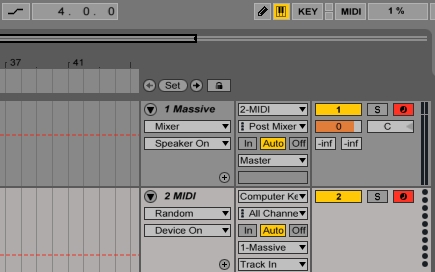
We need the same two tracks as before (a track with a MIDI instrument on it, and a separate MIDI-only track). Again, we can stick MIDI effects on the MIDI-only track that we might want to record whilst hearing them run through our MIDI instrument'the routing is only a little bit more involved - you can see it in the image above.
Firstly, make sure that the computer keyboard button is on - it's the button at the top right of the screen, between the Draw Mode Switch (the pencil) and the Key mapping button. Now, route the output of the MIDI-only track to the Massive/instrument track, and make sure the MIDI-only track's input is set to 'All Ins' or 'Computer Keyboard'. On the instrument track, choose the name of your MIDI-only track in the top drop-down menu - mine is called '2-MIDI'. Finally, Arm the record button on both tracks (you will probably need to hold down Control on Windows or Command on Mac in order to switch on the second one without switching off the first). Hit record and...voilà!
Now when you next work on a tune whilst on the move, you can tap away at your keyboard and everyone will think you're the funkiest and/or the most inept accountant around!
Be sure to check out some of the gorgeous MIDI clips included in our Ableton Live and Massive preset packs such as Dawn House, Exposure and of course, our gargantuan House Generator.


