
Chopping up drum loops for re-sequencing into fresh beats has been a staple technique in music production for decades now. In times gone by, this would have required a turntable setup, some vinyl records, a hardware sampler, and a fair chunk of time!
There is still merit to this 'old school' way of doing things, but fortunately for those of us in the digital realm (and frankly without the money, space and time for the hardware approach!) there are tools built into almost every DAW to help us slice and dice our favourite loops in no time at all.
In this quick tutorial, I'm going to show you how to chop a beat into a playable drum kit specifically in Ableton Live - for those who want the TL;DR - I'll start off with the main steps:
1. Create a new MIDI track and add a Simpler instrument to it.
2. Drag your drum loop onto the Simpler.
3. Set the Simpler mode to 'Slice'.
4. Set the playback mode on the Simpler to 'Poly'.
5. Right-click on your loop inside the Simpler, and click 'Slice to Drum Rack'.
6. Voila! You have a Drum Rack instrument loaded with sliced drum samples from your loop.
Let's dive a little deeper and get into some detail!
Could It Be Any Simpler?
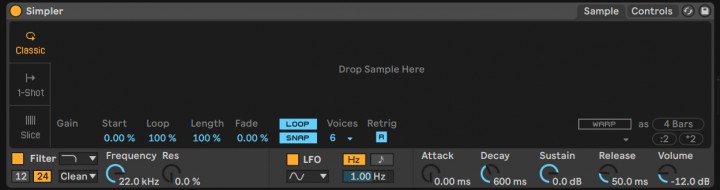
The first step is to create a new MIDI track and add a Simpler instrument to it.
Make sure to use the 'Simpler' and not the 'Sampler'. They are quite similar instruments, with the 'Sampler' possessing much deeper control and sampling functionality. It can sometimes be confusing knowing which one to use in certain scenarios; however as a rule of thumb, if you want to slice something up, just use the Simpler.
Drag And Drop
Before carrying out this step, I think a bit of pre-editing of our loop is a good idea. Let's have a listen to the drum loop we've chosen to chop up - this one comes from our Outrun - Synthwave Loops pack:

Listen carefully for how many different drum hits are in the loop. Over the course of the 4 bars, a lot of the same sounds are repeated until the end. We only really need to extract one slice of each hit.
So what we should do now is identify the smallest possible section of the whole loop that includes all the hits we want - there are a number of ways to do this, but one of the great things about the Simpler instrument is that you can edit the loop inside it before you slice.
Let's now drag our loop into the Simpler and take a look how we do this:
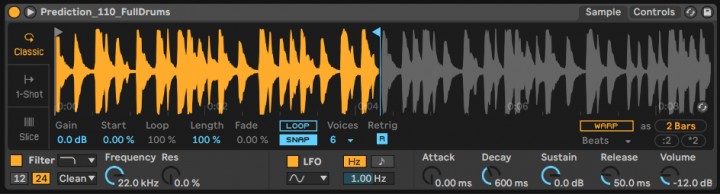
Once our loop is in Simpler, we can see two flag-like markers on the left and right hand sides - these are adjustable and allow us to specify which part of the loop we want to actually use.
As you can see above, I've moved the right marker towards the left and placed it where the end of the 2nd bar would be - this section contains all the hits that I'd want to work with in a drum kit.
Get In The Mode
Next, we tell Simpler to slice up our loop by setting the mode to 'Slice'. By default, it will analyse the file and slice according to where it sees an obvious transient. This is usually the most appropriate mode for chopping up drum loops.
If you're wanting to chop up a more sustained sound like a synth pad or orchestral texture, you may wish to slice by 'Beat' for example, which would slice the sample based on musical timing divisions.
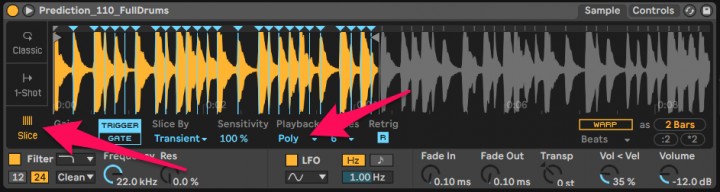
We also want to set the Playback mode to 'Poly' as it's set to 'Mono' by default. In Poly mode, Simpler allows us to play more than one sample at a time.
On a real drum kit, you can use both hands and feet to play several drums at once (if you're good!), so it makes sense for us to enable this setting. It's important to do this before the next step also.
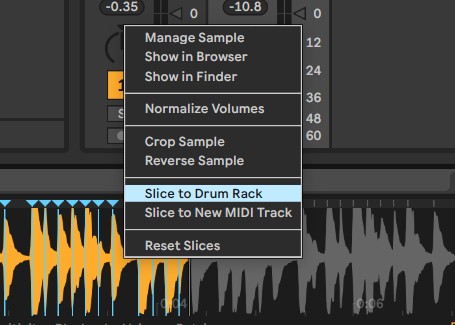
Slice To Drum Rack
Right-click on your loop inside Simpler, select 'Slice to Drum Rack' and, as if by magic, your Simpler has now turned into a Drum Rack instrument, which is essentially a group of Simplers loaded onto separate pads (and triggerable by different MIDI keys).
You can now click the preview buttons on each drum pad to hear your chopped drum samples, or if the track is armed for recording, pressing the keys or pads on your MIDI controller should also trigger the sounds.
You'll almost certainly find that certain hits have been duplicated across different pads - whilst sometimes this can actually build nuance into your kit as the hits may have been played at different velocities in the original loop, often you'll just want to delete the duplicates and leave yourself with a single part of the drum kit per pad.
Let's take a look at some more finishing touches before wrapping up.
Extra Steps
At this point, you're up and running and ready to re-sequence your loop and programme new beats. However, there are a couple of house-keeping steps I like to take beforehand, to make my beatmaking workflow as smooth and as straight-forward as possible.
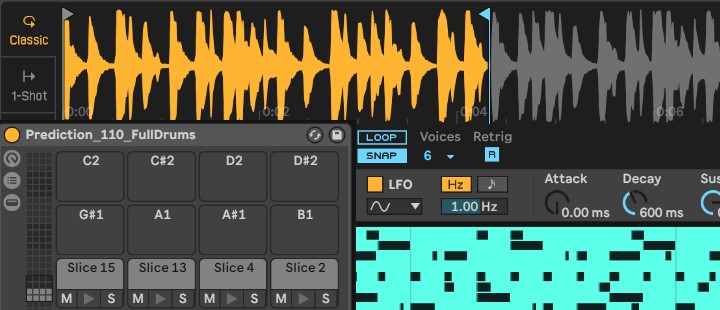
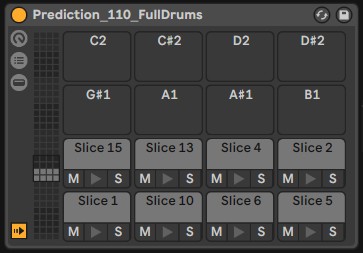
Looking at your new Drum Rack instrument you'll probably notice the rather generic pad names ('Slice 1', 'Slice 2' etc). If you skipped deleting pads at the last stage, then they'll be obvious to you now as well.
The first thing I do is re-arrange the pads by dragging one of each sample I want into the pads near the bottom. I then delete all the other pads that contain duplicates or slices that I don't want. You can see here how I've dragged various slices into new positions here:
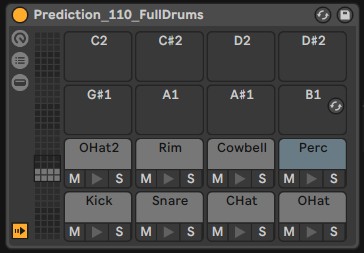
I now go through and rename each pad to something more meaningful. This is done by first clicking on the pad, hitting command + R, and typing in a new name:
Let's finish things off by adding Live's Drum Buss device to the track to get the kit pumping a bit more.
We're now ready to programme some beats! Let's drop in a drum MIDI file from our Vintage Drum Loops pack and convert our original Synthwave drum loop into a bouncy old skool Hip Hop break:

And it's as simple as that! In a matter of minutes we've taken a drum loop into Ableton Live and completely make it our own.
It's worth noting that you can tweak each sample within the kit as well, adjusting volume, fades, pitch, and all the other parameters available to you within Simpler.
To build the most interesting kits, try to using loops that contain a wide variety of sounds and you'll soon find yourself with kits and beats like no one else. Until next time, get creative!


