In this tutorial, I'm going to introduce you to the Morph Square in FM8 - a really cool way to coax interesting new sounds and transitions from your trusty FM8 presets, introduced in the upgrade from FM7 to FM8! With just a couple of clicks and some dragging, you can set up custom performance groups and make some of the craziest wobble basses imaginable'

What's This'
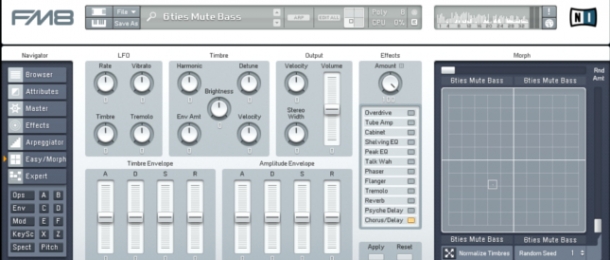
The morph square can be seen in all its glory on the Easy/ Morph page in FM8's interface (see lead image). Here, you can see the large-form morph square for fine manipulation, and set randomisation parameters - more on these later. However, the real power of the morph square is accessed via its diminutive form, in the top bar in FM8's interface (above).

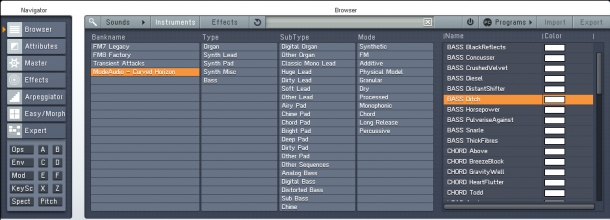
The smaller morph square allows you to drag presets out of the Browser and onto any of the smaller morph square's four corners. For a start, this lets you have four presets loaded into one instance of FM8, so you can save on CPU if you're using the presets separately. As the name implies, however, what this is really for is morphing smoothly between the presets you've loaded.
Four Corners Of The World
It's quite hard to get tired of dragging random presets out of the Browser and onto the morph square, and then shifting the little red cursor around to the sound of all sorts of warbling, explosive little sonic accidents. With time, however, it becomes clear that to really make this facility useful, you need to be quite selective about which presets you choose.
Starting with a basic sound, you might want another, brighter sound for accenting rhythmic weights in a groove, or a heftier sound to shift to in a build up. Trial and error is a great - and fun - way to fill up the four corners. You can then automate the morph's X and Y parameters in your DAW for smooth transitions, or record your noodlings to a new track for more expressive, detailed phrases.

Morph Bump
You might notice that there's a limiting factor in using the morph square, however - when the oscillator waveforms change at the crossover point from one preset to another. This results in something of a sudden change in sound quality, right on the line. If you've automated the X and Y controls precisely, you can make this happen at specific times for musical effect, but it's better to just smooth out the abruptness. This is where the randomisation controls come in.
To the sides of the large morph square are two sliders - labelled 'Rnd Amt'. These spread the change points for individual parameters out over a larger area of the morph square, meaning that when the cursor crosses into a new corner, the waveforms don't all change at once. When you're using more complex presets, this really helps to break up the abruptness of the changing sound!
Variations
Another option is to make variations of sounds, pre-loaded into the morph square. To do this, make sure that you click the 'Edit All' button in the top bar before you start programming your sound. Once you've finished making the preset, switch off the Edit All function, and select which corner you'd like to embellish using the morph square. Now, you can tweak the parameters to whichever extremes you'd like to reach when using the morph square! This is a great way to retain maximum control over your sounds - if you have the sound design chops, of course.
Rise Up
You may notice that when morphing between presets, the pitches of individual oscillators shift up or down if they are set at different ratios or offsets in the presets. This is a neat way to build some crazy risers, no' Go ahead: set the pitches in one corner to lower values, and in an adjacent corner, set them higher (way higher - you can go up to 64x the original pitch)! Now, you can automate the X or Y parameter to get a highly complex, interesting riser sound to crank up the excitement in your next production!
The patches used in the above sound examples are from our Curved Horizon - FM8 Vintage Presets pack, grab it and get morphing now! Be sure to explore our complete collection of synth preset packs as well.


