
A few weeks back I showed you how to program a pad using Lennar Digital's excellent Sylenth1 synth plugin. There's much more to Sylenth1 than just the ability to make warm, analog-style musical parts, though - this week, i'm going to take a look at how we can use Sylenth1 to make risers, those upward contours that crank the tension up in anticipation of a drop, making for some deliciously satisfying sonic euphoria! You'll have the chance to download the riser patch used in my guide below at the bottom of the article - let's dig in!

Raw Materials: Oscillator A1 + Amp Envelope
First things first, we need to choose a few basic sounds to throw in to our riser. The obvious place to start is with the first oscillator, which is number one on the 'Part A' page of Sylenth1. The default wave shape is a Saw wave, but I'm going to set this to the Quarter Pulse wave. This one still has the full, gritty quality of the Saw wave, but with a slightly more hollowed-out quality which will let some of the other elements I'll add later come through in the finished article.
As I'm triggering the riser using a held, 4-bar MIDI note on middle C, I've set the oscillator's pitch down by 3 octaves so that we have enough distance to go up in pitch before the sound becomes inaudible! I'm also going to raise the number of voices up to 4. This gives us 4 individual Quarter Pulse waves playing at once, and means we can use the Detune control to offset their pitches against each other for a less stable tone.
Importantly for a riser, we also need to set a long attack time for the Amp Envelope. Risers are all about variation over time leading to the end of the riser (at which point the drop happens), and a long attack means we can make the riser a crescendo up to the end point. Go ahead and set up Oscillator A1 and the adjacent Amp Envelope like in the image above.
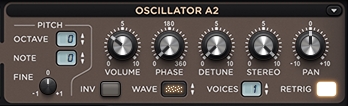
Textures: Oscillator A2
Noise works really well alongside pitched elements like our Quarter Pulse. This is because it fills in the spectrum above and below the rising pitch, as white noise covers the full bandwidth of our hearing. I need to give Oscillator A2 a single voice and set the wave shape to Noise; I've also turned down the volume so that it's not overpowering.
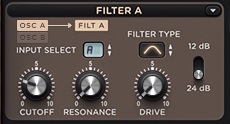
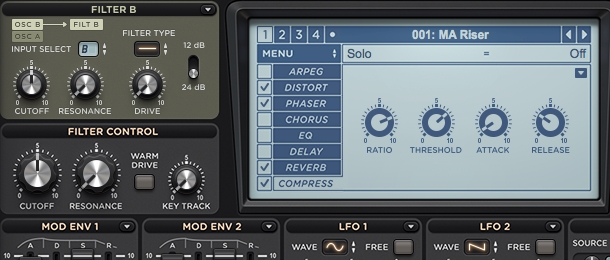
Sculpting: Filter A
As you can hear, the sound at the moment is quite bright - there's a lot of noise and upper harmonics taking up the higher reaches of the spectrum. I want to cut most of this out so that once we start modulating the riser upwards using the Modulation Envelopes, it feels like there's some real motion to the sound. I could use a Low Pass filter shape on Filter A, but this would leave a bunch of bass as the filter cut off opens up. I want to cut this out, too, for the same reasons as I want to get rid of the highs at the start. The answer is to use a Band Pass filter, which I'll set to a fairly low frequency so, again, we have some distance to cover before it reaches the end of its travel.
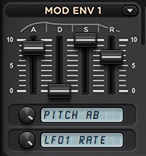
Motion: Mod Env 1
Now let's get this baby moving! The Mod Envelopes are the perfect tool to use - we can set them to the same length as our Amp Env A attack so that we arrive at the top of the riser with the sonic adjustments we're making reaching their peak at just the right moment. So, I've got a long attack time, and also quite a long release - we don't want the riser's pitch to drop the instant we release the MIDI note as it sounds a bit too much like shifting back into reverse.
The destination parameters I'm sending the Mod Env's control signal to can be seen in the image above. Pitch A B is an obvious one, as we want the riser's pitch to rise. The second assignment is the LFO 1 Rate - we're going to use LFO 1 to control some filtering, and if we make this assignment here, it'll speed up as the pitch of the riser rises.
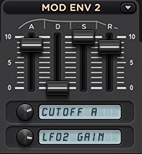
More Motion!: Mod Env 2
That Band Pass filter we set up on Filter A really needs to travel upwards, too, as you can hear it's deadening the latter part of the riser. So I've dialled in similar attack and release settings to Mod Env 2 (you could alternatively set Mod Env 1 as the source on one of the Misc modulators) and routed it to Cutoff A. I'll also send a bit of this envelope to the LFO 2 Gain; not sure what I'll use it for yet, but it's always useful to have options ;)
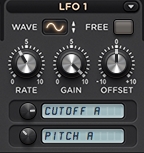
Adding Some Timbre: LFO 1
I'm going to use an LFO to add some faster, periodic modulation to that Band Pass filter too, now. This will help to keep things nice and busy, adding extra interest to the Noise. Remember that the rate of LFO 1 is increasing over the course of the riser due to my assignment of it from Mod Env 1, so I'm going to dial down its base Rate so it doesn't start off too quick. I need to turn its Gain up too, so that it's doing some more intense modulation, which is what we want in a riser. I've also assigned the LFO to Pitch A, but this time with a negative amount - now, the Quarter Pulse on Oscillator A1 will vary, too. As the general pitch of it rises (due to the assignment in Mod Env 1), it will squiggle upwards and almost get quick enough to start off some frequency modulation - things are getting interesting now!
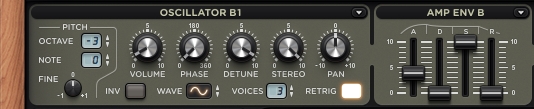
Thread Running Through: Oscillator B1 + Amp Env
I'd like to add a bit of simple Sine wave at this point, to clearly demarcate the rising pitch of the riser and add some bass to the start. Dropping the pitch of Oscillator B1 down by 3 octaves, I've turned the Volume way down (we don't need much) and cranked the Voices count up to 3 for some hefty Detuning. The Amp Env has a faster attack time to make this Sine wave audible as a separate element at the start of the riser.
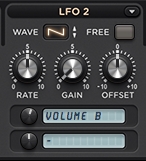
A Final Touch of Motion: LFO 2
I'm going to use LFO 2 to break up the sound of the Sine wave a little, so I've assigned LFO 2 to Volume B (not too much is being sent - I'm making subtle adjustments at this stage) and selected a Saw wave shape for it, so that it pulses rather than fades on and off.
Finishing Touches: FX
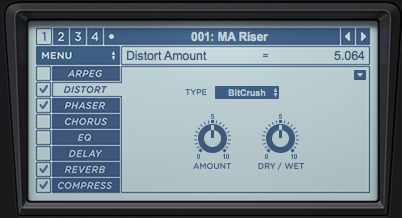
To make this riser really shine, we need to enhance it a bit with some FX. I'm using Distortion in the form of some Bit Crushing, first of all. This adds a bit of crunch and also breaks up the linearity of the crescendo (Bit Crushing removes the very quietest parts of anything that goes through it, such as the very start of our riser - hence the 50% Dry/Wet setting I've chosen).
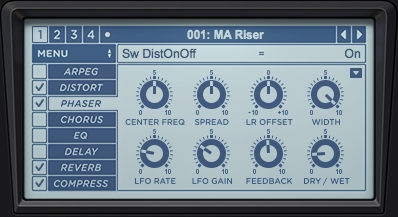
Just a small amount of Phaser mixed in gives us a bit of extra motion and interest.
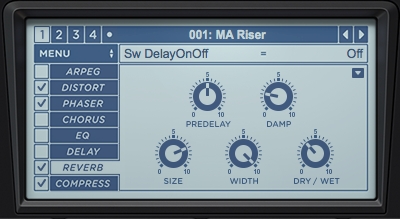
Some Reverb makes the end of the riser a bit less abrupt.
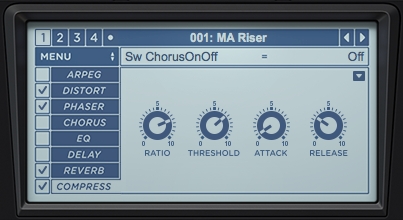
Some Compression gives us a more constant volume output over the course of the whole riser.
And that's it! A number of different elements, all aligned with modulation and directing the listener to the end of the riser and the goodness of the drop just around the corner. I hope this tutorial has been useful, and don't forget to try tweaking the riser (also adjusting the attack times to make it reach the climax on time, depending on your track's BPM) to get a feel for the power of Sylenth1!


