In a previous article, we talked about speaker placement with a view to getting an even frequency response and balanced stereo image at our mixing position. Where we place our speakers is one aspect of optimising our studio environment, the other is acoustic treatment.
There are many types of fancy devices with interesting names that can be deployed for the purpose of acoustic treatment, and as usual this is a field that one can really go down a rabbit hole with!
We appreciate that most of you out there are likely bedroom producers, with some lucky enough to have a spare room for the purpose, without the resources to invest in a highly optimised studio space. So, in this article we're going to cover the basics of acoustic treatment and provide some tips for how you might approach it in a humbler setting.

As always we like to put emphasis on the creative process, and whilst it's great to keep technical considerations such as room acoustics in mind, we don't need to let them become an obstacle to making great music.
Take it from us, you can spend days in a top-of-the-range studio with all the bells and whistles, and come away with nothing at the end of it. And, on the flip side, you can make a banger in your kitchen with nothing but a laptop and pair of headphones. Anything's possible!
With that said, let's dive in to the why, what and how of acoustic treatment and give you an understanding that you can incorporate into your own music making.
Acoustic Treatment: Why Bother?
Before getting into specifics, let's remind ourselves why we might want to consider some acoustic treatment for our studio.
If you read our previous article, 7 Rules For Speaker Placement, you'll remember that our main goal there was to try and limit the affect our room has on our overall sound. This is also our objective with acoustic treatment, and both concepts should be used in conjunction to tackle this problem more fully.

You might then ask, "Well, why exactly do we want to limit the affect our room has?", and it's a valid question!
Consider this scenario - you're making a track in your new home studio, and you decide to add a fat bass line. The low end frequencies sound too overpowering, so you reach for an EQ plugin and make cuts in the bass. You're happy now because your track sounds more balanced.
You excitedly send your track to a friend, who immediately responds with "It's pretty good, but it's lacking some bass energy". "What? How can this be possible?" you would legitimately think!

The key takeaway from the scene above is that the track only sounded good in your studio and not in your friends', and this is the crux of studio acoustics - the reflections in an untreated room will make you think you are hearing something in the music, when in fact you are hearing the affect of the room.
This will impair your judgement and cause you to make bad mixing decisions i.e - your mix will not 'translate' well to other environments.
You want your music to sound as good as possible everywhere, whether that's in another studio, a car stereo, a smartphone or a club, and this is what acoustic treatment (along with speaker placement) can help you achieve.
Ok, So What Can We Use To Help?
So now we've established why we might want to consider using acoustic treatment, what form does this actually take?
As we pointed out in the introduction, acoustic treatment comes in all shapes and sizes, but the two main categories are absorbers and diffusors. Within these categories you can find further sub-categories and even combinations of the two, but we're not going to overly complicate things for you here.
1. Absorbers
Absorbers are used, unsurprisingly, to absorb sound waves. In an untreated room, many sound waves will reflect off the hard surfaces and then arrive at our ear, along with the sound directly from our speakers.
An absorber is typically a rectangular-shaped panel filled with porous material such as rock wool (mineral wool) or fibre glass. The friction between the material and the sound energy passing through it causes many reflections to be absorbed, or converted to heat energy.

The thicker the porous material, the more effectively the panel will absorb lower frequencies, however you can only make a panel so deep, and these are typically most effective in dealing with mid/high reflections.
Bear in mind that not all sound waves will hit the panel straight on - so some bass frequencies arriving at an angle will get some absorption as they have more material to travel through.
2. Bass Traps
Bass traps can be considered a sub-category of absorbers. Sometimes it can be confusing when looking into commercial absorbers because the terms 'absorber' and 'bass trap' are often used interchangeably.
This is because some 'broadband' absorbers can offer decent absorption right down the frequency spectrum, however a bass trap should be designed specifically to target lower frequencies.

Again, bass traps can come in many different forms, but they're often triangle-shaped in order to allow them to slot into the corners of a room - this is where a lot of bass energy typically builds up.
The topic of bass traps is probably another article in itself, such is the prevalence of bass-related problems in musical environments, and you might see references to 'velocity' and 'pressure' traps in this context.
In this article, we're only really touching on velocity absorbers, as anything else would only be a concern for those who don't have budget and space restraints. We can still achieve effective results without breaking the bank and we'll see how later on.
3. Diffusors
Diffusors act in a different manner to absorbers - instead of drawing energy out of the room, they scatter (or diffuse) sound waves into the room. They are also typically aimed at frequencies at 1,000Hz and above.
Again, these can come in all manner of designs, the most common of which tends to look like a flat, rectangular panel with wooden blocks of varying heights attached to one surface.

The uneven surface on the front side causes sound waves to be dissipated throughout the room in a randomised manner, helping to avoid the dreaded 'flutter echo' effect that can happen between two parallel surfaces.
Diffusors allows you to treat the mids and highs without affecting the room reverb time too much, and can also help to keep a faithful stereo image from the mixing position.
Many acoustics boffins advise that diffusion should only be considered once you have adequately addressed low end problems in the room - with diffusors often being added to give a certain 'sweetness' to the sound. It's worth noting that diffusors cannot be used to 'extend' reverb in a room that is already quite dead sounding.
Stage 2: Practicalities
In this section we're going to offer a basic approach to how you might treat your room. Of course, every room is different, and ideally needs its own personalised treatment to deal with its unique problems.
However, most of us don't have the luxury of a custom, professional job, so we can apply some basic treatment ourselves to at the very least get the ball rolling.
So, working on the assumption that your studio is a small to medium-sized rectangle, and that you don't have thousands of pounds to spend, here are some things you can try:
1. The DIY Approach
For the absorbers, you can purchase some 100mm Rockwool, place it inside a simple wooden frame (you can even use an old bookshelf for this) and staple some stretchy, fire-proof material over the front side.

If you want to get more bang for your buck, make the frame 200mm deep and keep the 100mm slab flush with the front. The absorption will be comparable to having 200mm slabs in place. Either way, make sure you don't leave any fibre-like material exposed and use a mask and gloves when handling it.

You can build bass traps for the corners of your room with the same insulation slabs suggested for panel absorbers. Cut your rectangular slab into 2 equal squares, then cut across the diagonals of each square to give 8 triangles.
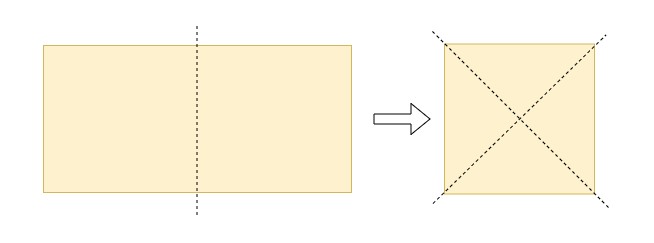
These triangles can then be stacked on top of each other and placed neatly into the corners of the room. The extra depth created by the shape of the material now makes it more effective at absorbing lower frequencies than our rectangular panels above.
It would probably be best to attach some simple wooden bracket to the wall too, so the slabs can slot in nicely, and some fire-proof material can be stapled across the front.

Diffusors are available commercially in all sorts of fancy designs. Some are even very precisely designed to target specific frequencies and scatter them in a certain way, although for our humble home studios this might be a bit overkill.
One DIY approach is to take a large, flat rectangular wooden panel, and glue an assortment of 100mm x 100mm wooden blocks of varying height to one surface. The taller the blocks, the lower the frequency they are capable of affecting, but these are really intended for the mids and highs.

My favourite approach is the tried and tested homegrown 'record-shelf' method. Assuming you have a substantial enough vinyl collection, perhaps padded out with some books here and there, you can create your own truly personalised diffusor with an IKEA shelving unit.
Just make sure to fill it out in a randomised manner, and it should work just as well as something purpose built.

The reason I like this approach is because it prevents the studio from feeling too sterile. For most of us, this room is not only for mixing and mastering, but is also a creative space where our musical ideas come to life.
We need a certain ambience or energy for a room in which we want capture inspiration, and what better way than surrounding yourself with your favourite works of art.
2. Where Should I Position Things?
Typically the first place you're going to put absorbers are on the walls to the left and right of your mixing position, as well as behind the speakers on the front wall. Another spot on the ceiling above your head is another common reflection point, so consider adding one here if you can fix it securely!
To get the placement exact, the standard method is to sit in your mixing position and have a friend traverse the perimeter of the room, holding a mirror against the wall. Each time you see a monitor's reflection, that's where a panel should go.

The corners of a room tend to be where sound pressure levels are high in the bass, therefore this is where you tend to find bass traps positioned.
Try placing your triangular bass traps in each corner, starting with the two in front of the mixing position. Ideally you want to fill the whole corner from floor to ceiling. One of the principles of using bass traps is that quantity is everything - you can never have too much bass trapping.
Assuming your studio is of a decent size, the diffusor tends to go on the back wall behind your listening position. In very small rooms, you may find a diffusor to be ineffective, as there's not enough room space for waves to be dispersed into.

The Final Word
Hopefully by this point you have an understanding of why acoustic treatment is used and what it often entails. You should also have a few ideas and a starting point for thinking about how you might apply it to your own studio.
Remember - we're trying to temper the effects of our room on the sound we hear, in order to give our music the best chance of translating well to other environments.
Start with absorbers at the first reflection points that are as deep as possible, so you can get good broadband absorption across the frequency spectrum. It's probably better to install deeper, but fewer panels, rather than a load of thin panels in several places.
After this, you might try to target the bass a bit more by addressing the corners of the room. If you can't fill the whole corner right away, ideally aim for the middle and try to build out to the corners over time.
Only once your absorbers are in place is it the time to think about diffusors, but if you opt for the record shelf technique it wouldn't hurt to have it in place from the beginning.
One thing to bear in mind when treating your room, is that ideally we want to bring down the reverb decay evenly across the frequency spectrum. If we use absorbers that only reduce reflections of the mids and highs, then we'll end up with a 'boomy' room where reverb can still be heard in the bass frequencies.
If you're still in the early stages of your music production journey and still figuring out your DAW, you probably don't need to think about this too much yet. Only when you're ready to share your music with the world should this be a consideration.
A final word on acoustic foam - stay away from it! It's expensive and ineffective. Good luck and happy mixing!