

We all know that whilst producing a track can be an incredibly exciting experience, the flip side is that it can also be a painstaking and lengthy one. This results in something that many of us are guilty of - when the arrangement finally does fall into place, we can be too quick in our rush to export, unleashing a track that could in fact do with a few more minutes in the oven on an unsuspecting world!
The problem is that by this point, there is a good chance that our ears have lost perspective on the mix. Listening to the same thing for hours on end can desensitise us to imbalances in the given track, so it's important to remember that once the arrangement is complete, there is another distinct phase in the chain that should not be overlooked: the mixdown.
It's crucial that your session is tidy and you're in the right frame of mind to get the most out of this stage of production, so I've put together 10 top tips to ensure you get there, every time. May the countdown commence:

1. Take A Break
As I said above, it's easy to get carried away by the momentum of your own production process - you've finished the arrangement, so it's time to dive straight into the mixdown, right'!
Wrong! A great approach here is to take a break before moving on - the longer, the better in my view, from a few days to even a full week. This allows you to come back to the mix with completely fresh ears, as well as a new enthusiasm for your track which may well have dwindled over the course of working 30 days straight on that pesky percussion part!
2. An Outsider Perspective
You may have already been sending clips to friends during the production of your track, to get a bit of feedback and reassurance. This can be incredibly positive and useful, but what's even better is to have someone sit in the room with you as you listen to the whole track.
The strange thing with this process, is that all the imbalances and shortcomings in your track will suddenly seem immediately obvious to you, just by virtue of having someone else beside you.
It's as if you hear the track through their ears instead if your own - obviously, the more technically aware your fellow listener is the better, so that they might be able to offer corrective tips but this trick can work surprisingly well with someone who just loves music as a listener alone.

3. Watch Those Levels
Again, this goes back to the concept of keeping your ears fresh - I think you're probably starting to get the hint regarding how important I believe this is!
You want to keep your master volume at a level that is comfortable for listening, occasionally turning it up to see how things translate at a higher volume but only to return to a lower one for the majority of your session.
Celebrated mixing engineer Chris Lord-Alge actually recommends mixing at the lowest possible level you think you can get away with, arguing that it's much easier to spot subtle shifts in the mix when everything is quiet generally. If it's good enough for the pros, it's good enough for us!
4. Housekeeping
When you're deep in the throes of creativity, it's easy to get lost in your track - I mean this quite literally, in the sense that you can end up with an unwieldy and cluttered session that makes it hard to locate any part in particular.
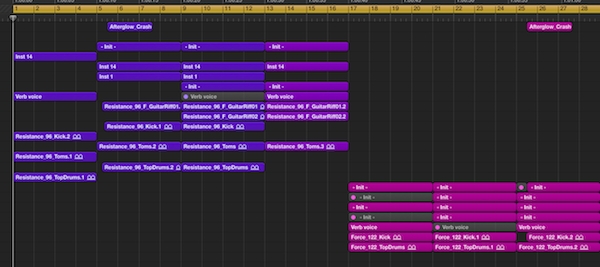
This is why it's important to make it clear what everything in your track represents - use meaningful channel names, such as 'sub kick' or 'disco guitar lick' and if possible, colour-code different aspects according to some meaningful criteria.
I like to colour-code segments and clips based on structure, so when I'm jamming an arrangement, I know that I will use the 'purple' clips in the intro, for example. All of this aids in helping you work more quickly and efficiently.
5. Consolidate For Clarity
If you have multiple instances of the same sound or instrument across several channels, consider if this is really necessary. If they all require the same treatment on the FX chain, then bounce them down to a single file that can be used on one channel in the DAW - this will clean up the project visually, as well as freeing up the computer's processing power.
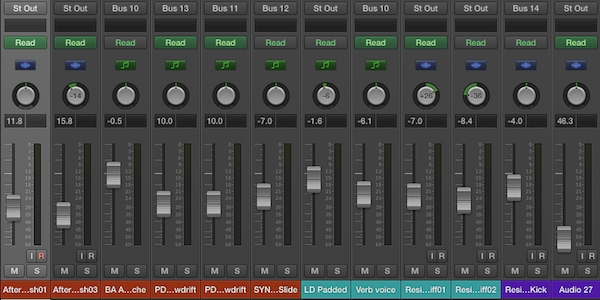
6. Arranging Your Mixer
Make sure the way you have your channels stacked in the DAW is logical i.e. the synth instruments are next to each other, all the vocal tracks are adjacent, the FX is all together etc. If you have up to 80 tracks in your session, you don't want to be endlessly scrolling up and down to find that one backing vocal line that you desperately need to tweak!
7. Grouping & Bussing
If you're not familiar with this strategy already, a great mixing approach is to group sets of sounds that belong together by bussing them out to distinct channels.
It's very common to group all the drum sounds together for example, once you have achieved a nice balance within the kit itself - you can then adjust the overall level of the kit while mixing the rest of the track, without upsetting the internal balance of the drums.
This can also be applied to your SFX, background synths, vocals parts and so on - assigning sets of sounds to a specific bus group will also allow you to apply the same set of processing plugins to multiple instruments, again saving you on some CPU power.
8. Prune Those Dead Channels
This may seem obvious, but it's easy to let your track count grow exponentially when you're in the depths of your latest spurt of inspiration. So, take a few moments to check that anything present in your DAW is absolutely necessary for the final track, again helping to make your session more navigable and visually tidy.
Sometimes I'll find that I have muted channels or musical segments because I'm unsure whether I'll find use for them later, for example. In these cases, I tend to hit 'Save as'' in the DAW and keep this project version as another potential avenue that the project may go down.

9. Remove The Silence
This will mainly apply if you've been doing audio recording, however if you're using samples, it's possible that they also might need some trimming (all of our samples come pre-trimmed and precisely edited, of course). Things like electrical hum, ambient noise and vocalists breathing can be cut out using your DAW's editing tools, or dedicated plugins such as De-essers, noise gates etc.
Even if these sounds seem innocuous in and of themselves, the cumulative effect of several on top of each other can amount to something significant - of course, this might be an aesthetic you want to aim for, but it won't work for every track and every style!
10. Cutting Inaudible Frequency Space
As well as getting rid of the 'silent' audio sections, you'll also want to tackle the frequencies at the top and bottom of each sound that are largely inaudible. This can be achieved by applying low and high pass filters, adjusting the cut-off point to the frequency just before the quality of the sound begins to be affected.
It's also good to try shifting the cut-off value with each track both solo'd and when heard as part of the whole mix, so you can get a sense of how the overall balance is affected as you proceed.
So there we have it, 10 tips to keep you on your toes and your session moving along swiftly as you progress from mixing, to mixdown and finally, to mastering. I hope you've found the above useful and happy cleaning and tidying up those dusty projects!


