

Picture the scene; you’ve just finished that long-overdue reorganisation of your drum samples folder, getting rid of all the chaff and leaving only the very best sounds behind.
You fire up your DAW, load up some choice picks and jam out the deepest groove you’ve put together yet - the next day, after listening to some of your favourite music for inspiration, you open up your beat again only to discover that it sounds a bit limp and weak, without much depth or vibe.
Sound familiar? Now, the problem could well be that the drum sounds you’re using simply aren’t going to cut it when compared to the work of the best producers out there, but let’s assume you’re getting your samples from a reputable source (wink, wink).
So, you’ve probably already tried some transient shaping here, a little EQ and compression there, and whilst this has helped to beef up your drum sound and add some punch, things are still sounding just a little but flat somehow. The question then becomes, where to turn next?
In my opinion, one of the best tools you can utilise in adding some real presence and character to your drum sound, is reverb. It’s often the magic ingredient hiding in plain sight, helping to draw disparate sounds together into a single sonic space and context, as well as delivering the atmosphere and sheer excitement of acoustic space to dry, electronic sources.
My own technique for working with reverb on drums is a two-stage process, so let’s break it down using some audio examples so we can really here how profoundly things can be affected by just a little bit of verb. Let’s go!
Stage 1: Drum Reverb
To demonstrate our ideas today, we’re going to need some drum sounds. To accentuate the point, I’m going to work with the driest, most electronic sounding drums I can think of; those belonging to the legendary TR808 drum machine.
Here’s a simple beat, cooked up with some of the sounds included in our recent Cassette 808 Drums mini pack:
Don’t get me wrong; these drums sound punchy and full straight out of the box, without much need for additional processing. However, there’s a certain sterility to them, a lack of ambience and presence that could be helping to glue the overall sound together and give it character.
This will become especially clear when we start adding some reverb - the first part of the process is to apply a reverb that will act on the entire drum sound as a whole, which I will refer to, simply enough, as a drum reverb.
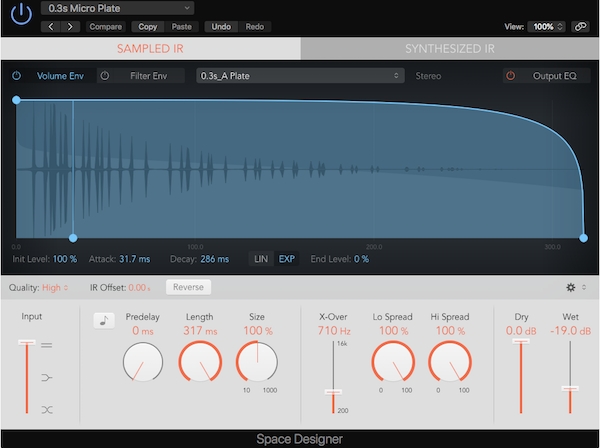
The reason for even making this distinction is that, once you begin experimenting with reverb on drums, you’ll quickly learn that it’s really only certain types of reverb and impulse responses that are fit for this purpose, namely those with very short decay times.
Before continuing and for the sake of clarity, I’m going to use Logic Pro X’s native Space Designer plugin as my reverb source through my demonstration, which is what is known as a convolution reverb. This type of reverb applies short recordings taken in real acoustic spaces to a dry signal of any type, resulting in very natural sounding effects.
Other types of reverb utilise algorithms and digital processing to mimic the complex patterns of reflections that occur when a source radiates a sound in 3 dimensional space - typically these produce less realistic sounding results, which doesn’t mean to say they aren’t musically interesting in their own right.
I typically prefer the results I get with convolution reverb, which is why I’m using Space Designer for our purposes here, but there’s no reason at all why you shouldn’t try the same ideas out with other types of reverb.
Ok, back to the discussion at hand - here’s my beat from above, but with a standard, medium-length decay reverb applied:
We can instantly hear that this is much too much; the drums sound totally drowned in this reverb, with the decays of previous drum hits blending with and reducing the transients and impact of later sounds.
Now, let’s try the same beat but with a much shorter decay reverb applied:
That’s better! This reverb doesn’t get in the way of the transients (the attack portion) of our drums, yet helps to glue them together and make them sound like they’re coming from, or situated in, the same sonic space.
We can now pull this reverb back in the mix to the point where we’re not even really hearing it has a distinct reverb sound; yet when it is removed, the drums sound instantly less vibrant and exciting.
Here are the drums now with the reverb first bypassed and then turned on:
Hear what I mean? It’s subtle but once you start working in this way you’ll never want your drums to be without just a little bit of verb!
Stage 2: Bus Reverb
It’s time to move onto the second phase of my drum reverb process, which I’ll refer to as the bus reverb stage. This is when we send individual drum sounds to a reverb that is also receiving other sounds from the track in question, like bass, synths and vocals.
Why would we do this when the drums are already sounding good? Well, we managed to get our drums sounding more like a cohesive whole when we applied some reverb, so it stands to reason that when we bring other musical elements into the mix, we’ll have to do some work to glue them all together too, right?
Here’s our original drum pattern mixed in with some other elements (as featured in the demo of Cassette 808 Drums):
It sounds nice as it is, but I think we can do a little bit more work to make the different elements of the track sit better together - I’ve setup another instance of Space Designer on a bus track and am going to send a little bit of most of the instrumental elements to it.
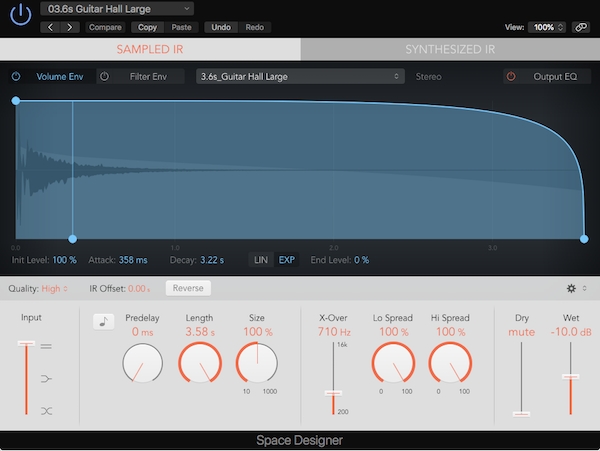
The reverb is this time going to be longer decay, so it sounds like a real acoustic space - rather than sending the entire drum sound to this reverb, I’m just going to send individual sounds, wary of how the drums sounds last time when I sent them all through a longer decay reverb unit.
Here’s the beat again, this time with the clap and hats sent to the same reverb as the bass and synth elements of the track:
Again, the effect is quite subtle, but I hope you’ll agree that the results are sounding more unified and nicely balanced now.
Rounding Out The Beat
I hope you have picked up something useful today in my demonstration of the important of using some reverb on your drum sound. Reverb is useful not just for helping with the mix and balance of your drums, but also in adding some depth, character and vitality to your percussion.
I’ve used reverb in really quite a subtle way above, so I hope you can envision taking the technique in other directions - much further for example, to a place where it’s very over-the-top for a totally different effect and sonic flavour.
Until next time, load up those reverbs and get creative!


