

Sound design is an incredibly creative discipline, incorporating a wide range of versatile technologies, synthesis methods and processing techniques to shape and sculpt sound in almost any conceivable way.
These processes range from the stupefyingly complex and academic (FFT processing is but one example), to the wonderfully simple and easy to implement.
The technique I'm going to look at in this article thankfully falls into the latter category. The art of playing back the samples stored in an audio file at a variable rate, known as sample rate conversion, provides an uncannily effective process for transforming sound.
By simply changing the rate of sample playback, a humble tap on the surface of a table can become a deep, resonant, booming impact. A scraping sound can morph into a frenetic, high-pitched dance. Lightly flicking some stretched tinfoil can be transformed into a sharp-edged hi hat sound.
The best part is that all this can be achieved by the click of a button and some quick bouncing down. I'm going to take you through the process in Logic but it can be similarly applied in pretty much all the other major DAWs. Before we begin however, let's take a look at some terminology.
Back to School
What exactly does sample rate even mean' To understand this, we need to first know that what is typically referred to as a singular 'sample', or audio file, is in fact made up many thousands of distinct samples.
CD quality audio stores 44,100 samples in every second of data, which has become a standard in many types of audio production. This means that in a 5 second-long 'sample' of a kick drum sound, there are actually 220,500 samples or pieces of info stored.
Sample rate thus determines how quickly or slowly the virtual playhead in your DAW reads through the individual samples stored in your audio files. So, if we play through our 5 second kick drum sample at 44,100 samples per second (44.1kHz), it will play back at normal speed. The interesting part is where we change the rate above or below this norm.
When we push the rate up and beyond the original value, two things happen - we get an increase in the perceived pitch of the sound and the file becomes shorter. The former occurs because we are beginning to play or cycle through the samples stored in the file at a quicker rate than they were recorded or originally stored.
This therefore shortens the wavelength of the resulting sound, which is one of the most important pieces of information the ear and brain use to determine pitch (shorter wavelength = higher pitch).
The latter happens because we simply run out of samples sooner than before, as we are playing more back per second. Now that your brief science lesson is over, let's move on to the fun stuff!
The Big Pitch Up
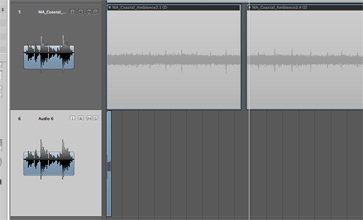
We'll begin by pushing the sample rate up above our test sample's normal rate. If you're not sure what the normal rate is, open up Logic's audio bin (cmd + 9 is the shortcut) and look for the name of the file in the list; sample rate and bit depth will be listed alongside filename.
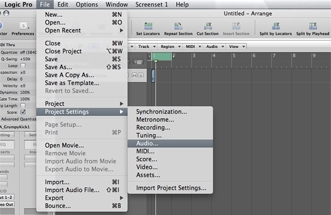
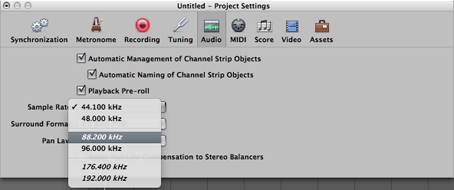
Sample rate conversion in Logic is achieved simply by entering your project settings and selecting the 'audio' tab. You are then free to select a new sample rate from the available options. Let's first try some rates above 44.1kHz; the kick starts to sound like a tom, then bongo, then a tiny tap the higher we go.
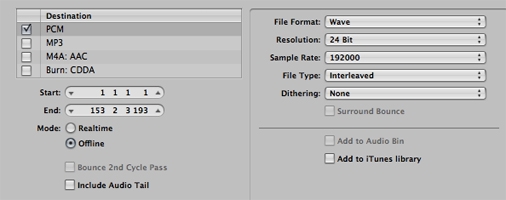
Let's say the bongo sound is what you're after. In order to then use this sound with the other parts of your project at their normal rate, you'll need to solo this audio file and bounce it out at the normal project rate (probably 44.1kHz). Logic will then hardcode the new sample rate in the resultant audio file so that when you bring it back into your project with the original rate applied, it'll sound like it did when you pushed up the rate before.
This type of processing is particularly effective in the creation of hi hat and small percussion sounds. Find anything metallic - scissors snapping, bin lids being struck, car hoods being pushed down on - and increase the sample rate up above its normal rate; instant success!
Murky Depths
Whilst boosting the sample rate is highly effective, by far my favourite use of this technique is taking the rate lower than the original. In the reverse situation of what was described above, when we lower the sample rate we stretch out the wavelength of the stored audio, therefore lowering the perceived pitch. We also increase the length of the file.
This type of processing is great for creating drums out of unusual sounds. Sample rate convert a thigh slap to create an interesting kick sound; push down the rate of a can being opened for a strange clap or snare sound. Lowering the sample rate is also perfect for creating atmospheres, textures and ambient beds for your music.
Field recordings are the perfect choice here - car engines; wind in the trees; the sea spraying against the side of a ferry; all are great candidates for sample rate conversion.
One caveat with lowering the sample rate, is if you are working with sounds that are sampled at 44.1kHz the general audio quality will begin to deteriorate the lower you go. This is why 44.1kHz has become something of a standard and why audio sampled at higher rates, commonly 48 or 96kHz, is often desirable for sound design purposes.
In fact, Logic doesn't let you set the sample rate lower than 44.1kHz, so one way round this is to sample rate convert your audio to a higher rate first before then lowering. So for example, let's say you have a field recording at 44.1kHz. Select this sample and bounce it out at a much higher sample rate e.g. 192kHz.
Then, bring the new audio file back into your 44.1kHz sample rate project. Voilá - you've just effectively lowered the sample rate of this file to around a quarter of its original value!
A great trick is to find a recording full of activity, perhaps a cityscape full of car sounds and the clanging of building construction. Lower the sample rate and listen back to it carefully, then snip out any clear transients or attacks you hear.
Take your favourite slice onto a new track and open up an EQ or filter - cut away some of the boomy lows and isolate the attack; congratulations, you've just designed your very own percussion sample!
I hope to have introduced you to a new, exciting processing technique that you'll be able to begin using instantly. As with many aspects of sound design, your imagination (and sample collection) is the only limit and the results can often be very surprising. Until next time, get creative!
Check out our complete range of SFX, texture and ambient sounds to get your sample rate conversion experiments off the ground.


