
Xfer Records’ Serum soft synth, created by producer and Deadmau5 collaborator Steve Duda, is a powerhouse of sonic possibility which took the music production community by storm back when it first dropped in 2015.
It has fast become one of the best-loved and most used soft synths in the game, cementing its place as the primary synth we create presets for at ModeAudio some years ago now too.
This catalogue now spans thousands of .fxp presets of all shapes and sizes, and all that time spent in the company of just a single user interface has resulted in an extensive knowledge of some of Serum’s quirkier, hidden or otherwise more advanced features.
Today, I’d like to share my top 5 of these lesser known yet extremely powerful features with you, which I very much hope you can take away and use to further your studies within the wonderful world of synthesis and sound design. Let’s get started!
1. Enveloping
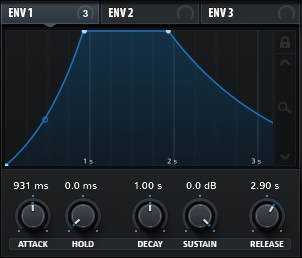
Serum offers 3 assignable envelopes which can be mapped to a vast array of different parameters. A classic use for an envelope is to shape the volume or amplitude of the output of a synth’s oscillators, which is perfectly possible in Serum by mapping an envelope to one or more of the 4 oscillator ‘Level’ knobs.
What isn’t immediately obvious from Serum’s interface however, is that the first envelope, ‘Env 1’, is already hardwired to act as a volume envelope across the output of all oscillators. This is why when you change any of the ADSR settings for this envelope, you will alter the way Serum’s overall output volume is shaped.
If you want to pair your volume envelope with other parameters, such as Filter cutoff, then all you have to do is map ‘Env 1’ to the ‘Cutoff’ dial and you will have an envelope which modulates both parameters at once.

Assigning single modulation sources to multiple parameters is a powerful way to build up networks of modulation, sonic movement and control in the sound your synth produces, and mimics how real instruments respond to a performer’s actions in the acoustic world.
For example when a guitarist plucks a string with a plectrum, the more force he or she applies to the string, the louder the resulting note.
Crucially however, this isn’t the only acoustic ‘parameter’ that the performer’s action affects; it also increases the apparent brightness of the sound (a bigger vibration of the string will produce more harmonics or partials), the length of the transient or attack portion of the sound, how long the note decays for and several other aspects of the sound the guitar makes.
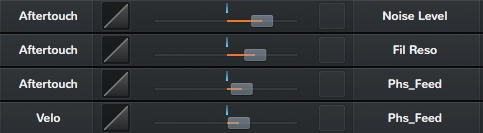
2. Expression: Aftertouch & Random
A somewhat ‘hidden’ feature of Serum (that’s if you haven’t read the manual, of course!), aftertouch modulation is pretty important in creating expressive presets and sounds which respond to a number of different gestures from the performer.
Of course there are many types of sound and even entire genres (read: Synthwave) that have little use for such additional expressive control, but for those of use who want to take our MIDI keyboard meanderings to the next level, then aftertouch mod is something you’re going to want to become familiar with!
The reason the feature is not entirely apparent upon first loading the synth is because it is not directly accessible from the main screen of Serum’s UI, or as a draggable mod source in the way that the Mod Wheel (simply labelled ‘Mod’) is.

To assign aftertouch therefore, you need to dive into Serum’s mod matrix, accessible via the ‘Matrix’ tab at the top of the UI. You’ll find when perusing the dropdown list of available mod sources that both ‘Aftertouch’ and even ‘Poly Aftertch’ (sic) are assignable, as well as some other extremely useful randomisation sources.
These sources really are a bit of a game changer when it comes to bringing new levels of expressivity and ‘performativity’ to your synth sound design and building them into your presets will introduce new dimensions of sonic complexity and control to your production and performance toolkit.
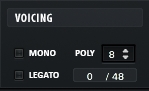
3. Voicing: Poly
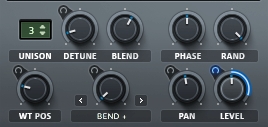
The little ‘Poly’ box located in Serum’s ‘Voicing’ section is used to determine the maximum number of oscillator voices that can play simultaneously in a given patch.
If you have a preset with just a single oscillator activated, with no extra unison voices (i.e. the ‘Unison’ box displays a 1) then this box tells you how many keys you can play at the same time.
For most presets however, the picture will be a little more complicated; you’ll most likely have multiple oscillators active (the ’Sub’ and ‘Noise’ oscillators count here too) and even multiple voices triggering in the main ‘Osc A’ and ‘Osc B’ oscillators.
This all eats into your total voice count, reducing the total number of MIDI notes you can trigger at the same time.
If you’re just playing lots of single notes, then this isn’t really a problem (unless the amplitude envelope release is very long); however, if you want to play chords, you’ll find that the oscillator engine starts to reset whenever the maximum voice limit is reached, resulting in jarring, abrupt shifts in sound.
There’s a simple way to combat this of course; make sure you set the threshold high enough to cover the total number of voices you want to sound simultaneously. There’s of course a trade-off here; the higher the Poly count, the higher the toll on your CPU usage. Just being aware of the issue is an important first step, however!
4. Voicing: Unison Width
Width has become an increasingly important aspect of modern music production, arguably mirroring the quest for every greater volume. As such, many modern synths come prepackaged with many tools and tricks for affecting the apparent width of the sound they produce.
We’ve already discussed Serum’s ability to stack unison oscillator voices in a single preset, which helps to produce a thicker, psychoacoustically ‘bigger’ sound, and another aspect of this is the way these stacked voices are spaced out across the stereo field.
When you add unison voices to either Oscillator A or B by increasing the number displayed in the ‘Unison’ box, they are automatically spread out across the full stereo field, which is great for producing big, wide results.
However, whenever your arrangment calls for more than just a single synth, you’ll quickly find that too many big, wide sounds playing together in your mix produces muddy, messy results; this is where Serum’s ‘Unison Width’ box comes into its own.
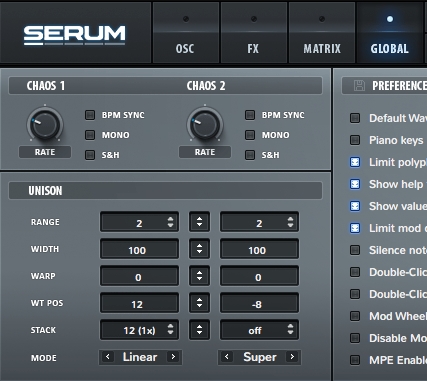
Under the ‘Global’ settings tab at the top of Serum’s UI, you’ll find a range of controls for affecting how Serum’s voice stacking, or ‘Unison’, function operates. The first column affects ‘Osc A’ and the second, ‘Osc B’ and the ‘Width’ box, set to the maximum of 100 by default, can be changed simply by clicking and dragging.
Use this when you want to dial back the width of the sound in question; for example, it can be interesting to have a primarily or foreground oscillator set to a narrower width range, say 30 - 50, with a secondary or background oscillator layer set to the maximum value.
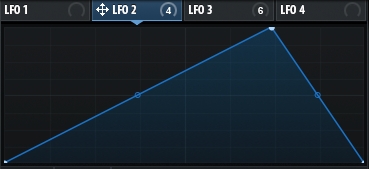
5. LFOs: Making The Predictable Unpredictable
Besides enveloping, the other quintessential modulation source open to synthesists is the humble Low Frequency Oscillation, or LFO. These very slow-moving waveforms, typically in the region of 0.1 to around 20 Hz, allow for seamlessly cycling modulations in your sound, from simple tremolo or vibrato effects to shimmering Sci-Fi pitch sweeps and far beyond.
Assigning LFOs as they come in the box is a great way to introduce classic synth flavours to your sound; however, a modulation which simply cycles at a fixed rate indefinitely is a bit of a blunt instrument, producing limited scope for sound design.
Something we like to do often in the presets we create for our catalogue here at ModeAudio, combats this by using LFOs to modulate themselves, producing more complex and less predictable shifts and evolutions in sound.
For example, one of the most basic and yet one of our favourite uses for this technique is to modulate oscillator pitch, creating that irresistibly woozy, warbling effect so beloved of analog synth enthusiasts (such as ourselves!).
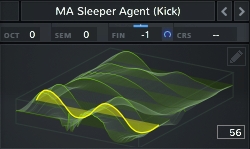
To do this, simple drag one of the ‘LFO’ mod sources to the ‘Rate’ dial of the LFO that you will then assign to the ‘Fin’ or Fine pitch control in either or both oscillators. The effect really sounds best in subtle amounts, so start by just modulating the pitch by say 10 - 15 cents or so.
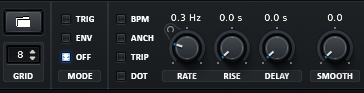
Set your main LFO to something very slow, say 0.3Hz, with the LFO used to modulate the main LFO’s rate to something slightly higher, say 0.6Hz. Even this simple, 2-layer LFO network produces a satisfying pitch warble that is obviously shifting constantly but not at an obviously fixed rate.
You can obviously hugely expand on the network by introducing a 3rd LFO to modulate the 2nd LFO’s rate, use the initial or main LFO to also modulate the second LFO’s rate in turn and so on, and this is before we even think about changing the LFO’s shape to build in more complexity to the way the modulation affects Serum’s parameters.
A Workhorse, A Sonic Universe
I hope the above has helped to shed some light on some of the more shadowy aspects of Serum’s functionality, which can nevertheless unlock new dimensions of creative control and musical possibility for your productions.
From modulation and expression to voice stacking and width, these features touch upon a wide range of Serum’s celebrated synthesis capabilities and I hope you’re looking forward to incorporating some of them into your synth workouts soon!


