
Do you ever get frustrated that your House beats seem to lack a bit of, well, 'oomph''! You're using high quality samples and have some production know-how but even still, once you've cooked up a groove and are listening back to the fruits of your labour, things just sound a bit lightweight when compared with your favourite tracks - I know the feeling!
You might have already tried adding more samples, layering things to thicken up the sound, but that just seems to muddy and unbalance the rhythm - well, have no fear, you've come to the right place!

Today I want to take you through some quick tips that will help you to achieve a chunkier drum sound, and none that will take you more than a minute or two to implement in your DAW.
We'll begin by introducing a typical House beat, albeit one lacking a good dollop of vibe. We're just going to focus on the 3 main drum parts for this demonstration - kick, snare/clap and hi-hats - as this is all you really need to get a nice House groove going, after all! Here's the original groove:
As you can hear, it doesn't have too much going for it, so let's start tinkering to chunk that beat up!
1. Crush Your Hats
We'll start with the hats - a quick and easy way to thicken up the sound of the humble hi hat is to run it through a bitcrusher. All too often our hi hats can sound too thin and tinny but using a bitcrusher plugin to reduce the sample rate will add some weight to the mid range resulting from harmonic distortion. Here is our hi hat pattern as it stands now:
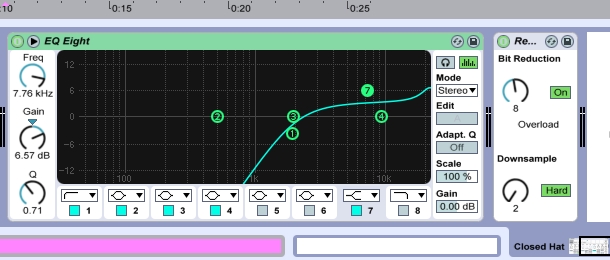
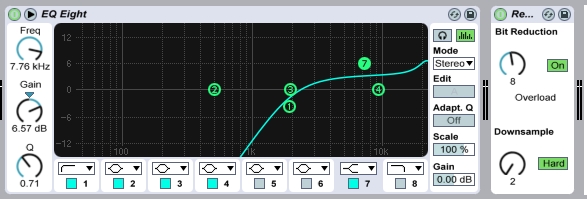
Now let's use Ableton's native Redux plugin to lower the bit depth to 8 and set the Downsample knob to 2. The knock-on effect of this is that we will lose some of the higher frequencies, so let's put a shelve EQ first in the chain to boost the top end:
As you can hear, our hat pattern now has a bit more body and hiss to it, which will help it cut through busier mixes. This technique also helps to give it that old school lo-fi feel that is popular just now.
Try not to lower the bit-rate too much, as you'll start to introduce too much hiss - as ever, you need to be careful to get the balance just right. You may also want to add a low pass filter after the bitcrusher in the FX chain, to weed out any unwanted bass frequencies that are introduced.
2. Snare and Clap: Layer and Spread
I mentioned layering in the intro above and although this technique can quickly become a bottomless rabbit hole that never seems to get you where you want to go, when used in moderation it remains an invaluable tool for helping to beef up your drums.
The crucial thing here is to choose sounds that already fit well together, then apply some light EQ to gel them together.
Another little trick that works wonders here is 'spreading' the samples slightly along your arrangement timeline, so that they don't line up perfectly. This will help to give that thick, full-bodied sound we're after. Here is our sole snare sample as is:
It's pretty lifeless as it is, so let's add a clap sample with a bit of 'crack' to amp things up - digging around in our Hybrid Drums - Live & Electronic Drum Samples pack turns up a sample that's just right. At this point, a good approach is to get the loop playing, dropping in various samples as the loop cycles, as this will help you quickly find a sound that fits well.
Now we've found the right sound, we'll roll off a bit of the bass and top frequencies of the first snare sample, accentuating the mid-range as well as allowing the 'snap' of the clap to cut through.
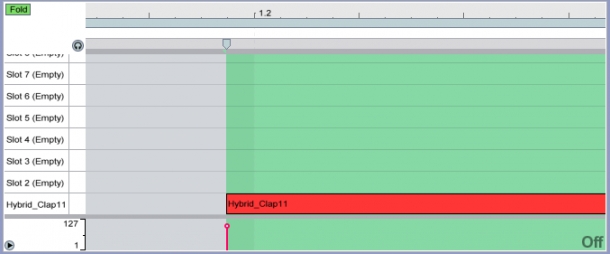
We'll also move the clap sample slightly before the downbeat - this is a tiny adjustment but makes such an impact when combined with the kick to produce that deep 'crunch' on the 2 and 4 of your 4-to-the-floor beats.
After layering, it's also good practice to route the samples to a group/bus channel and apply a light bit of compression to help them gel. Here is the resulting sound:
So far, so beefy - now let's move onto our final element, the all-important kick.
3. Cut your Kick
Now this might seem counter-intuitive but when it comes to the kick drum, I find that removing some of the sound can really help to give it that 'chunky' feel. This has to do with shifting the emphasis towards the low-end - remember that when you take away from a sound, you throw the spotlight on a different part of the frequency spectrum.
Again, the key here is to start off with the right sample - one with plenty of sub boom as well as hi-end punch. I've found something I like in Hybrid Drums again - what we want to do now is roll-off almost all of the top-end. Here is our original kick sample:
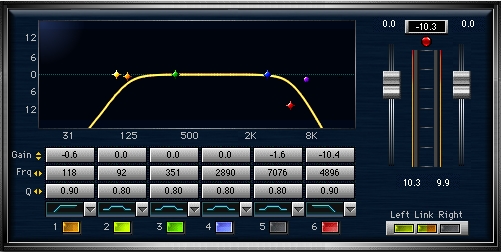
Now let's add a low pass filter and EQ to sculpt out those higher frequencies:
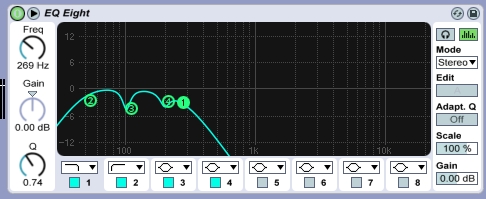
As you can see, I've added a couple of notch filters cuts to tone down some other lower frequencies that I didn't want. This should help to give our kick that deep sound you often hear in underground House styles.
If we were going for an Electro-style pattern, we would want to keep most of those higher frequencies to give more punch and 'crack' to our kick, so of course these techniques need to be considered within the context of the style you're going for. Here is the resulting sound:
On its own, it is difficult to hear how this helps fill out our beat, so let's put it all together:
So there we have it, 3 short, easy but effective tips for bringing that chunk to your House rhythms - try them out for yourself and get creative!


