
When it comes to creating your own drum sound, one of the best methods I've discovered is to take a set of pre-existing samples and blend them together. The idea is to take certain elements that you like out of the different sources and craft a new sample that combines just those elements.
Before we begin, we've done a number of articles on the power of layering already here at ModeAudio, so I suggest checking out our drum layering tutorial before reading on.
The Lo-down
Ok, let's crack on with the key concept behind today's tip - turning this layering technique into a more intuitive process. What exactly do I mean by this' Well, let's see if we can remove the computer screen and mouse from the equation for the time being, and we'll start to get a feel for the gist of the process.
Instead, we're going to focus on achieving our sound crafting with a MIDI controller. This might just free up some brain bandwidth for our ears to hear more acutely than when using other parts of our network of senses simultaneously, as well as allowing us to 'feel' our way towards the right balance of sound.
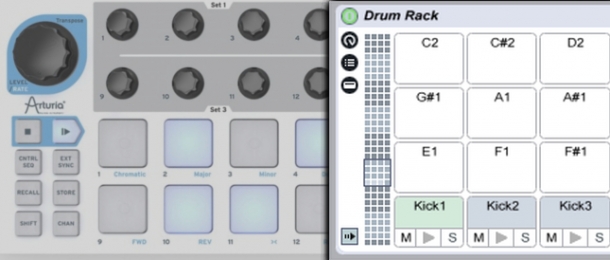
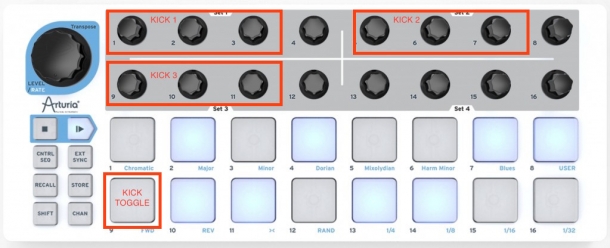
For this purpose, it makes the most sense to use a MIDI controller with knobs that we can assign to different EQ parameters. Faders would also be useful, as we can assign these to volume controls for mixing, however knobs are fine for this too. In my case, I've gone with the Arturia Beatstep which is a really handy and affordable controller.
It has 2 rows of 8 dials and 2 of 8 buttons, in a typical MIDI controller layout. There are a number of ways you can setup this process within your DAW of choice, but for demonstration purposes we're going to use Ableton Live's Drum Rack device to sculpt our own layered kick drum sound.
Setting The Scene
You might be surprised to hear that the samples you choose to use in this process don't have to be meticulously pre-matched - in actual fact, the serendipitous bringing together of almost randomly selected sounds can lead to surprisingly satisfying results.
Of course, if you'd prefer you can specifically shoot for a certain 'subby' kick matched with more of a 'toppy' sample and so on, but in my example I'm trying to take a more careful and thorough look for the best qualities in my chosen samples without any preconceptions.
Assuming you have 3 different kick samples ready to blend now, let's begin by creating a new MIDI track in Live, adding a Drum Rack, and dropping each sample onto its own pad on the rack:

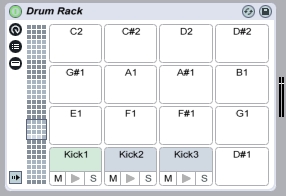
I've used 3 samples from our Hybrid Drums - Live & Electronic Drum Samples pack as it contains a whole host of different percussive flavours, and having listened to each sample individually in turn, I've decided on the qualities I want to isolate - I want to use the subby, bottom-end of the first sample, the low/mid-range thud of the second and finally, the high frequency 'fizz' of the third kick.
Here are the sounds I've chosen:
We'll also need to create a MIDI clip that will loop the playback of all the kicks together:

For The Love Of FX
Now let's go into our Drum Rack and start adding the FX we need for sculpting purposes, before hooking up particular parameters to our MIDI controller for screen-free tweaking.
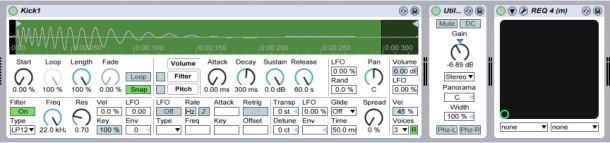
On the FX chain of each kick, I've added a Utility device to manage the volume and an EQ plugin so we can sculpt specific frequencies individually. In this section we can also adjust the sample's start and end time before we really get going.
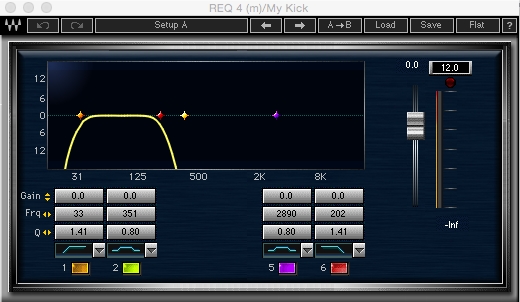
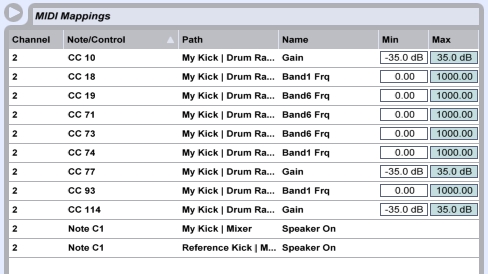
For the EQ plugin on each kick pad, I've set up a low-cut and high-cut filter, then assigned the frequency parameter to a knob on my MIDI controller. I've also assigned a knob to the gain parameter on each Utility device.
So, for each kick sample we have 2 knobs controlling the frequency range and 1 knob controlling the output volume. We may also want to add an additional channel to our session on which to place a 'reference' kick i.e. a nice kick sample taken from a record that roughly represents what we're trying to achieve with our layered sound.
To this end, I've added a 4/4 kick loop clip to this second channel but have deactivated/muted it for now.
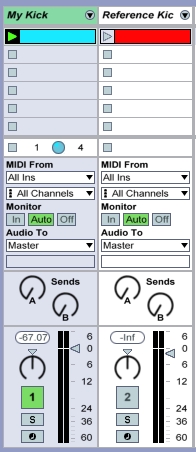
Once we've assigned all required parameters to our MIDI controller, we're now ready to hit play and start tweaking. Notice how I've also setup one of the pads to toggle between the 2 channels, so we can quickly go back and forth between our own kick designing and the reference kick sound (for this, you need to assign the same pad to the same parameter on each channel using Live's MIDI Mappings tab, so that when one is activated and the other is deactivated).
Close Your Eyes, Open Your Ears
Now we can trigger both loops simultaneously, start twiddling those knobs and sculpting those sounds without ever having to look up at the screen! At this point I like to turn up the master volume a little, close my eyes and really let my ears take over. You'll be surprised at how meditative and enjoyable a process this can be!
Try to intuit your way towards a nice sound at first - you can always look back at the parameter values on the screen if you want to do a bit of fine-tuning afterwards.
As we've explored in previous layering articles, a very useful and organic way to think about layering sounds is by breaking things down into frequency bands. As I said above, I want to use each of the three kick samples to satisfy specific frequency criteria - this makes my sculpting efforts a heck of a lot easier than if I was just randomly scanning around each sample (though, this can be an extremely fruitful exercise in its own right).
After a bit of fiddling around, I've isolated the frequencies I want to use from each kick sample. Here's how they sound:
All that's left to do now is mix them together, plus I like to add a bit of compression, EQ and limiting to the group/bus channel to help gel the individual sounds into a cohesive whole. Here's my finished kick:
I'm very pleased with my finished sound - it has a nice, resonant thudding quality to it and it doesn't lack in any of the 3 broad frequency regions, low, mid and high.
So there you have it - a simple but effective way to layer your drum samples intuitively, using your ears alone! People often associate MIDI controllers with melodies, beats and automation in your tracks but I hope I've shown you how effective they can be in taking your FX plugins out of the box, even creating custom hardware FX units like this nifty little kick sculptor in the process!
Final Suggestions
1) You may also want to assign a pad that will solo each individual kick sample too, so you can do some fine-tuning on the fly.
2) It's a good idea to spend 20 minutes or so just 'learning' the knobs. You want to get a feel for how turning each knob affects the overall sound, so play around with things for a while as if you were learning how to use a new instrument.
3) You might want to try adjusting the acceleration settings of your knobs (if possible), making them more or less responsive depending on your preference.
4) The knobs on the Arturia BS are infinite rotation (meaning they just keep on turning forever), which makes it more difficult to know exactly where you've left things set after leaving a particular knob for a while. For this reason, you may prefer to use a MIDI controller with fixed throw knobs, though in my experience it doesn't make a huge difference.


