

In today's vibrant music production landscape, big is very often better. Owing in part to the constant march of the loudness war and the resurgence of genres such as Synthwave, big, chunky, in-your-face synth sounds come pouring out of many tracks, primed and ready to bathe you in deep, oceanic synth bliss.

Turning a single-voice, unprocessed synth melody into something speaker-shaking might seem daunting at first. In this tutorial however, I want to introduce you to 4 handy and easy to follow methods for beefing up your synth sound.
We'll cover techniques that will deepen, widen and thicken your synth patterns into voluminous beasts that burst from your productions into the air around you!
I'll be working with a mixture of plugins, soft synths and MIDI, offering you various tools to try in a range of production situations. Let's tuck in!
Layering Part 1: Down The Rabbit-hole We Go
The first order of the day is perhaps the most obvious - layer, layer on the wall! Stacking up your soft synth sounds is one surefire way to create thick washes of synth heaven but bearing a few useful pointers in mind before getting started will help you to get better results, faster.
The easiest trick to implement here is to stack up your synth lines in octaves. This involves simply duplicating your synth MIDI notes and pitching the copied notes up and/or down the octave.
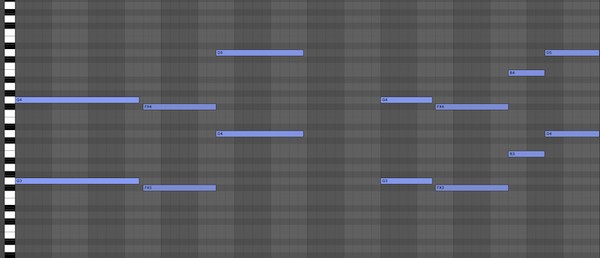
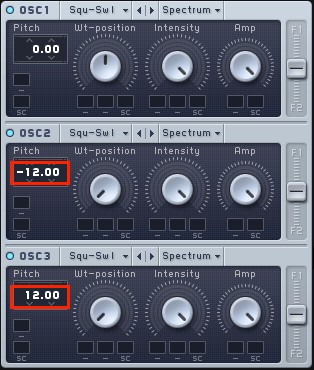
If you're not using them already, you can also use the extra oscillators in your synth (such as Massive, Serum or Sylenth1), layering more octaves without having to duplicate any MIDI notes. Simply adjust the pitch parameter of each extra oscillator up/down 12 semitones.
If you want even further control of the layered sounds, you can duplicate your synth plugin and then shift the MIDI notes up/down the scale for each copy. This allows you to process each synth copy separately.

Now, it's important to realise that adding octave voices will give your melody quite a different feel, whereas we want to make sure the emphasis remains firmly on the original melody - we want to give the impression of a single synth 'voice', albeit one that sounds nice and big!
To illustrate this, listen first to a single voice synth melody, made using a preset from Neon Dream - Massive Retro Presets, then listen to a version with 3 additional, octave stacked copies:
The stacked version certainly sounds bigger, but it doesn't feel like a single, cohesive voice. So, how do we make the 4 synth lines sound 'as one'?
We can achieve this through a simple combination of basic mixing and filtering, shifting the copied synth voices back in the mix to ensure all they contribute to the original melody is added weight and body, rather than stealing the limelight.
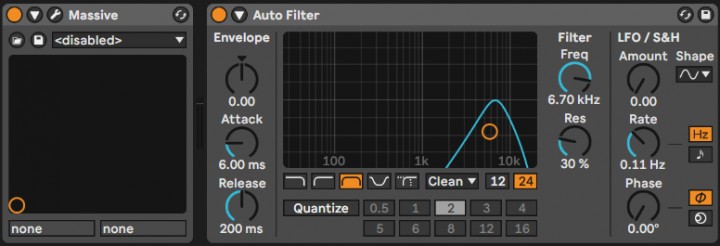
The two lower voices are low pass filtered, with drops of 3 and 9dB in their levels. The voice pitched up the octave is band pass filtered and cut by 12dB. The filtering helps to give each voice its own place in the spectrum, ensuring they don't clash with one another and the mixing blends the voices nicely and gives prominence to our original melody.
Here's the result:
Much smoother and unified, right? And all thanks to a just little mixing and filtering!
Layering Part 2: Adding Extra Synths
The next option when it comes to layering is adding additional synths, triggering the same melody but with different waveforms dialled in. Now, finding synths and waveforms that work together is a matter of personal taste but you should always remember that the idea is to create the impression of a single musical force, rather than several separate, competing melodies.
To this end, a trick that I find indispensable is sending all your synths triggering the same melody to a single bus channel and then applying group processing to the summed signal. Compression and EQ will most likely be useful here and then anything else you add on top should help to further gel the different synth sounds together into a singular voice.
Here's the same synth melody as above but this time created with 4 different waveforms:
We're getting some clashing again, so let's bus the synths out into a single, summed track. To do this in Ableton Live, hold the Shift key and select each synth track, then press Command+G to bring them into a 'Group' track.
Now we can have fun with some processing on the Group track - I've added some fast attack compression, EQ, a little tube saturation, some subtle low end roll-off and finally a touch of reverb. This all really helps to bind the different waveforms together - here are the results:

Detuning: Spare A Few Cents
The next trick I want to explore has a much more obvious effect on the overall sound but it's one of the most useful tools you can use to create those giant, skyscraper synth sounds - voice detuning.

This technique operates by adding subtle detuning across a number of duplicate synth voices, shifting phases and creating a huge, spread-out sound in the process.
Returning to our 4 voice melody from above, I can achieve this by opening up each synth and shifting the pitch by just a few cents each, within the range of +/- 15 cents. The more synth copies you add, the bigger things sound - here's 12 synth voices:
If your CPU is starting to max out having so many synth copies running in parallel, you can always bounce down to a single audio file once you've performed your processing and mixing. You can then repeat this process as many times as you need till you've cooked up one phat synth pattern!
Of course, if you're working with a fully-featured synth like Serum or Massive, then you actually have detuning options built right into the synth, making this technique a breeze to implement.
In Massive, hit the 'Voicing' tab then turn up the number of 'unisono' voices - this simply adds additional copies of your 3 waveform choices into the sound output by the synth. You'll need to increase the total number of voices Massive can output if you're opting for a polyphonic melody also.
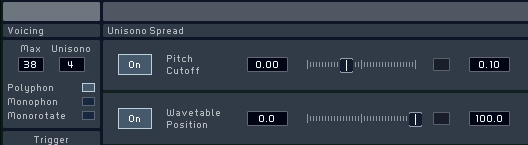
Next, set the box to the right of the pitch cutoff slider to something small like '0.10' - this is a pitch shift value in cents. Drag the slider to the right to taste (the further right is goes the more warble-like the sound will become). Moving the wavetable position slider to the right as well will create a thicker, more spread-out sound still.
Adding a little pan position spread doesn't hurt either - here's how this all sounds:
Pretty, erm, massive!
Widening: Call Up A Chorus
The last tool I want to add to your synth thickening inventory is simple but mighty - chorus! Together with the phaser and flanger, chorus works by duplicating a signal and manipulating the phase to create a constantly-shifting sound.
Chorus delays the copied signal by a small amount, mixing it back in with the original to achieve a phase-shifting effect. The delay time is often also modulated by an LFO, adding even more movement to the processed sound.
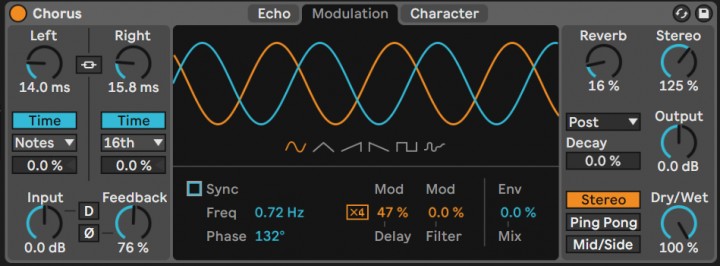
Depending on which chorus plugin or effect you use, you'll have differing processing options and parameters at your disposal but you will almost always have a delay amount in milliseconds and an LFO rate in hertz to set. In Live, I can call up the native 'Chorus' plugin and set fairly small delay and LFO values to create a subtle effect:
This effect really is an ace in the hole when trying to create big, towing synth sounds - you can even stack them in parallel to get even more movement out of our sound.
Due to our tinkering with Massive's pan position above, you'll have noticed there was quite a lot of pan shifting in our last example. If this isn't something you want in your final sound, you can use a stereo width plugin to make things sound like they're coming from a more central position.
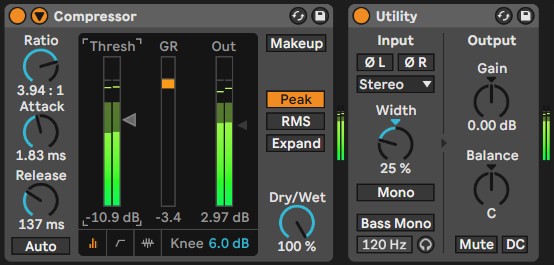
In Live, we can use the 'Utility' plugin to reduce the stereo width of our sound, I've also added a little more compression to help iron things out further:
Big Sound, Little Effort
So there you have it, 4 handy methods for boosting the size of your synth sound without breaking a sweat. Of course, it's quite possible to mix and match these techniques to achieve even fuller results, so experimentation is always useful. Until next time, get creative!


