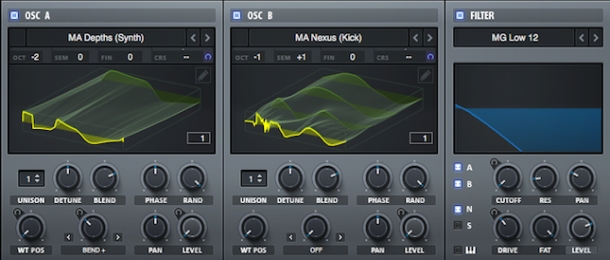
Serum, the hit soft synth plugin from Steve Duda and Xfer Records, is an exceptionally versatile beast, as capable of producing full throttle EDM leads as it is delicate, rusty, analog-style pads.
When we first discovered it here at ModeAudio a few years ago, it quickly became our go-to synth, and has featured in many of our sample pack releases as well as, of course, our expanding range of Serum .fxp preset packs.
As is now the standard for any professional-level soft synth, Serum is fully-featured, offering wavetable oscillators, enveloping, filtering, a noise generator, effects processors, LFOs and endless modulation routing possibilities - as such, it can be used to synthesis an almost bewildering variety of sounds.
Today, I want to guide you through one of its more unusual uses, in generating drum sounds and sequences, to help expand your knowledge of its inner workings and demonstrate just how much it can do.
For further evidence, simply listen to some of our Serum pack demos (Sift, Touch and Silhouette might be good places to start) but for now, let’s fire up our synth and get tweaking!
1. Synthesising Drums
A synth might not be the most obvious place to turn when attempting to generate drum sounds, with many classic drum machines in fact utilising recorded acoustic samples for playback, rather than genuine synthesis.

There are of course one or two exceptions to this, with the most famous drum machine of them all, the Roland TR-808, using synth circuitry to generate sound.
Typically, when attempting to synthesise a drum sound, the task is divided between creating the resonant, tonal decay of the drum head or skin, and the sharp, snappy transient or attack.
These two sounds are usually generated by an oscillator using a standard waveform, often a sine tone, and noise generator, which are then mixed together to produce a single hit.
In Serum, we can give these tasks to Osc A and the Noise generator, respectively.
2. Synthesising Drum Resonance
The classic method in synthesising the resonant decay of a drum sound is to apply a short, rapidly decaying envelope to the pitch of an oscillator producing a sine wave. This create a kind of transient snap in itself, as well as the falling pitch of the decay portion of the sound.
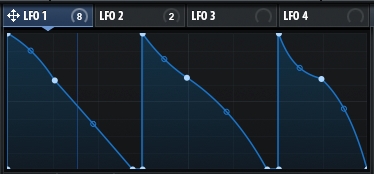
You can choose to apply the same envelope to the pitch as to the volume of the oscillator also, or use a separate envelope for each. I’m actually going to use an LFO to draw in the shape of my pitch and volume envelope, as it offers more flexibility than Serum’s standard ADSR envelopes (more on this later).
I’ve loaded a kick sequence preset from our Screenplay - Serum Cinematic Presets pack to deconstruct and demonstrate the stages in this tutorial - here’s the basic kick sound, using three slightly different envelope shapes to show you how they influence the resulting sound:
This preset features its very own, custom wavetable, as almost all the sounds in Screenplay do, which is sort of a cross between a sine and square wave. It was sampled by us from a kick drum sound, and therefore very appropriate for our purposes here!
The LFO is assigned to Osc A’s course pitch control, set to a modulation depth of 90, as well as its level or volume dial. I also have it assigned to the wavetable position (WT Pos) and warp dials, but these are just giving us subtle tonal modulations and aren’t core features of the kick sound.
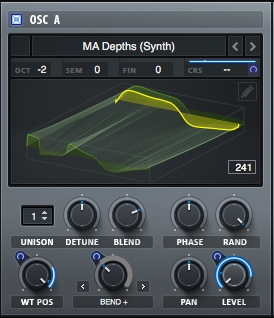
You’ll notice I’ve lowered the octave of the oscillator also and I’m using a very low MIDI note of F0 to trigger Serum in my DAW - these settings are all relative really, what you’re really aiming for is to have the energy of your sound peak somewhere within the 50 and 60 Hz region. Use a spectrum analyser plugin to check this.
I like the sound of the third shape in the sequence the most, it’s the most kick-like to my ear, so I’ve tweaked the first two to resemble it also.
3. Synthesising A Drum Transient
Now, let’s move on to synthesising the snappy transient portion of our kick sound, which in an acoustic drum sound would be created by the felt of the kick pedal’s beater striking the plastic skin of the bass drum.
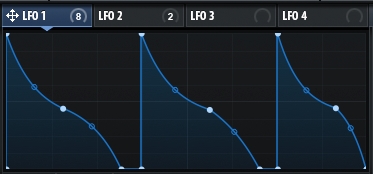
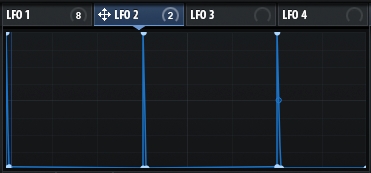
Again, I’ll need an envelope to control the level of the noise generator, but we don’t need to modulate the pitch this time, as the envelope will force the sound to decay very rapidly. Also as above, I’m going to use another LFO to sequence the same pattern albeit with much, much shorter decays:
I’m using the ARP White noise sample to generate this sound, though of course you can use any of the others in Serum’s in-built library or your own samples, as well as those found in our texture-focused Serum packs like Touch or Ionise.
The nature of the noise sample will determine the quality of this short, sharp sound, and those with lots of high frequency content work best in this context but you should always experiment to find something that suits the surrounding elements in your track.
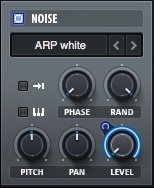
Setting the generator’s Rand dial to anything other than 0% will give us a slightly different output each time the sound is triggered, giving us a little more life and movement.
Now with a little bit of mixing applied also, here is our combined transient and oscillator sound:
4. Applying Filtering & Effects
We have the makings of a kick drum sound here but it lacks some finesse - so, now our attention turns to Serum’s powerful filtering and effects processing sections.
Low pass filtering with the same envelope controlling the oscillator pitch applied to the cutoff will help give us a more controlled kick sound - we can also use the filter drive section to lend more body and heft:
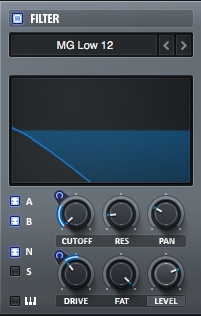
Filtering has also helped to better gel our distinct oscillator and noise sounds into a single, unified waveform.
The sound is a bit flabby still, so I can use Serum’s excellent compressor module to reign things in - in particular, using the multi-band mode can give us a more powerful, direct sound.
I’ve also added a touch of EQ to boost the fundamental frequency of our sound and some distortion for added grit, though this is modulated by the transient envelope LFO so only affects the very start of each kick sound:
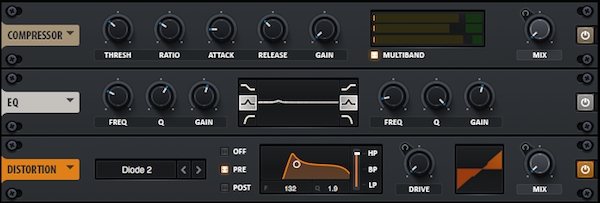
We now have a full-bodied, powerful, snappy kick sound at our disposal, which can be tweaked in any number of ways to produce different variants. Easy peasy!
5. Sequencing Percussive Patterns & Beyond
You will have gathered by now that another reason to use an LFO to envelope your drum sounds is that you can use it to sequence patterns - it might be a little fiddly at first but you can save LFO shapes in Serum for later use, so the more you experiment, the larger the bank of sequences you’ll have to draw on later.
To create hi hat sounds, go back up to the transient step 3 above - this kick drum attack sound could easily be used as a hi hat instead, possibly with some high pass filtering applied to really focus on the upper frequencies and probably a faster LFO sequence enveloping the noise generator’s level (the LFO’s Rate control is your friend here).
Snares are similar to kicks, though you’ll want the noise or transient sound to decay much more slowly, in fact you probably want it to decay slower than the resonance sound, to create that splashy effect.
You’ll also want the sound’s fundamental to peak closer to 200 Hz, so use the octave control or your MIDI note trigger to boost the energy up the frequency scale.
Our recent Screenplay preset pack is full of such percussive sequences, from explosive snare patterns and taught percussion to chopping hi hats, as well as thudding kicks. I’ve loaded up a snare and hi hat sound from it to accompany my kick sound - here’s a little demo beat:
There we have it, drum sound generation is yet another string we can add to Serum’s bow - you should use the above tutorial as a jumping off point for creating your own exciting percussive sounds, by blending different oscillator waveforms and custom noise samples.
As ever, the sky’s the limit and until next time, get creative!


