
One of the trickiest things to get right when it comes to mixing is getting the elements of your track to gel together. Whilst volume and pan automation can do a great deal to help in this regard, if you want to really blend the various parts of your track together to produce a cohesive whole, then bus mixing is the procedure for you.
Bus mixing is a simple process and one that's easy to understand if you think of the different tracks in your mix as signals that can be sent to various places within your DAW. So for example, say we have a group of similar musical elements, such as drums, that we'd like to apply the same processes to to help glue them together.
All we need to do is send those individual drum signals out of their respective tracks and into a new track where they will be summed together - this track is referred to as a bus or bus tracks.
This technique does works particularly well for drums, with compression and EQ most commonly being applied to the bus to glue the disparate drum sounds together but it is also commonly used for kick and bass parts, lead synths, pads and textures, backing vocals, lead vocals, guitar parts; the list goes on.
Logic Workflow
The following steps apply to Apple's Logic DAW but can easily be transplanted to other DAWs. A few of the elements may differ such as the location of track send dials and so on but the concept is exactly the same.
1. In Logic, identify the tracks you want to group together. It helps to move these tracks next to one another in the arrange window so you know they are grouped.
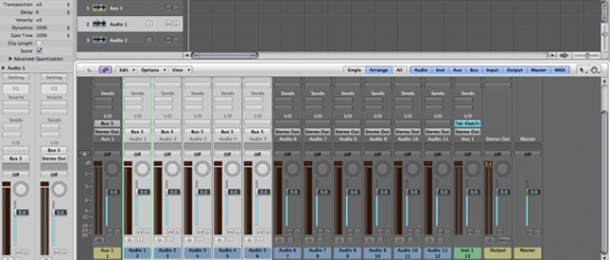
2. Open up the mixer window, click and drag to select all the track channels you're going to group. When they're all highlighted, click and hold on any output button within your selection of tracks (they will probably all have defaulted to either 'Output 1-2' or 'Stereo Out'). Navigate down to the 'Bus' options and choose a number.
3. This will automatically create a new auxiliary channel strip. This is your bus! All signals in your group are now being routed through this single channel and fader.
4. Select the grouped tracks in the mixer again. We strongly recommend you bring down every fader by at least a few dB (bring the levels down more for larger numbers of grouped tracks). This ensures that when all of these signals are routed and summed in your bus track, the resulting level won't cause the bus track to clip.
5. If you like, you can right-click on the bus channel and choose 'Create Select/Arrange Track' to create a track for the bus in the arrange window. This will allow you to programme automation on your bus track.
That's it! You can now tweak levels and panning for each individual track in the group as well as apply effects across the entire group. Compression is usually a good start, as this help to bind elements together by enforcing a single amplitude envelope upon the summed signal. Get as creative as you like!
Our Chroma Drums pack of Ultrabeat drum presets features Logic templates that utilise bus mix setups, so if you don't have the time to create your own default project, that's the place to look!


