
A few weeks ago I showed you how to make a riser/filter in Ableton Live that took care of enabling the filter and providing usable parameter ranges, all with the twist of a single MIDI control. This kind of setup is a lot easier to deal with in a live performance situation, as it means you can create clean filter sweeps to ramp up the tension before a drop without needing to press a load of buttons all at once, let alone have the three hands you'd need to accomplish the same thing! So this week, by popular request, I'm going to show you how to do the same thing in another of my favourite DAWs: Propellerhead's Reason.
This time I'm using some magisterial loops from our Remnant - Deep Ambient Loops collection, so if you like what you hear then check it out! I'm actually using the Dr. Octo Rex patches included in the Refill version of the pack, which allow me to load up and switch between the included loops super easily. You'll also be able to download the Combinator preset and loops used below at the end of the article. Let's go!
Preparing the Canvas
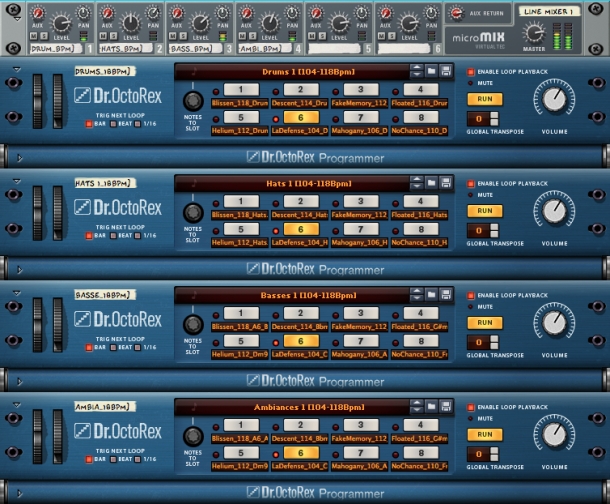
You can see my four Dr. Octo Rex patches (carrying drums, hi hats, bass and ambiance, respectively) above. I've just plugged them all into a Line Mixer to sum the loops into a single stereo bus. Here's what they sound like in their original form:
The reason I've sent the four Dr. Octo Rexes to a stereo bus is because filtering a whole bus achieves the effect I'm after: a gradual revealing of the whole bandwidth of the music, from the kick and bass all the way up to the tops, with the tension rising all the way. To do this we're going to need the help of Reason's eminently handy effect rack, the Combinator!
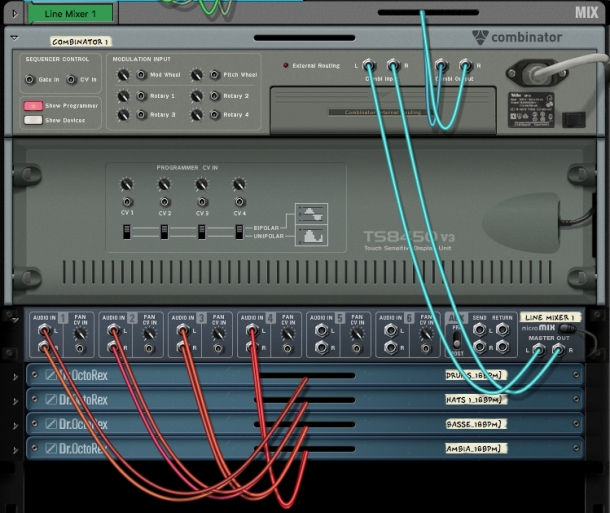
First, I need to create an empty Combinator to put my Filter in. I'm going to position this in between my Line Mixer's outputs and the inputs to its Mix Channel, so that it functions as an insert effect. (I'm not using the Insert FX facility in the Mix Channel, as it doesn't provide the modulation controls I need to make this work).
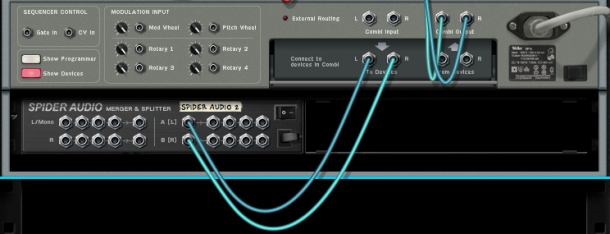
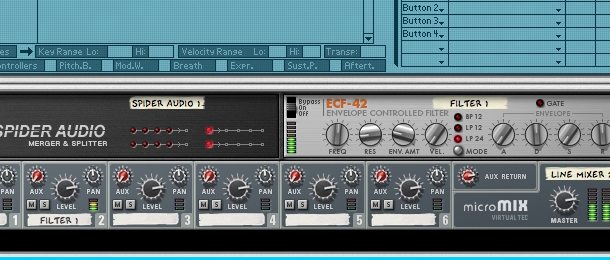
Next, I've added a Spider Audio Merger & Splitter that will give me two 'copies' of the signal: one that I can use for filtering and another that I can leave untouched, for switching between the two. It's connected to the Combinator's 'To Devices' output.
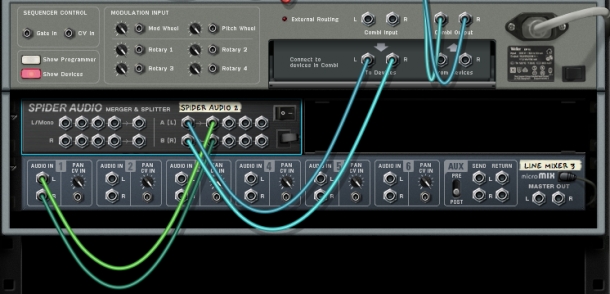
In order to manage my two signals, I'm now dropping in a Line Mixer, and connecting it to the first of the Spider's pairs of outputs.
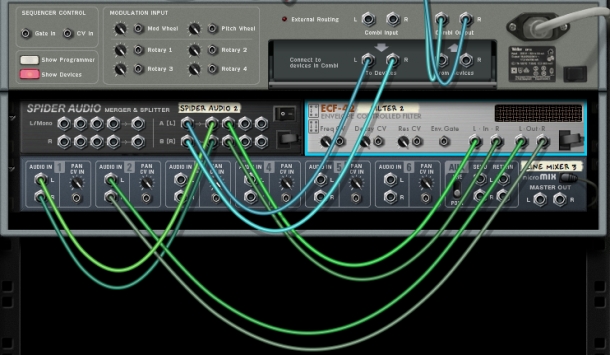
Now it's time to add the ECF-42 Envelope-Controlled Filter. I'll connect the Spider's second output pair to the Filter's inputs, and then connect the Filter's outputs to the second channel of my Line Mixer.
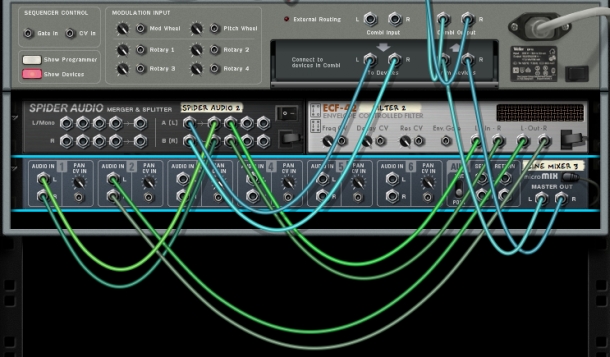
The final signal routing step: connect the Line Mixer's main outputs to the Combinator's 'From Devices' input to complete the loop!
Get With the Program
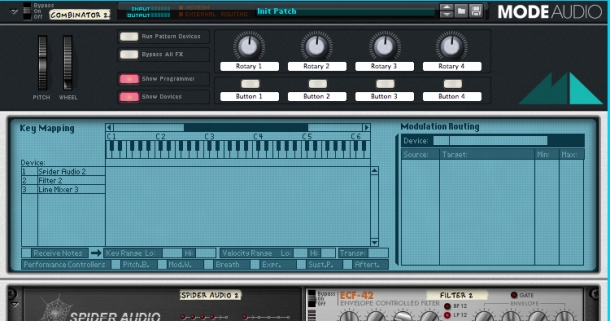
Flip the Rack round (by hitting the 'Tab' key) and click the 'Show Programmer' button. This is where I'm going to make my control assignments.

First, I'll click on my Filter in the 'Mapping' section of of the Programmer screen. This makes its controls available for routing to the Combinator's controls. Now, in the 'Modulation Routing' box on the right, I'll click in the 'Target' column next to the 'Rotary 1' source and choose 'Frequency' from the list. This is sending the Combinator's Rotary 1 control data to the Frequency control of the ECF-42 Filter within.
Here's what a sweep (by turning the Rotary 1 control) sounds like now (with the clean signal muted in the Line Mixer):
With the filter fully closed, it sounds like it's cutting a bit too much at the start, don't you think' We can change this by adjusting the range numbers in the 'Rotary 1' row of the Modulation Routing box.
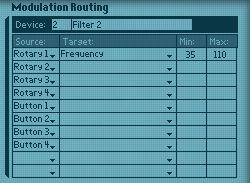
I've changed the minimum Frequency value to 35 so that the filter always lets some of the bass through, avoiding a silence if I were to turn the knob too far down. I've also changed the maximum value to 110, as I couldn't hear much happening beyond this point of the sweep. I want to be able to time the filter becoming fully open precisely with a drop, and having it open too soon would be embarrassing!
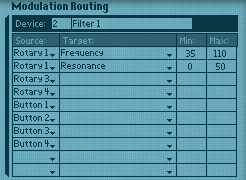
I've also added a spot of Resonance (only up to 50), which will increase when I turn the knob. This really adds some nice character to the sweep, and provides some interesting development over the course of the knob's travel. Note that you have to choose Rotary 1 from the 'Source' drop-down if you want to control both from a single knob!
Resonate to Elevate
The problem with adding Resonance this way is that when the Filter is fully open, you're also getting a Resonance boost right at the top end which can be quite painful if you're young enough! The solution' Bring our dry signal into play on the Line Mixer.
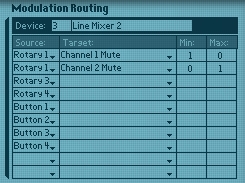
As you can see above, I've clicked on the Line Mixer in the 'Mapping' section of the Programmer, and connected the mute controls for both of the channels I'm using to Rotary 1. I've inverted the Channel 1 Mute behaviour (it's now muting the Rotary is below 127 and unmuted on 127).
Now, when I reach the top of the Rotary 1 travel, my Line Mixer switches to the clean channel and gets rid of that high Resonance in an instant, leaving me with my clean audio to continue from the drop!
I hope you've found this tutorial useful - you can download the patch and the loops I used to get you started below. Enjoy!


