
I can vouch for everyone here at ModeAudio when I say we love drums. Aside from being a drummer of the acoustic variety, it tends to be drums that really hook me into a track and make it just work. As a producer, I like nothing better than to sit down with my drum samples, spending hours choosing the right ones for the given track and knocking together some rhythms. Increasingly though, I find myself turning to drum synths to supplement my sample library and give my sound something different and unexpected.
My forays into drum synth sound design have lead to our Chroma Drums preset pack for Logic Ultrabeat, as well as our Hyper Beats presets for Maschine's excellent new drum synths and Critical Mass for Massive. Whilst making these collections, I've picked up a tip or two regarding drum sound design and would very much like to share a few of them with you here.
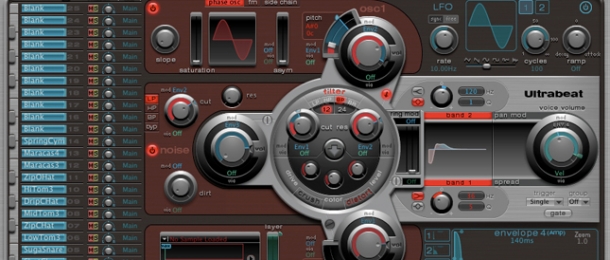
I'm going to be using Logic's Ultrabeat for this tutorial but you can follow the same principles in virtually any other drum synth (or synth for that matter) that allows similar functionality.
The Basics
Let's start with the essentials and work our way up from there. In this tutorial, we're going to look at designing kicks and snares, being the most fundamental elements of most drum beats (and electronic dance tracks in general). Look out for future tutorials on cymbals, percussion and more.
It's not too much of a sweeping statement to say that most electronic drum sounds are modelled on their acoustic counterparts. Real-world kick and snare sounds, and thus their electronic analogs, are broadly made up of two elements: the 'click' and the 'tone'. You can also think of these elements as the transient and the body, to borrow terms more familiar to recording engineers. In order to produce these two fundament elements we're going to need two oscillators and some way to mix them together.
Clickety Clack
The click part of an acoustic drum sound results from the impact of either the beater on the kick or stick on the snare skin. This is an incredibly complex sound in itself and is made up of numerous fleeting vibrations that would take a university degree to properly model. Luckily for most of us however, a simpler approximation more than does the job.
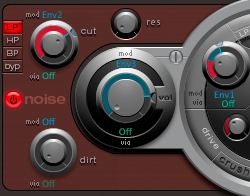
Select a noise waveform for your first oscillator. Apply an incredibly short amplitude envelope to the waveform, triggered to last just a few ms. That's basically it! You can of course try filtering the sound, different types of noise (pink, brown, blue, you name it) as source waveform, effects such as distortions etc. However, the bare ingredients are literally that simple.
Rock Your Body
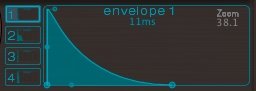
The tone or body part of our modelled drum sound takes slightly more effort to create but only just so. For a kick sound, choose a sine wave with your second oscillator, set its base pitch to something nice and low (around 58 Hz) and apply an envelope to modulate this pitch. The shape and curve of the envelope is critical here - start out with an incredibly quick attack (around 1ms or as fast as you can make it) and slower decay, say around 50ms. You'll also want to set the sustain and release to 0.
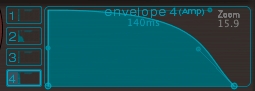
This pitch envelope will give you the punch of the kick. Increase the decay and you'll produce a more relaxed sound - it's worth taking your time with this setting as it will go a long way to defining the overall quality of your drum sound. For example, anyone wanting to recreate that vintage, laid-back, tuned 808 kick sound will want to boost up the decay times of both the pitch and amplitude envelope, whilst ensuring the curve of the pitch's decay is fairly steep (this ensures that there'll be enough time for a reasonably stable pitch to be recognised by the ear).
You can then either apply the very same envelope to the combined sine wave and noise/click amplitude, or set up something similar (though perhaps with a longer decay and slightly slower attack than the pitch envelope) to have fuller control over your sound. There you have it, your very own modelled kick!
Snare It Up
For the snare, follow the same steps above but increase the sine's base pitch to around 200Hz. We then need to model the rattle of the acoustic snare's well, em, snares (the metal wires that stretch across the underskin of the drum) - to do this we need a third oscillator. Set this oscillator to a noise waveform also and this time, instead of using an envelope to modulate the pitch, apply the envelope to a filter you can run the noise sound through.
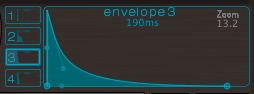
Again, the shape of the modulation envelope is critical and playing around with the filter's resonance can also throw up some interesting results. Apply a final envelope to control the amplitude of the combined output of noise click, sine wave and noise rattle to complete your snare. For faster genres requiring tighter drum sounds (e.g. Drum & Bass, Garage etc), you'll want to begin by trying a short decaying envelope similar to that described above for the kick. For slower genres requiring a bit more weight from the drum section, try longer decay times of 50ms+.
The mix between the three oscillators generating click, sine and noise is crucial here, especially the balance between the latter two. More noise will give you a snarly, aggressive sound (Dubstep producers take note), whereas favouring the sine will produce something more akin to a classic 808 snare sound (for all you Hip Hop heads).
Get Yourself Effected
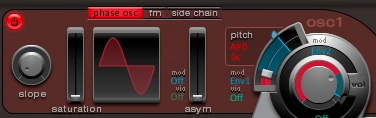
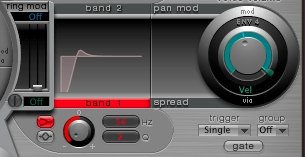
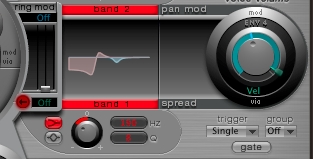
Now you've crafted some decent basic kick and snare sounds to work from, it's time to tweak them to perfection. Ultrabeat offers up a number of useful processors in this regard, including a humble 2 band EQ, distortion, bit crushing and ring modulation, as well as more unusual modulators that can be applied directly to the oscillators themselves such as phase oscillation, FM processing, saturation and so on.
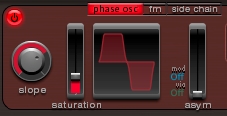
The best way to get used to how these processes affect the output of each oscillator is simply to experiment. Luckily, almost all of these effects are controlled by a single slider, so it's won't take long to hear the full range of modulation possibilities.
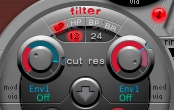
To give you a bit of orientation in this regard before you go blindly pushing and pulling those dials however, I recommend a bit of saturation on the kick (0.20 or less) and a deep cut to the first band of the EQ (say around 40Hz) with a Q value of 2 or perhaps a little more. This will add some subtle higher harmonics to your output, along with a nice low, resonant 'boom' thanks to the EQ.
For the snare, bit crushing can work nicely to add some crunch (try a 10dB drive with your clip control set to 0dB) and using the same EQ cutting trick with a slightly higher Q of around 2, albeit cutting at around 190Hz this time, can work wonders in adding body to your sound.
Get the Test Tubes Out
This brings us to the end of our overview of kick and snare drum sound design. I hope you've pick up some useful tips that you can start trying in a synth near you but don't forget, you can experiment with any waveform you like and apply radical, leftfield processing to your heart's content - it's about creating something that works in the given situation and sounds great to you.
To get you started and give you a palette of sounds you can then tweak to perfection, check out the drum synth preset packs in our collection.


