
In this walkthrough, we're going to take a look at using Ableton Live's Drum Rack for making tuned percussion patches - your ticket to everything from glockenspiels and xylophones to 808 kick bass lines and melodious, arpeggio-like hi-hat parts. One of the joys of Ableton Live is the flexibility with which you can create custom signal chains for individual drum and percussion samples. Starting with the Simpler sample player, Drum Rack provides triggering, MIDI management and playback options before allowing you to add limitless further processing by dragging and dropping audio effects and plugins to the chain. You can also assign the effects' parameters to macro controls on the Drum Rack's main interface, for easy access and hassle-free live performance.
Making Space: Choke Group Assignments
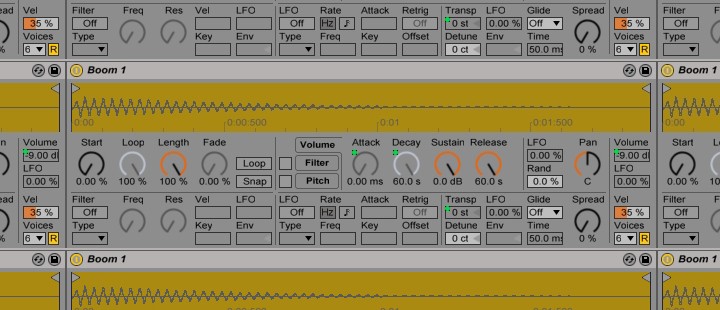
Let's cook up an 808 bass line. We only need one sample - and a nice, long-decay 808 kick sound will do nicely. Drag the sample onto one of Drum Rack's pads, and it'll load directly into a Simpler. We're going to need more than just the one note that this sample provides, however - so copy the sample over to a few other pads. Now, if you adjust the pitches of the samples (using the Transp. number box in Simpler) you can set up the notes of your bass line.
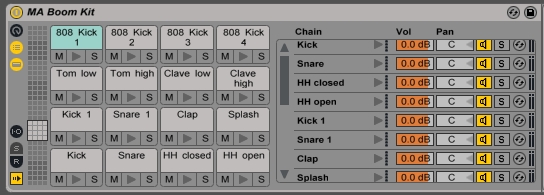
You'll notice, however, that if you trigger another note before the previous one has fully decayed, they'll clash and your ears will endure a short mud bath. What we need is for the previous note to stop sounding when we trigger a new one, and this is called 'Choking'. To set this up, click on the middle little button in the group of three, beneath the On/Off button where the pads are. The button is called Show/Hide Chain List.
Now, click on the button labelled I.O which has just appeared on the left, called Show/Hide Input/Output Section.
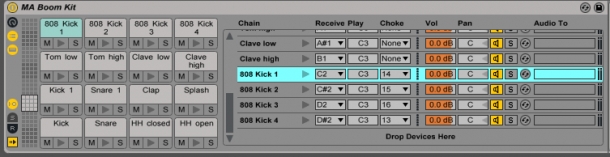
This shows us the Choke column. Here, we can select which pad we would like to mute the currently selected pad. As my 808 kick samples are on pads 13-16, I'm going to have them be muted by the adjacent pad, as shown above. Now, when I play two pads in fairly rapid succession, the notes don't cross!
Choke assignments are a simple way of making your drums rely on each other and act together as a single unit of related sounds. It is for this reason that all of ModeAudio's Ableton drum rack presets are designed with chokes already preassigned.
Easy Access: Macro Control Assignments
The bank of eight rotary controls which pop up next to the drum pads are our macro controls. Once we have built up some further effects processing on our hits, we can right-click on controls in the effects units and chose 'Map to '', which greys out the original control and marks it with a little green square. Turning the corresponding macro now has the effect of controlling the assigned parameter. It also lets us assign multiple parameters to the same macro, meaning we can make more complex adjustments than would otherwise be possible with just a mouse, or a single knob on a controller.
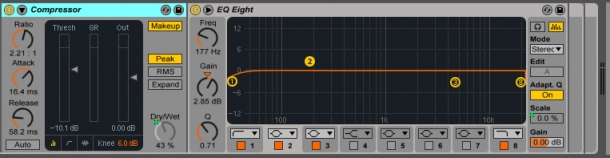
This means that we can do things like create a 'Tone' control, which is adjusting the parameters of several EQ peaks and filters at once. Or we could drive the parameters of Saturator and Redux units to create a 'Dirt' control. The possibilities are endless!
Percussion Section: Beyond Drums
These techniques can be used to build patches that can imitate traditional percussion instruments, and also go beyond them to create whole new sound palettes. For example, pitching up our 808 kick sample by a couple of octaves and applying some light distortion, before sending it through a frequency shifter to shift the frequencies back down, makes for something that sounds like a huge glockenspiel with train tracks for keys. Copy the chain over to further pads, adjusting the pitches and frequency shifts, to get your full scales of notes. In this case, the frequency shifter is warping the frequency relationships of the harmonics added by the distortion effect, lending the results an inharmonic, metallic quality.
Another fun thing to try is tuning hi-hat samples. If you pick samples with an audible pitch - i.e. not just a burst of white noise - then tuning the samples to the key of your tune allows you to tie rhythmic and harmonic elements together. You can create interesting melodic elements by tuning open and closed samples differently, and vary up your hi-hat loops considerably!
Check our drum and percussion samples section to find some material to get tuning straight after download. Be sure to explore our custom tools for Ableton Live also.


