
For many, the most obvious way to lay down a drum beat in a computer is to simply drag some hits into the nearest DAW and nudge things around until your groove starts to swing.
For those in the know however, sequencers can offer many advantages to this approach and once you have your set up configured and saved, you're only ever a click away from some solid rhythms.
Logic's Ultrabeat is quite a rare animal in the world of drum sequencers and programmers, in that it is also a drum synth. So while the following can apply exclusively to working with drum samples, with Ultrabeat you also get the option to design and throw in some of your very own synthesized elements as well.
The first time you load up an instance of Ultrabeat, its myriad dials, sliders and buttons can seem pretty daunting, especially as you thought you were only loading up a drum sequencer!
This tutorial aims to make sense of all this for you and offer you a powerful, easy and effective method for creating drum beats. Before to check out our basic introduction to Ultrabeat before continuing.
Stereo or Multi
The first thing you should decide on is how do you want to control your drums outside of Ultrabeat? Do just want separate auxiliary faders for every single drum in Logic's mixer or do you want to mix within Ultrabeat and just control master volume in the mixer section?
You can picture this as Logic either feeding the signals of all its drum slots to a single channel, thus summing them together, or outputting them all separately.
The first scenario calls for the addition of a multi-output version of Ultrabeat to your session, whereas the latter would require a stereo version. Personally, we recommend the multi-output option as this gives you the power to add external effects and plugins to your drums individually, on top of what is on offer within Ultrabeat.
Load 'Em and Save 'Em
So once you've chosen your output method, right click on the input section of a new software track and load up Ultrabeat. We heartily recommend you then create a kit template preset, so you can quickly load up a blank canvas whenever you want to work on a beat.
For stereo, you can actually just choose the 'Drag & Drop Samples' preset from the '01 Drum Kits' folder - locate this using the preset dropdown at the top of Ultrabeat.
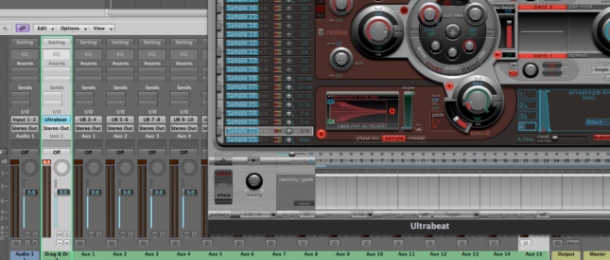
For multi-output, you can still use the same preset but you'll need to switch all the output routing. To do this, look in the mixer section to the left of Ultrabeat and note where it displays the word 'Main' on every channel. This is your output setting for each slot.
To give yourself 16 outputs (8 stereo and 8 mono, Ultrabeat's limit), change the output from 'Main' sequentially up the list of sample slots till you're at 'Sample 16', which you will have changed to output 24. Save the preset!
Mixer, Mixer, On The Wall
For the stereo version, you're pretty much good to go at this point. You can drag and drop samples into the sample slots, get programming and add effects to your master Ultrabeat channel in Logic's mixer.
For multi-output however, you'll need to go into the mixer and create auxiliary channels for each output slot. To do this, go to Logic mixer, locate your Ultrabeat channel and note the little '+' symbol right underneath the Solo button.
Click this as many times as you have output (16 in the above example) to create separate aux tracks for each drum. Now, you have the ability to process each drum separately outside of Ultrabeat!
Summing It Up
We'd also recommend a final stage for the multi-output option. Processing for each drum is a powerful tool but you'll also almost definitely want to sum all these sounds back together and apply effects to the whole group, in order to gel the sounds together.
To learn how to do this, please see our Logic Bus Mixing tutorial!
In a Nutshell - A Quick Ultrabeat Multi-Output Setup
1. Open Logic.
2. Create a new software track and load up a multi-output version of Ultrabeat.
3. Open 'Drag & Drop Samples' kit preset and change all outputs sequentially.
4. In Logic's mixer, click on the '+' on the Ultrabeat track to create aux channels for all drum outputs.
5. Select Ultrabeat and all aux channels in mixer and change their output to single bus channel. You can now control overall drum volume with a single bus fader.
*Logic project templates containing the above setups can be purchased in our Chroma Drums - Ultrabeat Presets pack.


