
Maschine has undoubtedly taken the world by storm with everyone from budding enthusiasts to the biggest names in EDM desperate to get their fingers on those pads and dials. Whilst the Maschine hardware is a powerful performance tool, letting you play drum patterns and trigger sounds live with consummate ease, its software component is an increasingly sophisticated DAW with lots of interesting native processing tools.
In this tutorial, we're going to show you a few techniques for creating a bigger and better drum sound, from thickening and dynamic controlling to adding brightness and air. The below techniques can of course be applied to other software and drum processing plugins so please read on even if you don't own Maschine.
1. Samples Come First
Firstly, select the samples you want to use in your kit. Obviously this will have the single biggest impact on your overall drum sound so spend a bit of time choosing samples you like and that you think can work together nicely (we have plenty to choose from in our catalogue). With Maschine 2.0, you can even select from different drum synth types to use as your drum sound source but we're going to discuss drum synthesis fully in another tutorial (see our Maschine drum presets to get started in advance).
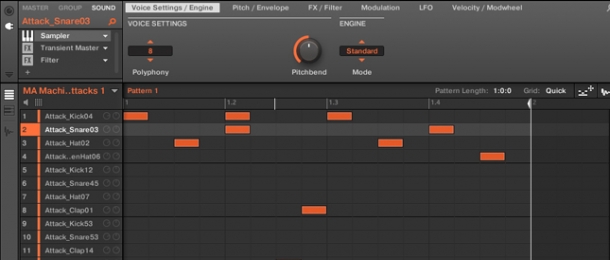
For this tutorial, we're going to use the first Maschine kit from our Machine Attacks drum hits pack. We recommend quickly creating a beat that features all of the sounds you want to use in your track, so you can hear how each drum sounds individually and in the mix.
2. Snack, Crackle and Pop
Now, play your pattern and listen to how each sample sounds both solo and with the other sounds. You can solo sounds in Maschine either by holding down the 'Solo' button on the hardware interface and selecting a pad, or simply by right-clicking the number of the relevant sample slot in the software.
This procedure will give you a general idea of how you should go about processing each drum individually. How you want each drum to sound and subsequently how you will process them will of course depend on your own tastes and preferences, but it will be instructional for us to go through the main parts of the drum kit and discuss some general processing advice for each sound.
3. Karate Kick
Let's begin with our kick sound. Listen both solo and in the mix - is it a nice, full sound' Is there enough body or weight' Is there enough snap in the kick's transient (the very beginning of the sound)' How you answer these questions will determine how little or much you use the following processes:
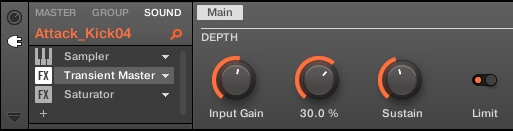
a. Transient Master - this is Native Instrument's excellent amplitude envelope shaping plugin, allowing you to add extra bite to the beginning or length to the decay of your sound. In this example, we've decided to add a little more snap to the attack by boosting it by 30% and reducing the sustain by 10%. This gives us a punchy, tight sound that doesn't hang around for too long and get in the way. It's useful to use the limiter if you're also boosting the gain of your sound as we're doing here, because we don't want to feed a clipped sound into our next processor (this might produce unwanted distortion if the kick sample is already loud).

b. EQ - now we want to shape the colour of our kick by applying some subtle boosting and cutting at the right frequencies. We've added a bit of low-end weight by adding a 2.4dB gain boost at 70Hz - a good exercise here is to push the gain up to around 10dB (though please make sure to reduce the master output so as not to blow speakers/eardrums) and pan the frequency dial from 50 - 80Hz. Once you've located a frequency that sounds good, reduce the gain to a sensible amount that gives your sound a nice lift in the right frequency area. Using the same frequency panning technique, we've also added some punch by boosting 3dB of gain at 117Hz and increased clarity by cutting 3dB at 520Hz.
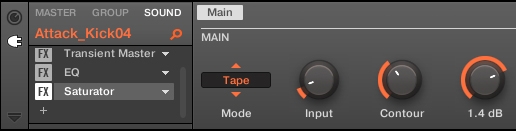
c. Saturator - used subtly this processor can add some grit to your kick sound, helping it to stand out a little more in the mix. We've added a subtle gain drive of 1.4dB with our favourite saturation type, 'tape', to give our kick just a little more edge. Saturation is an interesting mix of compression and distortion, often designed to add warmth to a sound by acting primarily in the 300 - 500Hz low-mid range. Using Maschine's 'tape' saturation setting, you can achieve this effect nicely, primarily on kicks, snares and toms.
It is worth spending a bit of time with each saturation mode to figure out your favourite settings - there is quite a lot of scope with this processor for getting different results, so it's well worth the extra effort in our book!
4. Snarling Snare
The above processes used for the kick can work equally well for snare sounds, you'll just want to alter the frequency ranges used to affect those areas relevant only to the snare. Usually this is around 200 - 240Hz for weight and snap, and around 3k - 5kHz for slap or brightness. With our example here though we're going to try something else.

a. Filter - a very important part of drum processing is giving each drum its own area of the frequency spectrum to really stand out in. This can often mean filtering a sample that features frequencies that clash with those also contained in another sample, as is the case with our snare. For most snare sounds, the body of the snare is contained in the 200 - 500Hz region, which conveniently leaves anything below 200Hz for the kick. The first process we're applying to the snare is therefore a high-pass filter at around 190Hz to give the kick its own breathing space. Placing the filter first in the chain also means the proceeding processors will only be working on the desirable frequencies in your snare sound.

b. Compressor - the sample we're using already has a nice attack to it, however it's lacking body and weight. To modify this, we're using a compressor with a relatively slow attack of 6ms to leave the transient alone but boost the decay and sustain parts of the sound. It is often useful to think of your sound in terms of an ADSR envelope, so you can really zoom in on the particular parts of the sound you want to change.
We're using an amount of 49% with a -32dB threshold, which really helps to thicken the sound. For subtler effects increase the threshold and decrease the amount, whereas if you want an extreme change do the opposite.
5. Hot Hi Hats
Again, transient shaping, EQ and compression can all work wonders on a hi hat sound. You will mainly be dealing with the higher end of the frequency spectrum this time however, focusing in on 4k - 6kHz for crispness and 8k - 12kHz for air or brightness.
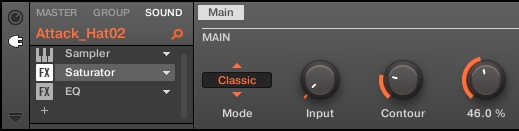
a. Saturation - this can really help to thicken up a weak or thin hi hat sound. We're adding a 46% gain drive using the saturator's 'classic' mode, to add some weight.
b. Filter - our saturation process has actually thickened up the hi hat sound a little too much and it is now stealing the limelight from our snare sound a little. To combat this, we're high-pass filtering the hi hat at around 220Hz, as this gives some frequency space back to the snare as well as tightens up our hat sound.

c. EQ - we're boosting the hat at 4kHz and 9kHz by 2dB and 3dB respectively, to add some crispness and to brighten the sound. Now it really shines alongside our other drum elements!
6. Who's the Master?
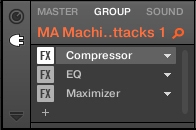
Now we have the main parts of our drum kit sounding great together, we can apply what some refer to as 'glue' processors. These are processes that we add to all drums at once to get them to gel into one cohesive sound, as opposed to a number of distinct sounds working against one another. In Maschine, we can apply these effects to either the 'group' or 'master' output tabs - we're going to use effects in the group tab as these are saved with .mxgrp (Maschine kit) files.
a. Compressor - this is arguably the post important audio gluing tool at your disposal. By applying a compressor to your drum master output (this could be a group out or an auxiliary channel that you've routed all your drums to) you are enforcing a uniform amplitude envelope on each of your drum sounds simultaneously, which really helps to bring them together. We're using a fairly quick attack of 6ms and reasonably slow release of 55ms to thicken our sound whilst leaving our attacks/transients unscathed (too quick an attack will result in your compressor reducing the impact of transients, thus weakening the overall drum sound). Our threshold is set to -8dB and amount to 40%, so this is a fairly subtle use of compression but effective in gelling our elements together nonetheless.

b. EQ - it is important to remember that using an EQ on your drum master output will affect all your drum sounds in one fell swoop, so it's best to use it quite sparingly here. We've added a little 1.6dB cut at 350Hz to clear up some slight muddiness in our kick and snare sounds, and a 1.6dB boost at 10kHz to brighten the overall sound a little.
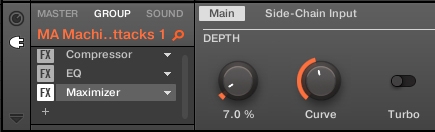
c. Maximizer - as the final piece of the puzzle, a limiter or maximizer is very useful for getting as much volume out of your drums as possible. The most important thing to consider here however is that you shouldn't be expecting to get a lot of extra punch, snap or weight from these processors, as you should have achieved these qualities in the processing of each drum individually. This is really just about boosting overall volume and we like to use these processors very subtly.
We've pushed our maximizer amount up to 7% with a curve of 40%. This latter control works in the same way as the 'knee' control of a compressor - it determines how strongly the process will be applied at and around the threshold amplitude. Our setting is fairly gentle so the gain boost does not come into play too suddenly (though the result is still audible).
We haven't used the turbo control here but if you really want to crank the volume, flick this switch on to effectively maximize your sound twice.
Tricky Sums, Easy Answers
So there you have it, with a little effort and time spent on each drum individually and as a whole sound, you can really bring the most out of your drums. Using different varieties of EQ, compression, saturation and filtering can work wonders in tidying and thickening up your drums. It's important to remember to consider each drum's place in the frequency spectrum, as well as how each sound develops over time. In our next tutorial we'll look at ways to really mangle and modulate our drum sound, so stay tuned!
Maschine can also be used as a multi-output instrument in DAWs like Logic, so be sure to check out our bus mixing tutorial if you'd rather gel your sounds outside of Maschine with 3rd party plugins.


