

Sometimes you just can't get enough of a good thing, so it is in this spirit that I'm thrilled to welcome back the esteemed Martin Russ to the pages of this magazine! Master synthesist and author of the peerless Sound Synthesis & Sampling, Martin has already showered us all in music production wisdom across 4 Q&A sessions I conducted with him recently.
This time, we're paring back some of the Ableton Live trickery and taking a much deeper look at a much simpler element of the modern DAW, though oft-overlooked: MIDI velocity. 'How could we possibly tease a range of production tips and tricks out of such a basic element of the piano roll, let alone even one'' we hear you cry - I'll leave it to the mind and mouth of the ever-inspiring Mr. Russ to answer!
ModeAudio (MA): Once again, welcome back Martin! In our previous discussions, you've explored using samples in ways we never imagined - as an experiment, let's take these techniques away from you and go way back to basics! In 'Exploring Float's Guitar Samples: Part 2' you talked about using MIDI velocity a lot, can you expand on this please?
Martin Russ (MR): MIDI velocity is one of the less-visited elements of modern DAWs, so, naturally, it's one of my favourite areas to explore! For many people, the 'piano roll' time grid view of musical events is the place where they do detailed editing, such as setting event positions and volumes for drums (entering 'drum' events into a 'piano' roll always amuses me, but then it couldn't be called a drum roll could it'!).
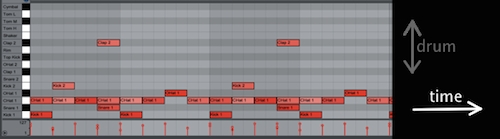
With regard to MIDI drum programming, events are spaced out in time horizontally with velocity easy to specify, as we often don't have multiple events per unit of the grid. By contrast, for melodic and harmonic lines your attention is drawn to the vertical as well, specifying pitch. For chords in particular, you get lots of events happening at once, so all the velocity markers get squashed into one making them difficult to edit individually.
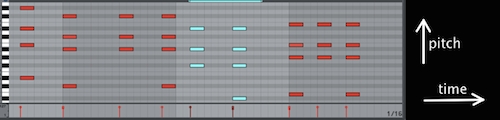
To combat this, producers often tend to go for the easiest option, which is to select blocks of notes and setting them all to the same velocity. Laptop 'virtual keyboards' even often have a control that sets the velocity of all played notes to a fixed value, which is so boring in my opinion. Consequently, you tend to see block chords with constant velocity per note.
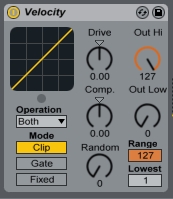
So MIDI velocity can be fiddly to use and for the most part, it is thought of synonymously with 'volume' and largely forgotten about. This is evident in the very design of DAWs - in Ableton Live for example, there's just one MIDI Effect that allows proper control of velocity, called quite simply, 'Velocity'. In Live's manual, there are only brief descriptions of what Velocity's controls do - in fact the 'Random' control in Velocity has one of the shortest explanations in the whole document!
All in all, it's very easy to overlook velocity and think it isn't significant - particularly thanks to the rise of all the impressive, button-laden controllers that are available now, and with the visual ease-of-use of mapped, asynchronous clip envelopes.
MA: Hang on there! You've already used clip envelopes in our previous discussion, so they're banned too!
MR: You got me! Ok, so this is becoming the first part of a secret user guide to the Velocity effect in Ableton Live, but a lot of it can be applied to other DAWs too.

I'll be using bits from ModeAudio's House Generator - Ableton Live Racks pack for all the examples, because it has lots of block chords and pads in its examples, plus some interesting rack instruments that are built in an unusual way.
MA: This sounds exciting Martin, let's dig in!
MR: Ok, firstly I will introduce a useful utility that makes working with velocity much easier, particularly for people who use clip envelopes and who like to see a visual representation of what's going on. It's called VeloView and it's a MaxForLive (M4L) MIDI effect that I created - it's the sort of functionality that I think should be included in a future release of Ableton Live (please ;). For now though, this is just another reason to get M4L!
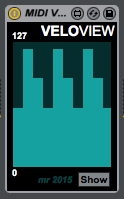
VeloView shows you MIDI Velocity in a scrolling window - the taller the green line, the higher the velocity, so instead of having to find a velocity-sensitive instrument and listening to the effect of changing the controls in the Velocity effect, you can now simply see a clear 'velocity' value instead. Suddenly, velocity is visible instead of hidden! VeloView doesn't use much processing power, but you can turn off the graphics with the 'Hide' button and it then uses even less power.
MA: The secret is exposed! VeloView is available for free download at the end of this article and you must have Ableton Live and M4L to use it. We'll be using it in our discussion to illustrate points but you can still apply the ideas and techniques to your workflow, even if you don't have either piece of software installed.
So, the Ableton Live manual makes reference to the ability to 'sculpt or even redefine the dynamic structure of a piece' - how can we use VeloView to allow us to achieve this'
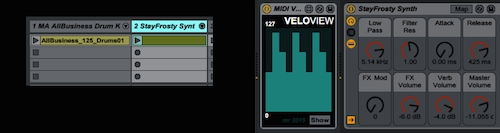
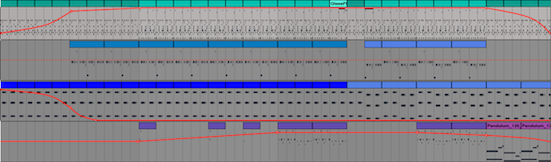
MR: Let's work with an example. I'll open up a new Live Set and drag 'AllBusiness_125_Drums01.alc' from the Clips folder in House Generator onto track 1 and drag 'StayFrosty Synth' from the Instrument Racks folder onto track 2. Finally, I'll insert VeloView just before the synth instrument.
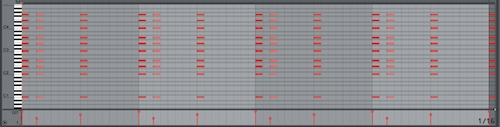
I've created a new clip for StayFrosty Synth with an extended C major chord spanning a few octaves. Putting the chords on the first beat, the first off-beat and the middle beat, with velocities of 127, 64 and 96, is a good starting point.
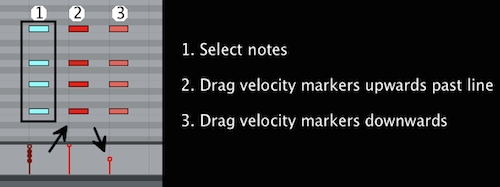
The Ableton Live manual doesn't mention the shortcut to set several notes to the same velocity - you select all the notes you want to change, then drag the velocity markers (the lollypops) up to the top, then back down again. This first sets all the velocities to 127 then allows you to set them to a consistent lower value.
MA: That's a top Live tip! For more handy Ableton Live MIDI shortcuts, check out our tutorial. Back to the discussion at hand!
MR: We want a dense chord to start with here because we'll be pruning it down considerably - also in the context of an actual production you would have lots of tracks covering different parts of the spectrum. So, I've now created 2 tracks and dropped both their volumes by 6dB to make sure I don't clip the master fader - here's how they sound with the drum clip:
Playing this pair of tracks gives us our baseline sound and after a couple of repeats you are probably bored with it. However, note what VeloView is showing you - three blocks of velocities and it looks as fixed and stilted as it sounds! If you record the MIDI output of a track using chords produced in this way, then you can see that the chords are identical every time they repeat.
So, let's add the Velocity MIDI effect in front of StayFrosty Synth. I've turned the 'Random' control all the way up to 64 - let's listen again and also keep an eye on the velocities in VeloView:
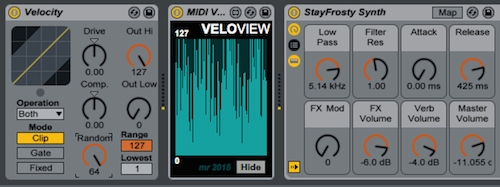
Suddenly things are more interesting! So, what's going on here' It turns out that the Velocity effect is polyphonic, which means that when it generates random values to add to the incoming MIDI velocity values, it generates a separate random value for each MIDI note within each chord.
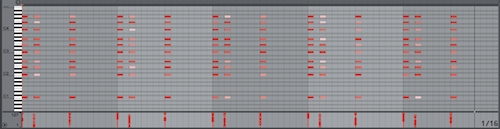
You can really see this at work in the VeloView window, where the block velocities have now been replaced by a dense forest of notes with differing values. If you record the MIDI output of a track using chords produced in this way, then you can see that each chord has different velocities for each note, each time it is played.
What you are getting are the sort of chord inversions that a jazz player might throw in just for the sake of variety, or what a skilled producer might spend hours adjusting in order to sweeten the song!
MA: Ah, variety at last! Let's dig deeper - how does Velocity's Drive control work?
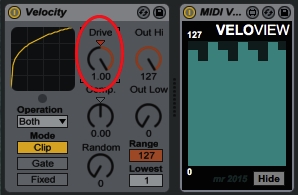
MR: We can see if we return the Random control back to 0. A Drive value of -1 should have given you just the chord on the main beat and nothing much else, whilst +1 should produce three similarly loud chords. So the Drive control acts like a compressor for positive values and an expander for negative values - remember however that this is simply compressing and expanding the output of the MIDI effect, not any audio you are generating with the track!
MA: Interesting...so what about the Comp(and) control?
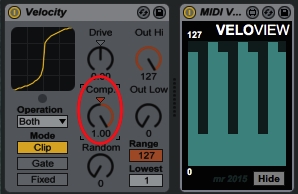
MR: Comp(and) is similar to Drive but it works symmetrically around middle range velocities, rather than fixing the lower end. So, when you compress the high velocities you are expanding the lower and vice-versa, like a see-saw. Thus, this is subtler in its effect and useful for making adjustments to a mostly complete mix. Adding in some Random adds the same unpredictability as with Drive above. Once again, looking at the VeloView window makes the differences in the two controls very obvious.
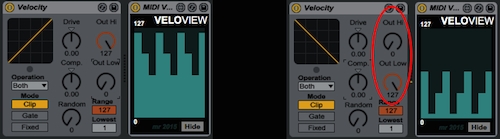
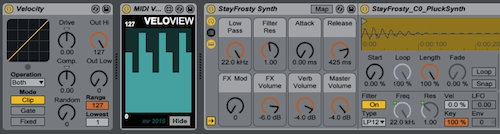
The Velocity effect also has Out Hi and Out Lo controls, and these allow you to limit the maximum or minimum velocity values the effect can generate. If you set Out Hi lower than Out Lo then the effect inverts the velocity values it outputs and the off-beat now becomes the strongest chord. You'll also notice that the other controls like Drive now work in reverse in this situation too!
As usual with Ableton Live, you can automate any of these controls or even map them to Clip Envelopes - all of this is achieved in only one of Velocity's three modes!

The values I've used in the examples above are very extreme, so you'll probably want to experiment with more subtle values in your own productions. As you can see in the screenshot above, small amounts of randomness allow the original velocities to be perceived, whilst full randomness tends to obscure anything. Sometimes just a little randomness is all you need'
MA: Wow, that's a lot of power hidden in an effect that often gets ignored!
Thanks again Martin, as ever you've given us a ton of useful info, tips and insights for us to go away and try out in our own productions. We'll keep our discussion of using Velocity and VeloView in a more practical way for part 2 - keep your eyes and ears peeled!
Download Martin's incredibly handy VeloView Max for Live effect here!


