

Today sees another welcome return by the venerable Martin Russ to the pages of this magazine! We're honoured to have the master synthesist and author pick up our previous conversation all about velocity - we hope you'll enjoy what is simply another effortlessly brilliant lesson in how to achieve fantastic sonic results with next to no effort at all (albeit with bags of understanding and know-how thrown into the mix).
There's another opportunity to download Martin's excellent 'VeloView' Max4Live effect for free at the end of our discussion but without further delay, let's all gather round the campfire and learn from a master of our craft!
ModeAudio (MA): Welcome back Martin! Let's get right back into it - so you used quite extreme sound examples in your demonstrations in our first discussion but what about using what we've learned in a more practical context?
MartinRuss (MR): Ok! Whenever I build a Live project containing several parts in the same way more than a couple of times, I start to look at how I can automate that process. So for example, from the previous examples I'd notice I'm using Velocity and VeloView together a lot, so I'd then go and make a MIDI Effect Rack that enables the selection of just this device configuration with one click.
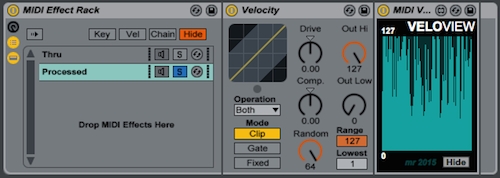
By using an Effect Rack containing two separate chains, we can set the 'Solo' button to 'Thru' or 'Processed' allowing us to easily bypass just the Velocity effect whenever we like. It's easy to see how complex effects procedures could be built up for easy toggling in this way.
Now I want to raise an important point about velocity and MIDI in general - MIDI velocity was intended to be used as an expression control and not just for volume. Real world instruments don't just get louder when you play them harder, they produce more harmonics, resonate in different ways and otherwise change timbre or colour.
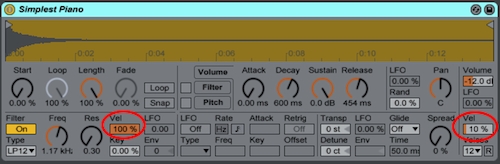
Live's 'Simplest Piano' is a good example - if you open it up and examine the Simpler controls, you'll notice that there's hardly any velocity control of volume (10%), but there is 100% velocity control of the filter, so the main effect velocity is controlling here is in fact the brightness of the piano sound, not its loudness (though this is also affected by MIDI velocity, just in a much subtler way).
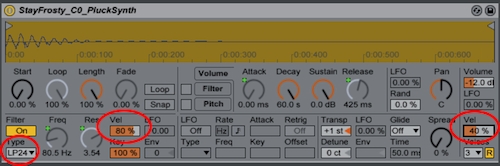
Let's get back to our example in House Generator - the 'StayFrosty' synth could be altered in a similar way, so that the filter is velocity sensitive as well as volume. The synth instruments in this huge sound pack all use Drum Racks with Simpler doing limited-range transposition of samples, which gives a good compromise: pretty tight control of the sound without the processing power drain of full individual multi-sampling with one sample per note.
So, to add filter velocity sensitivity in this way means editing each instance of Simpler for each note. This may take a while so when you've done it, I'd recommend saving it as a new variant instrument (adding 'filter vel sens' to the name is a good idea too!).
MA: That's a great idea Martin - adding even more flexibility to our instruments sounds very good to us! So can we apply this additionally expressive instrument to one of your previous examples?
MR: Let's go with the full velocity randomisation technique - when you are going to add randomness to a song, you need to look for the right type of track. For this technique, where you just fully randomise the velocity, a 'chord' or 'pad' track with lots of parallel notes works best. Adding additional notes above the existing ones gives broader inversions, or adding a copy of the root an octave down (emulating the stretched left-hand octave playing that you often see people doing with real keyboards). Let's hear how this sounds:
Things can start to sound very jazzy indeed and of course it is very possible to over-use this idea. The example here is deliberately over-the-top so you hear the effect, you might want to try something much subtler!
MA: Great! Let's move onto drums - can we use your random velocity technique here too?
MR: Often, users will just add the Velocity effect in front of an entire Drum Rack instrument, which then applies changes to all the contained drum samples at once. In my opinion, a much better strategy is to target just the top-end parts like hi hats and shakers as this leaves the majority of the dynamic range constant.

There are a few ways to add the Velocity effect for this purpose but the simplest is to just add it to particular chains within the Drum Rack itself. This is one of those features of Ableton Live that not many people know about - you drag the MIDI Effect into the chain list and it then appears and applies in just that chain alone.
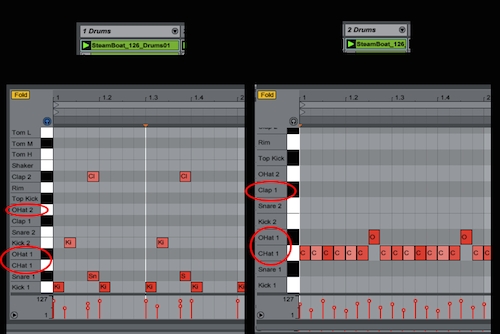
So, let's drag the Velocity effect into the main closed hi hat of one of House Generator's Drum Racks (I've chosen the SteamBoat Kit) and turn the Random control up - suddenly we've got a more 'human' feel with a jiggly hi hat hand instead of mechanical repetitions!
Another option is to duplicate the drum rack and delete the lower elements like the kicks and snares, leaving only the top-end parts and then applying Velocity before the whole Drum Rack but personally I like to keep things self-contained under one roof.
MA: This is a fantastically simple way to build constant variation and feel into your drum tracks - where else can we go with this?
MR: If you combine the random velocity technique above with the 'MIDI Effect in a Rack' way of controlling exactly where MIDI processing is applied, then you can make very specialised instruments indeed. One example that is easy to produce is an instrument that cross-fades between two different sounds depending on the velocity of the notes.
Now whilst that seems like an exotic thing to be able to do, it actually has a very solid practical use and can save lots of time when arranging because high velocity sounds are interpreted by your ear as the main sounds, with the low velocity sounds perceived as an accompaniment.
In a moment we'll listen to an audio example that has a slowed-down version of the 'Jezero' demo project from House Generator, running at 108 BPM and with just the drums and pad tracks enabled. I split the drums across two tracks, with kicks and snares on one and hats on the other as described above, muting the latter for now so they won't distract too much from what we're going to do with the pad sound.
The pad in the original 'Jezero' track is made from the 'Haven Pad' instrument, so I added in an Instrument Rack and put the Haven Pad into the first chain. In front of the instrument rack I put the Velocity effect, plus VeloView so that the velocities are visible.

As an alternative sound, I added in the 'Limbic Synth' from the 'Lead Synths' folder into the second chain in the rack, shifting it up an octave with a 'Pitch' effect. The second Velocity and VeloView combination is there to allow the Limbic Synth to be processed differently to the Haven Pad. Here's how this all looks inside the rack now:

Let's mute the Limbic Synth and listen to the Haven Pad in context, alongside the hat-less drums. This is a very useful trick when mixing and contracting a track, as it allows you to really focus in on certain parts of the music - right, let's give things a listen:
The Haven Pad sound is quite deep in the final mix and it has just enough movement and brightness to provide a backing to the other tracks - let's try the drums with the Limbic Synth instead:
I've also added some ping pong delay for spice, resulting in this echoey sound being much busier with lots of wandering harmonics but it's way too far forward in the mix at the moment. You can hear what happens if you over-boil a track with too much depth if you play the Haven and Limbic chains together:
So, as you might expect, we've moved our background pads to something much busier and complex that you would expect to be carrying something more like a lead melody at the front of the mix. Let's play around with the setup use the second Velocity effect to invert the Limbic Synth velocities, leaving everything else alone:
Now we're getting somewhere! You've got the Haven Pad sound from the original example but around it, there's this weird, echoey sonic 'halo' from the detuned Limbic Synth that sounds like some sort of clever reverb effect. We've achieved the work of a skilled producer's effort over a few days, except that all we did was layer two sounds and then invert the velocity of one of them!
MA: What a great composite sound! Can we quickly revisit exactly what's going on here with the MIDI effects before we wrap up?
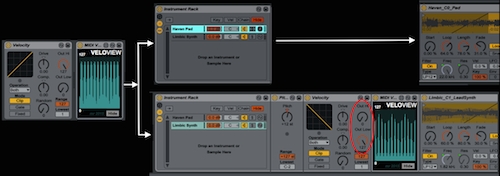
MR: Certainly - the MIDI velocity from the piano roll enters the chain from the left and goes (unchanged) through the first Velocity effect, with VeloView letting us see that there are rounded-top mounds for each riff or musical phrase. This means that the sound starts off softly at the beginning, gets louder and then goes softer again at the end of the phrase - all of which drives the Haven Pad sound, exactly as it appears in the original project.
However, in the other chain we've inserted a pitch-shift up an octave and then inverted the incoming MIDI velocities, resulting in the Limbic Synth playing phrases that start off loud, then fade away as the Haven sound swells up, and which then rise up again as the Haven Pad fades away (look closely at the VeloView curves for each chain - they are the opposite of each other).
Add the delay effect to Limbic Synth to make it sound like it is a reverberated version of the Haven Pad and you've got a composite pad sound that sounds way more complex than it really is! All this was achieved with the simple inversion of MIDI velocity - see, it's easy when you know how!
Finally, we can use Velocity in the first chain to add some randomness, which is of course then inverted by the 2nd Velocity effect, as well as adding some randomness into the hi hats drum track. Let's have a listen:
There you go - you should now be well equipped to add a bit of random velocity to your own music!
MA: We're sure that many people will be doing exactly this - thanks again Martin for a fascinating insight into some of the more unused parts of a fantastic DAW, despite all the limitations we threw at you!
Download Martin's incredibly handy VeloView free Max 4 Live effect here!


