

Drums, big and small, real and electronic, sharp and smooth, salty and sweet; ok, maybe not that last one! Arguably, there is no core element of electronic music more important than drums, providing the foundational bedrock for arrangements and the rhythmic pulse for dancers.
Nailing your drum sound is thus a vital task for any producer working their way from bedroom amateur to global artist - it also happens to be one of my very favourite areas of music production to prod and explore, so let's dust off those virtual sticks and get tapping!
Whilst some of my previous tutorials and tips have covered very specific parts of constructing drum tracks and individual sounds, here I'd like to distill down the entire drum design process to what I consider to be 5 pivotal stages.
Of course, everyone works in different ways and there are countless approaches to cooking up fiery beats - what I will say for my process is that it is tried and tested and, quite simply, produces slamming results. Let's get tucked in.
1. Drum Sample Selector
The first order of the day is, of course, finding the right sounds. Choosing sounds that already have some vibe to them in the first place is the best starting point here - thankfully, there are decent options open to you when it comes to sourcing drum sounds, with the majors being drum synths (both soft and hardware), existing music (this is the traditional sampling method but please be wary of copyright issues) and drum sample packs.
It goes without saying the ModeAudio collection is jammed full of thumping libraries designed for just this purpose, but experimenting yourself with synths and sampling can provide startling results also.

The next-most important factor is to make sure that your selected sounds actually work together as a unit. You might have found the most incredible clap sound in the world but if it doesn't feel right with any of your kicks, you should look for something else. How do we define sounds that have the right 'feel' when listened to together' This is a matter of personal taste but listening to your favourite artists will give you some inkling as to the kinds of sounds that you personally like to hear side by side.
Beyond this, consider the following: general sonic character (do the drums sound organic' robotic' dry' spacious' light' heavy' etc), sample length and attack type (does the drum sound 'sharp' with a strong attack or is it mellow and relaxed').
In most cases, I'd wager you'll want to find sounds that have similar qualities in relation to the above 3 factors, for example a set of sharp, organic, fairly short sounds, or you might want to play these qualities against each other such as using a mellow, boomy kick with a short, sharp clap and so on.
Whilst I can't know in advance the exact type of sound and character you want to aim for with your drum track, the above factors always cross my mind when setting up my drum sounds and carrying these same principles across to your own productions will pay dividends in starting you off in the right direction.
2. Multitrack Drums
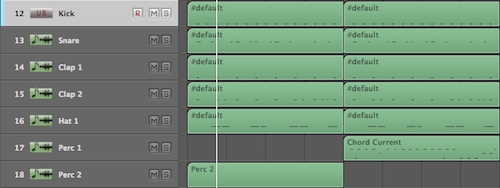
Now you have some sounds selected (if you're using drum synths, let's assume you're going to record or bounce out the waveforms as audio samples), you can either take the old school approach of simply using the regions on separate tracks of your DAW or you can load the sounds into a sampler with multitrack output capabilities (my undisputed preference).
This stage is vital to the process because we need to be able to process each sound individually, in order to work each sound up into something better and more appropriate to the production in question.

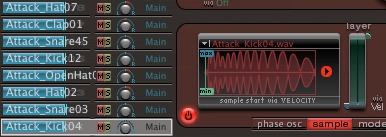
One of my favourite tips here is to work with multiple copies of the same sound or drum sample, particularly regarding hi hats and percussion sounds. A typical drum beat will feature many more hi hat or shaker notes than it will kicks and snares, so it's important to build a little variety into your pattern by using subtly modified versions of the same sound.
This technique is made all the easier in a multitrack sampler, as you can place the same sample on a number of voices or pads and route them all to the same output channel for processing.

The key here is subtlety, as you want the samples to sound as if they are coming from the same source whilst still achieving sonic variety - my favourite tricks are to shift pitch by a number of cents (semitone shifts are too audible and obvious), using a little low-pass filtering and applying different amplitude envelopes across the copied samples.
Taking a simple 16th note hi hat pattern as an example, we could copy our sample onto 3 pads, apply slightly different low-pass filter cutoffs, cent pitch adjustments and envelope release amounts to each, then distribute the 16th notes between the 3 versions.
This is also an ideal stage to utilise drum layering if you feel your drum sounds are lacking depth or complexity, as you can route multiple samples to the same output channel to be processed as a single sound.
A sampler such as Logic Pro's Ultrabeat is ideal for this as it allows basic filtering and processing of signals per voice, before then being sent to the desired output track.
3. Drum Channel Strip
Your samples are loaded and multitrack versions and outputs are setup - now it's time for some processing. Obviously you'll want to process each drum sound in a different way, to best compliment what's already contained within the sound or to push each towards a specific sonic direction.
This means by definition that any one set of plugins cannot possibly satisfy all situations - however, I find I tend to reach for the same core processing signal chain when I'm producing drums and whilst there might be unique processors that apply the finishing touches in particular circumstances, the following plugins do the bulk of the sculpting work.
Transient Design
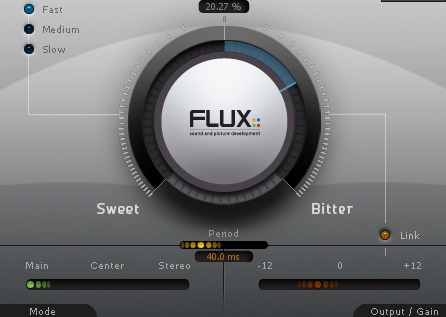
The first element of any drum sound that I pay attention to is the 'transient', or initial attack portion of the sound. When it comes to creating punchy, 'snappy' drum sounds, this is the pivotal part of the process. Using specially designed plugins known as transient 'shapers', we can enhance or reduce the power of this attack portion of a given drum sample.
The circuit for these plugins usually involves incredibly fast-action compressors and limiting but, thankfully, the controls available for adjustment are few and very straight-forward.
Often, we simply have 'attack', 'release' and 'gain' controls at our disposal. For a sample that doesn't quite feature the transient snap I'm looking for, I'll often boost the attack dial a little and reduce the overall gain amount to make sure I'm not clipping the output.
Depending on the plugin you're using, you might also be able to experiment with attack time, release and even saturation effects, such as with Schaack's mighty Transient Shaper, or you may only have a single dial to work with, as with Flux's excellent (and free) Bittersweet VST.
For me, transient design is a must on kicks, snares, claps, toms and hi hats, whereas it might be less useful for shakers, tuned percussion and crash cymbal sounds.
Compression
Next in the chain, compression can be used to produce 'beefier' or bigger sounding drums. The aim here is to boost the decay, sustain and release portions of a given sample, creating a fuller, thicker impression. This will certainly not be required for every drum sound you come across, as over-compression will almost certainly lead to a flat and lifeless sonic vibe but if you feel your drum sound is lacking weight, compression could be the answer.
Start with light compression and a subtle overall gain boost but be very wary of harming the delicate transients of your drum samples - set your compressor's attack time to be too quick and you'll undo all of the snappy goodness achieved with your transient designer.
I'd think about setting your attack to 15ms and above minimum, with a fairly fast release time also to make sure the tail of your sample benefits from the overall gain boost applied from the compressor.
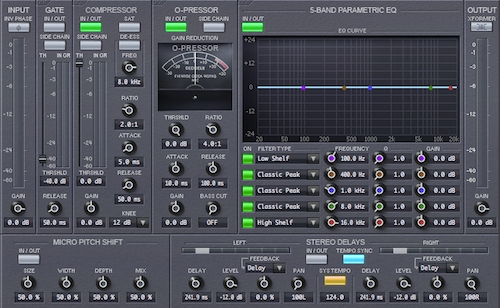
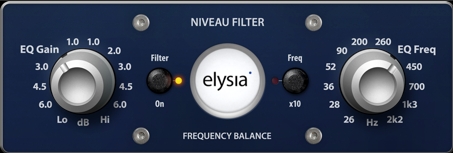
EQ
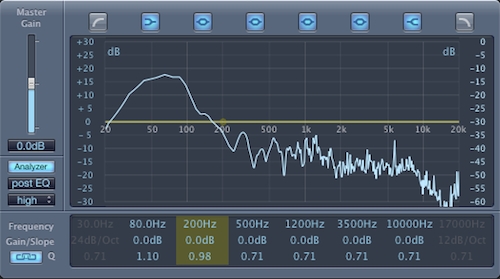
EQ is perhaps the most important tool available to you as a music producer and/or sound designer - it is with this device that we can really get in to sculpt the flavour and character of our sounds. With regard to drums, one of the most important uses it to make sure our samples aren't clashing with each others in terms of frequency, as this will produce a muddy, hazy sound.
Think of each sample as occupying its own, distinct frequency region and use your EQ plugin to make sure other sounds don't intrude on this area too much.
The classic example here is with the kick - often the majority of your kick sample's energy will reside from 20 - 120Hz, so rolling off all your other samples with a high-pass filter at 120Hz is a very common approach.
Use a frequency analyser along with careful close listening to identify the areas you want each drum sample to primarily occupy, using subtle boosts (start with 1 - 3dB with a high Q setting) to try to accentuate these areas if needed and subtle cuts at these frequency points from other intruding samples. For example, you might have a clap with an energy peak at around 1kHz - reducing the snare's energy at this point with a 3dB cut might be enough to really help your clap sample cut through the mix.
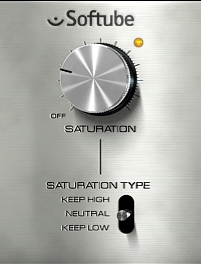
Saturation
As a final dusting of the individual drum processing cake, I find myself often using saturation effects to warm up my drums. These plugins employ some form of distortion to introduce extra harmonics into the spectrum of the processed sample, creating a richer, fuller sound if used sparingly.
Overdrive, tube amp simulations, distortions and even bit-crushing plugins can be used to this end - again I'd stress that subtlety is the thing here, as we're trying to introduce warmth and not produce an overly noisy, brash effect.
4. All Aboard The Drum Bus
Once all your drums have been primed to perfection individually, the next step to achieving a bigger, fuller drum sound is to apply some group or bus effects. To do this, send all your drum output channels to a single stereo bus track - from this track, you can then load up plugins and effects that will be used to process your drums as a whole.
This is a distinctly different affair to processing drums separately and you need to remember that any changes you make will affect your entire drum sound.
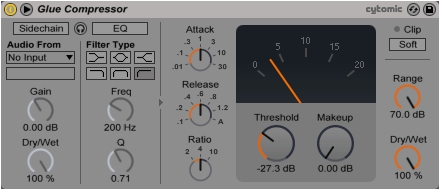
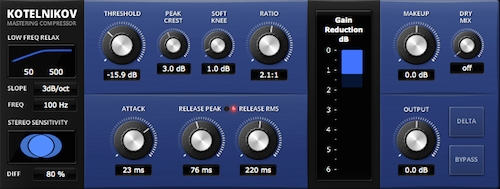
Drum Bus Compression
Compression, when used on a drum bus, really is a powerful tool - it can be the magic glue that brings all of your disparate drum sounds together under one roof. I'd start with aiming for relatively small amounts of gain reduction again, say between 2 and 3 dB, which should allow you to push the overall makeup gain to around the same point.
This brings the overall level of your drums up whilst reducing the peaks, so as not to clip the output.
There are several different types of compressor plugin available, which I've explored in detail in a previous magazine article. In the case of drum bus compression, I'd experiment with different types to find the right vibe but 'opto' compression circuits often work well here.
Amongst other things, this is because they are a little slower to react than other circuit types, allowing us to leave those all-important drum transients intact.
Drum Bus EQ
With our drums better gelled together thanks to some compression, we can now use EQ to polish up our sound further. Remember however, you're applying EQ to your entire drum sound so try to consider it as a whole before cutting or boosting - if you find yourself focusing on specific drums, you should go back and work with that individual drum's EQ rather than the group bus' plugin.
My most common uses of drum bus EQ are to improve clarity and add 'air'. I often find that the extensive processing applied to kick and snare individually results in a kind of subtle muddiness in the low mids - using gentle cuts of 1 - 2dB at anywhere between 300 - 500Hz can really help to reduce this murkiness and clear up the low to mid range of my drum sound.
To add air or a bit of high frequency sparkle to drums, adding a slight boost of 1 - 2dB at about 10kHz is a very useful starting point. Of course, if you're already using very bright cymbal samples or a snare with lots of gritty high end, boosting in this region might push things into harsh-sounding territory so, as ever, pay attention to which sounds are being affected the most by your EQ tinkering.
5. Final Touches
Your drum sound will be coming properly alive by this point, so all that's left to do is add some finishing touches to elevate things a few notches further. We can make things sound even weightier still with a final compression technique and adding some reverb can help to give our sound some added character and colour.
Parallel Compression
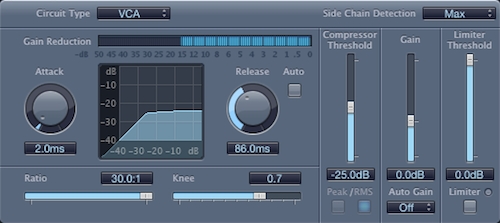
Parallel or NY-style compression is an incredibly celebrated technique for good reason - it helps to add punch and weight to your drum sound and works pretty much every time you care to try it. To use it, bus out your drum group channel to a second stereo channel and pull up a compression plugin.
We need something that can act very quickly, allowing us to pull back peaks drastically whilst leaving the quieter parts of the drum sound unaffected. 'VCA' and 'FET' style compressor circuits are ideal for this type of application - set your ratio to something very steep, like 10:1, and try to reduce peak gain by anything from 10 to 25dB and more.
Then, pull your parallel channel's fader all the way down to silence and slowly mix it back in with your main drum channel - we just want to hear the thickening effects of mixing a little of the over-compressed signal in with the main drum signal.
Drum Reverb
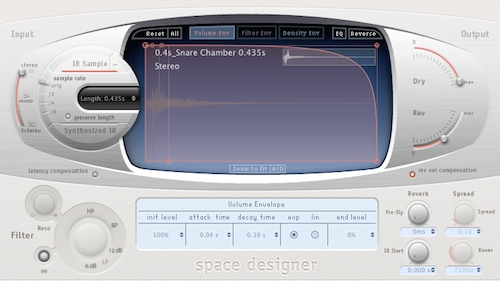
As a final touch, I like to add a little convulsion reverb to my drums to give them some real-world flavour. Convolution reverb is an incredibly clever and effective process that uses short recordings (known as 'impulse responses') made in real spaces to virtually situate any sound being processed within these very same spaces.
I don't want to produce really audible, noticeable reverb tails here (I might add this sort of effect to individual drums) but rather add some subtle character, so I typically hunt for incredibly short, 'drum room' style impulse responses to use - either I'll add the reverb plugin directly onto my drum bus if it has separate dry and wet levels or a mix control, or I'll bus out my drum group to a further channel with only the wet reverb signal level audible.
As a very final touch and if you want to squeeze some extra dB out of your drums, you can always place a limiter on your drum bus but be aware that often this results in a much harder, rough sound.
Conclusion
There we have it, drum processing in 5 simple stages! Follow the above steps, experimenting where suggested, and very soon you'll get the hang of things and be creating bigger, bolder drum tracks than ever before - let those drums punch and kick their way through your music!


