Native Instrument's Massive is an incredibly versatile soft synth, capable of producing sounds with a great deal of movement and change over time. One of the reasons that Massive is capable of such a large array of sonic evolutions is down to its handful of modulation sources, which can be used for anything from the obvious to the outlandish.
LFOs Are Out There
Low Frequency Oscillators are the most commonplace synth modulators around, but Massive's LFOs have some great features that set them apart. All the usual shapes are available (sine, saw, square and triangle), as well as some more complex ones available via the LFO's Curve Select drop down menu. What's really nifty, though, is that you can mix any two of the shapes together.
Choose two shapes, adjust their phases by dragging on the shape display, and then adjust the XFade Curve slider. By doing this, you can get, say, an erratic sine shape: 90% sine, 10% 'Noise 1'. Still rhythmic (especially using the Sync option beneath the Rate control), but less predictable!
Finally, you can achieve greater expressivity by using the LFOs' Internal Envelope. Routing it to the Rate, Amp or XFade Curve controls allows you to shape the LFO's modulation in time, relative to your note-on trigger.
Step Up and Sequence
Clicking in the top right-hand drop down menu in your LFO pane allows you to choose the 'Stepper'. This is Massive's rhythmic, arpeggiator-like modulation source. It's not a true arpeggiator as it does not trigger new note-ons whilst you hold a key on your keyboard, but unlike an arpeggiator, you can use it to modulate just about anything.
With up to 16 steps - looping with fewer steps than the default 16 can be achieved by dragging on the step numbers along the top - you can make choppy or flowing sequences. The most obvious use of the Stepper is to control the oscillator pitches. This can be made easier by using the Snap to Grid button at the top (which constrains the steps to whole numbers, or semitones in this case).
There are two sliders available in the Stepper interface which we can use to add further details to our sequence. Glide Mod allows us to set interpolation between steps, so if we are using the Stepper to control oscillator pitches, then using the Glide Mod would sound like portamento. Activate it by clicking in the top row of rectangles positioned beneath each step. Rectangles which are activated will cause the Stepper to interpolate between the step immediately previous and the one whose rectangle we have activated.
The Amp Mod slider works similarly, using the lower row of activation rectangles. This allows us to set certain steps to have less effect than others, as though we were manipulating the main Amp control on every step. This is great for automating the values within each round of our sequence, rather than just the overall levels controlled by the Amp knob.
Performers Make the Show
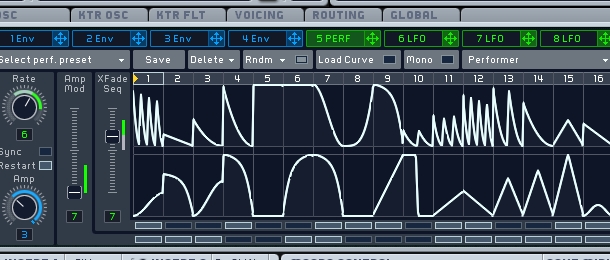
The Performer mode is like a cross between the LFOs and the Stepper. As with the LFO, we can choose two shapes and control the balance between them (using the XFade Seq slider and activation rectangles). We can also adjust the peak values for each step in the sequence by dragging on the step's depicted shape.
By default, the Performer has linear and equal-power curves loaded in every step, but we can choose from a range of different shapes. Clicking the Load Curve button at the top brings up the 16 available shapes, which we can select on the left and then load into a step by clicking on the step in question. This means that we could, for example, set up two different rhythms in the top and bottom rows, and switch between them using a square wave LFO.
Never Enough Envelopes
Massive's envelope generators, coloured blue instead of the green colour of the periodic sources we've discussed, shape modulation relative to our note-on triggers. Familiar Attack, Decay and Release time controls are included along with a very useful one called Delay, which sets how long to wait between the note-on trigger and the start of the Attack ramp. More innovative, however, are Massive's envelope Sustain parameters.
Using these, we can get Massive to vary whatever we're modulating whilst the envelope is in the Sustain portion of the envelope. This is great for setting up vibratos or the like during the otherwise stable (and thus usually quite unnatural sounding) main body of the note. Dragging in the box marked 'Loop' lets us set how many times the shape we're going to create is repeated before the envelope moves onto the Release portion. We can also choose an infinite number of repetitions, making the Sustain section into something more akin to an LFO.
The S Loop control determines how long the sustain shape takes to complete an iteration, whilst the Morph drop-down menus and knob let us choose shapes and mix between them as per the LFO or Performer shapes. The Envelope Preset menu, in the top left of the pane, is where we can choose basic envelopes with different Attack, Decay and Release curves to the default.
Super Complex Daisy Chains
Massive's powerful routing mechanism means that we can combine modulation sources to create seriously complex modulation patterns. Using an LFO to modulate the play Rate of a Performer, for example, lets us set up chaotic sounding patches, and create intrigue and instability in truly impressive proportions. Chaining multiple modulation sources together like this, we could feasibly set off a pattern of modulations which would take hours to repeat itself!
The inspiring power of MIDI when combined with Massive is covered in our next tutorial - also, if you want to see and hear all of the excellent sound manipulation processes described above in action, just head on over to our Massive presets section and have yourself a browse...


