
We're delighted to welcome the instructive and prodigious production talents of Kristian West back to the pages of this magazine. For his latest tour-de-force of a guest tutorial, Kristian decided to delve as deep as he could into the mixing of his latest track, Then This, which features a number of ModeAudio samples and presets, amongst other synths and tools.
Taking us on a track by track journey through this beautiful slice of bang-up-to-date Beats magic, complete with soaring vocal and drums as big as an entire mountain range, Kristian's production deconstruction is a lesson in careful layering, instrumental balancing and far beyond. Take it away, Kristian!
In The Beginning
Then This began when I placed a randomly selected vocal sample on top of an old track build-up I'd made previously. Everything around the vocal was eventually replaced however, even the tempo was changed in the end, as I sought to shape things around the singer's melody and turn the part into something that sounded truly 'mine'.
I've created a video to accompany this tutorial, where I run through what is happening on each channel of the mix beginning with track 1, and finishing with the master track. I'll use my discussion below to clarify elements of the video, going deeper into the construction and mixing of the production.
As with my previous guest tutorial for ModeAudio, I decided to restrict myself to using only a handful of core instruments, samples and effects, so as not to become distracted by choice during the composition process. To start, here's the final mix of Then This:
Aside from some processing using iZotope's Ozone mastering plugin to compress, widen and touch up the overall spectral balance of the track, everything I did to create the piece is documented in the below video. So, check it out and refer to my discussion beneath for extra detail.
Then This, In The Making
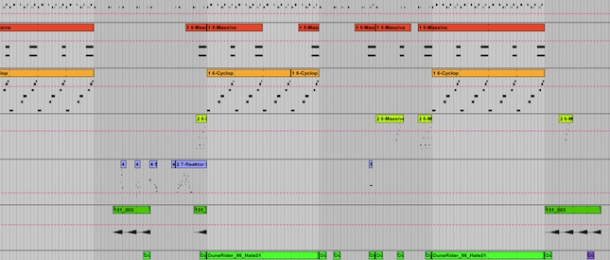
[00:00] Track 1 contains a MIDI clip, which is controlling a drum kit rack from ModeAudio's Pulse - Live Percussion Samples pack, as well as iZotope's Neutron mixing plugin loaded up.
Track 2 contains my bass synth, so naturally I need to find a way to make the kick from the Pulse kit sit well in the mix with the bass synth sound. This is where Neutron comes in - here we are able to monitor input from multiple channels to see where there is overlap in the spectrum, possibly causing an excessive amount of energy at particular frequencies.
We can see straight away that when both the kick and bass part play, there's much too much low bass energy. So, I can cut this a little using Neutron's EQ device on the drum rack track and then do the same on track 2 so that when both parts play together, there's isn't too much low end.
Neutron gives us a visual clue when there's too much sound across two channels in the form of a red bar, so we can use this to make further spectral adjustments.

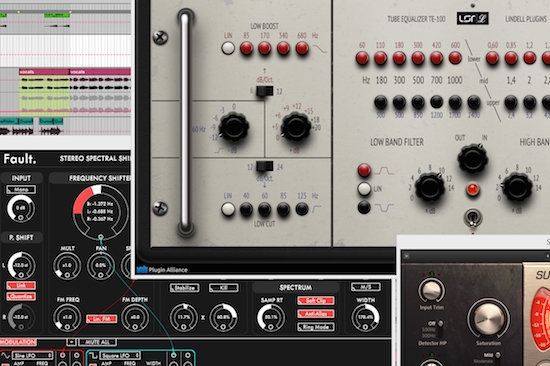
[01:54] Track 2 is my bass part for the track, coming from SugarBytes' Cyclop synth running through Reaktor 6 in FX mode. I also have a tube EQ loaded up on this track, as well as the Neutron plugin referred to above.
The raw sound from Cyclop is pretty simple and was never going to be enough for this track, so processing it using Reaktor 6's Molekular effects gives it a much more spacious, expansive feel. There was a lot going on under the hood of the Molekular patch I used, so I turned down all modulation, keeping only the harmonics generated using the Plagiarism device and reverb from Metaverb.
However, things still felt a bit stale and digital to me, so I pulled up an instance of the TE-100 tube EQ from Lindell, which is a very smooth sounding EQ that seems to manage quite heavy low boosts and moderate high lifts without sounding unnatural. The resulting bass sound has lots of energy across the spectrum, rather than just in the lows, resulting in a nice harmonic wash.
[04:00] Track 3 is running an instance of Native Instruments' Massive, with a preset loaded from ModeAudio's Constellation - Massive R&B Presets pack called 'SFX Tminusten'. Sometimes a synth patch just works as part of the bigger picture and this was certainly the case here!
When soloed it possibly sounds a bit too aggressive but once it's in the mix, the riser is a great sounding lead-in to the start of the main beat and theme.
[05:15] Track 5 uses Massive again, this time with a preset called 'Angeliq' loaded from ModeAudio's Surface Tension - Massive Drone Presets release. The great thing about browsing through presets is the possibility of quickly match a wide range of sounds up against what you already have in your track. Trail and error at its easiest!
I added a slight shimmering effect using Unfiltered Audio's Sandman plugin, as well as Output's Movement.
Track 5 uses Native Instruments' Rounds synth and track 6 is a sample from an old Computer Music CD accompaniment.
[06:52] Track 7 uses the 'Coldblood_72_Hats02' loop from ModeAudio's LA Beats - Loops & Samples pack, along with an LFO tool, EQ and compressor on top. Rather than use the sample as is, I slowed it down and chopped it up to create a sweeping effect, taking out some of the note onsets.
Unfiltered Audio's Fault was used next, which is a stereo pitch shifter with loads of modulation options. It can get pretty crazy pretty quickly, but it can also be used gently, giving us some delayed shimmering effects.
The Lindell TE-100 tube EQ was added next, underlining its power when it comes to treating complex sounds in a way that enhances rather than directly altering them. We're almost getting a treble-heavy screech from our use of the plugin here, but it's a sonically pleasant one when sitting in the full mix.
When you do a lot of tweaking on a particular track, it's sometimes better to keep the delicate settings you've chosen previously in the chain, and use an additional plugin to finish things off. Enter Native Instruments' Supercharger GT to tame the hats loop - quite a reversal of its usual role!
[09:45] Here comes the big one, the centerpiece upon which the whole track was formed...the vocal track! This track features two samples, both from the same Computer Music CD mentioned above - '150bpm pop trance vocals' and '140bpm chilled vocals 1'.
For the first vocal file, I scrubbed through the original sample and found the piece that stood out to me almost by chance. Without any effects added, the sample sounds dry and quite dull, and the tempo stretching is audible also. So, let's hear what happens as we gradually send this sound into space!
I added de-essing first after I realised the vocal was causing the master channel to clip. A huge space was then conjured up using Puremagnetic's Quick Verb, which Izotope's Möbius Filter adds some rippling action to. ModeAudio's Dirty Reflections audio effects rack from Power Tools - Drum Samples & Patches provides some delay also - even these slight modulations of the vocal sample is enough to keep things interesting.
The other vocal sample was added to the same track in order to be processed using the same effects - you can hear quite how far the processing takes these samples in the video above.
Neutron is used again for a subtle, broad mid frequency cut, since the harshest frequencies were already fixed with the de-esser earlier.
[13:43] Track 9 contains a guitar loop also from LA Beats, called 'WinterWell_80_Em_ElectricGuitar02'. You can hear how far I took it from its original sound in the video again - the processing was used to magnify the movement of the guitar player's fingers, albeit in deep space, of course!
Wow2 from SugarBytes gives us some whacky, LFO-driven modulation and Eventide's Blackhole adds some spacey reverb, allowing the guitar to sit nicely in the background of the mix.
[17:10] Track 10 uses 'SolarPlexus_78_D#_SynthLead02' from ModeAudio's Lost Archive - Trip Hop Loops pack, with reverb added from Blackhole again, Unfiltered Audio's G8 plugin giving it some granular flutter, and an additional instance of Blackhole pushes it a little further back in the mix.
So, that's everything contained in the mix, including process involved. Next up, a bit of mastering!
Master Of The Universe
[18:57] On the master channel, we have, of course, some compression coming from Elysia's Alpha Master and the excellent Levels plugin, which provides accurate metering and analysis.
The Alpha Master compressor has a very pleasant way of delivering parallel compression for a whole track like this and a plugin like Levels will tell you what your ears might not yet be able to determine, displaying all kinds of stuff that ideally needs to be fixed before you can send it out of Ableton and call the mix finished.
Levels pointed me to breaches in both headroom and dynamic range, so instead of just guessing where to go to fix things, the plugin lets you reach a set standard within you mix according to four visual sections - headroom, dynamic range, stereo field and bass space. Seeing how my track is performing according to these categories lets me make decisions about the overall mix, such as overall level.
Final Thoughts
In closing, it's important to think carefully about every part of the production process, namely about what you choose to bring into the mix and how you place it in relation to the other musical elements. So long as you're away of the why and the how of both these stages, then you'll be in full control of a sound that represents your tastes and interests.
Thanks for taking the time to watch and listen, and you can check out the rest of my music over at my SoundCloud profile. See you next time!


