

If you’re making electronic music, chances are you’ll be constructing drum beats at least some of the time you’re in the studio. It’s barely worth pointing out that taking drums out of the equation renders genres as diverse as House and R&B next to unthinkable!
So, getting the rhythmic side of your track right is almost certainly one of your top priorities as a music producer, and aside from programming the actual sequences themselves, this means choosing the right drum sounds to work with.
Moreover, your choices here will go a long way to defining the overall sound of your music - pay close attention to the percussion in the music of any of your favourite artists and you’ll quickly begin to identify stylistic similarities and patterns.

In other words, your drum sound helps to identify you as an artist and to this end, what I want to do with today’s tutorial is introduce you to a bafflingly simple yet effective technique for designing drums - I call it transient matching and I’ll lay it all out for you below, in 4 simple steps!
1. The Setup
Before we begin, I want to make it clear that you can use the overarching idea of transient matching no matter how you generate your drum tracks.
You might be directly editing raw samples themselves, using hardware, working with sequencers and so on - what’s really important here is that you have a source sound and some way to envelope it.
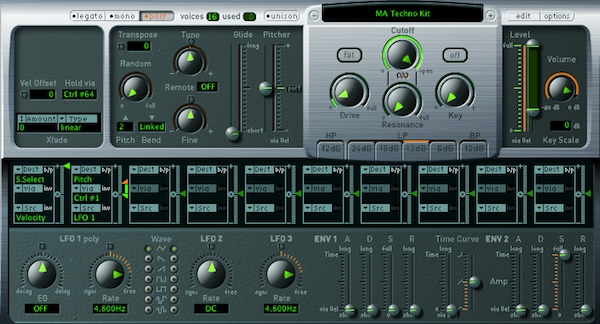
For me, the simplest way to do this is to work with a sampler, such as Logic Pro X’s EXS24. This lets me load in my own samples or drum kit patches and tweak the ADSR envelope that is applied to the output.
Other options might involve using an enveloper plugin, working with fades on audio regions and beyond - I’m going to stick to my guns and use EXS24 to demonstrate the technique for you below.
2. Anatomy Of A Drum Sound
Let’s load up a drum kit - I’ve chosen the MA Techno Kit patch from our Beat - Drum Machine Samples pack. Here’s a quick beat I’ve cooked up using the kit:
Whilst these samples sound great out of the box, using them unaltered like this isn’t really helping me go about crafting my own unique drum sound.
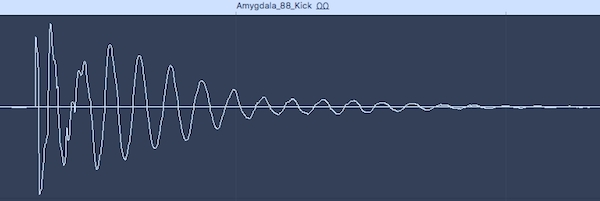
What we’re going to do is separate out the two most important aspects of the drum sounds included in this kit - the transient, or attack, and the body, or decay of the sound.
The transient is the very beginning of the sound, lasting just milliseconds and is responsible for what we often refer to as the ‘snap’ and ‘punch’ of a drum.
The body or decay is everything that happens after - the resonant portion of the sound that might last from milliseconds to seconds, describing the ‘boom’ of a kick sound amongst other things.
These elements combined make up a complete drum sound - they are what define its overall character. So, if we’re able to separate them out somehow, then we can mix and match them at will, creating our own unique combinations.
Well, envelopes allow us to do exactly that - by pushing up the attack of one sound, we can remove the transient from the output and by restricting the decay of another, we can isolate it!
3. Pushing The Envelope
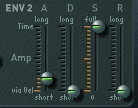
Getting back to our EXS24 kit, let’s push up the attack portion of the envelope being applied to the whole kit to around 15ms - here’s how this sounds:
We’re still getting a lot of boom and thump from the body portions of the drum sounds, but the beat has lost its attention-grabbing snap - now, let’s copy the same MIDI pattern to another track, load up a different drum kit and isolate the transients to begin mixing and matching.
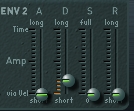
I’ve loaded up the MA Chillwave Kit, also from Beat, and have pulled back the decay of the master or amplitude envelope to around the 20ms mark so we have a bit of overlap between the two kits when we eventually come to combine them - here’s the result:
It’s all bark and no bite! Well, let’s try both elements, the body of the Techno kit and attack of the Chillwave kit, combined:
Comparing this to the completely unaltered beat above is quite interesting - here it is again:
What jumps out immediately to my ears is that the kick of the transient matched beat has much more punch to it, and achieved without a transient shaping plugin in sight!
Things get more interesting when you start to throw in more unusual sound sources into the mix - to this end, I’ve loaded up a kit from our Raw Material - Found Percussion Samples pack, which is a pack of unusual percussion samples created from recordings of everyday and household objects.
Isolating the transients from this kit and combining them with the body of the sounds from the Techno Kit gives us this:
Comparing all three beats yields noticeable differences in the overall sound, with the transient matched pair possessing more punch and character than the Techno Kit by itself.
4. Going Deeper
Now, we’re obviously taking quite broad swings at matching transients here as we’re only working with set groups of sounds from the kits presented in Beat and Raw Material.
We can get much more specific by isolating a single sound and sifting through a greater number of samples to mix and match with it.
Our Vapour - Drum Samples pack is an excellent choice for this task, as it contains patches of only kick, snare and hi hat samples.
I’ve isolated the kick part of my drum pattern and found a sample I like the body of from Vapour, called Vapour_LongKick14:
Let’s try matching it with a transient from a different sample from the same pack - as before, I’ve pushed up the attack on the original sound to 15ms, created a new track with the same kit loaded onto it and reduce the decay to 20ms.
Just for fun, let’s see how things sound with a new transient playing for every kick beat:
This is actually quite a cool way to build a bit of movement into our kick drum pattern! Getting back to the main task however, I especially liked the combination of the body of the sample above with the transient of Vapour_LongKick11:
Again, comparing this to the original unaltered sample reveals we’ve added some punch to the resulting sound.
Naturally, we could repeat this process for every sample in our beat, giving us huge scope for fine tuning and customising our overall drum sound. Add some transient and body layering into the mix and a whole new sonic world opens up to us!
Your Own Easy Drum Designer
I hope the steps above have made it clear to you how simply and easily the transient matching process can be applied in your music.
With just a little bit of setup, you can get far more out of your drum samples and sample packs than before, and move several steps closer to arriving at your very own drum sound in the process.
Good luck with your own transient matching experiments and until next time, get creative!


