
It's time for the final instalment of my series about delving deeper into Reason's fantastic Kong Drum Designer. In this series, I've looked at the Nurse Rex Loop Player, the NN-Nano Sampler, the Physical Drum Modules and the different Hit Types associated with them. That leaves us with the Synth Drum Modules, so let's get to it and find out how we can work with the modules' architectures to achieve the results we want.
Kicks
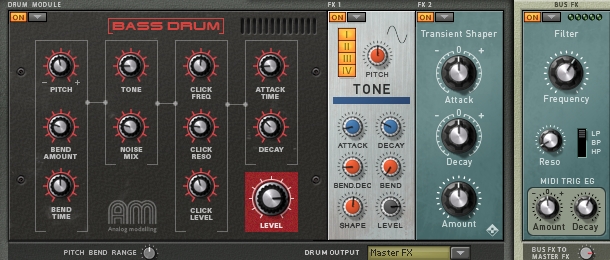
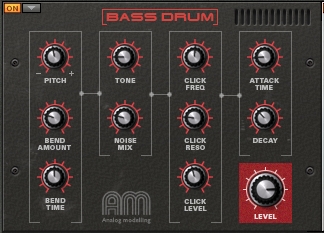
The Synth Bass Drum module has two types of sound source built in: periodic tones and noise. It's possible to use either on its own by adjusting the Noise Mix control, but the combination of the two gives the greatest flexibility to create all manner of electronic kick sounds.
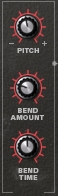
Let's start on the left of the module. These controls are Pitch, Bend Amount and Bend Time. Pitch, obviously, controls the tuning of our kick (try to tune it to the root note of the music you're working on). However, it's not the initial pitch you hear when you trigger the module - that's determined by the Bend Amount. Many classic synth drum sounds feature a fast glissando down to the main Pitch frequency, which emulates the release of tension in a drum skin that has just been hit. By setting the Bend Amount higher, you get an attack that sounds harder and fuller. You don't have to use it all the time though - setting the Bend Amount to zero gives us a single pitch the remains stable, which is great for booming 808-style bass drum sounds. The Bend Time control determines the rate of this downwards glissando. I find that either very fast or very slow Bend Times sound best, depending on how I've set the Bend Amount and what I'm working on more generally.
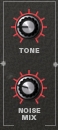
Next up is the Tone control. This lets us change the harmonic content of the hit by low-pass filtering it. Dialling up the Tone control makes for a brighter sound - great when you need to have a kick that cuts through the mix. Beneath this is the Noise Mix control, mentioned earlier, which you can use to add grit and character, or in conjunction with the Tone filter for some added 'air'.

The next section along contains controls for the 'click': Click Freq, Click Reso and Click Level. You can use the click to sharpen up the very start of the attack. It's a very short impulse sound, which you may recognise from the 808's kicks - and Kong has Freq and Reso controls to adjust it to perfection. The click runs through a band-pass filter before it hits the Level control, which means that you can make it sound a little like a woodblock if you stick the Reso up and adjust the Freq to around 3 o'clock! Less extreme settings work best, however, so a little Reso and a low-mid range Freq keep the impulse in check whilst still adding that lovely definition to the onset.
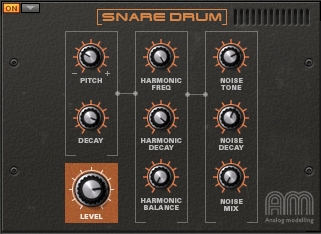
Snares
The Synth Snare Module has an excellent level of control. Like the Synth Bass Drum module there's a combination of periodic tones and filtered noise, except that now, we have an extra sine tone generator. Let's start on the left of the panel again:
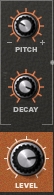
Here we have the Pitch control and a Decay knob. Real snare drums are a combination of tones from the Tom Tom-like drum skin/shell combo, plus noisy content produced by the rattling snares underneath. Using the Pitch control, we can set how low the tones go, which relates to the size of our Snare drum overall. The Decay control determines how long this tone lasts, and can be set quite long if you want a slack skin sound for low, burnt-out dub sounds.
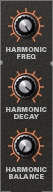
In the second panel, we have the controls for the second sine tone, referred to as the Harmonic. This is because its Freq control determines the ratio of the Harmonic frequency to the main Pitch frequency. Setting it higher can take it up to several octaves above the main frequency, but if you go back and change the Pitch control, the Harmonic Freq will adjust to maintain the ratio you set it to, which is how Harmonics work in relation to fundamental tones. The other two controls allow us to independently control the Harmonic's Decay, which you'd normally want to be around half the length of the fundamental Pitch Decay length, and the Balance, which controls the two tones' relative levels. Again, you'd normally have the fundamental Pitch louder than the Harmonic, so keep this fairly low.
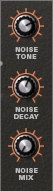
The last panel of the Snare is where the controls for Noise content are located. There's the Noise Tone, which is in effect the frequency parameter of a band-pass filter. This can make the added noise brighter for a snappier, livelier-sounding snare hit. The Noise Decay could be said to map roughly onto how loose the snares underneath the drum are: longer decay settings add the requisite air and coarseness you often need from a snare drum. The Mix control lets you adjust the balance between the tones and the noise, so that you can get the perfect balance between top-skin tone sound and bottom-skin noise.
Hi Hats
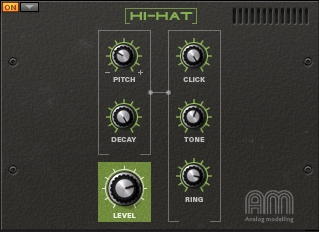
The Synth Hi Hat Module is an interesting beast, full of spectral variations to explore. Fundamentally, the sound sources on offer here are an array of pulse wave oscillators and band-pass filtered noise. Let's take a look at the left-hand panel.
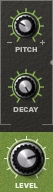
The Pitch control doesn't just control the frequency of one oscillator: it controls the frequencies of all the pulse wave oscillators. These oscillators are themselves not 'in tune' with each other, in that they are not tuned to integer multiples of the lowest frequency present. This gives this section an inharmonic sound, which is very metallic and thus perfect for emulating hi hats! They Decay knob allows us to set whether the hi hat overall is quite clipped or not in terms of length. Unlike the other Synth modules, the Synth Hi Hat module has a range of hit types that you can associate with the pad you're using to trigger it.
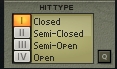
These hit types allow you to alternate between short, Closed hit types and a range of longer hits all the way up to fully Open, which scales the Decay value accordingly. Keeping the timbral qualities of the sounds the same but adjusting the length of the sound is a great way to emulate the different ways you can manipulate real hi hats with the pedal.
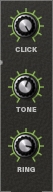
In the next panel, there are some great controls for manipulating the hi hat sound. First up is the Click control, which adds a user-defined level of impulse to the very start of the hit for super-sharp attacks, as seen in the Synth Bass Drum module. The Tone control is a band pass filter on the noise component of the output - setting this higher takes the centroid of the noise upwards in frequency, meaning that if you set the pulse oscillators' Pitch low, you can dial in some top end to keep your hi hats sounding bright and snappy. Lastly, the Ring control lets you dial in the aforementioned pulse oscillators on top of the noise, so that you can make your hi hats more or less metallic, roughly equating to how you can move the mic on a real hi hat to draw out different parts of the complex sound. There are vast possibilities in this module!
So, that's it for this series! I hope you've found it useful and come to love Kong even more for all the functions it provides in helping you get just the right drum sound. Stay tuned for more articles exploring Reason devices, but until then, get creating!


